正文
结构型设计模式用于处理类和对象的组合。
适配器模式(Adapter)
- 模式定义
适配器模式(Adapter / Wrapper),首先我们来看看什么是适配器。 适配器的存在,就是为了将已存在的东西(接口)转换成适合我们需要、能被我们所利用的东西。 在现实生活中,适配器更多的是作为一个中间层来实现这种转换作用。比如电源适配器,它是用于电流变换(整流)的设备。 适配器模式将一个类的接口转换成客户希望的另外一个接口,使得原本由于接口不兼容而不能一起工作的那些类可以在一起工作。
- UML类图
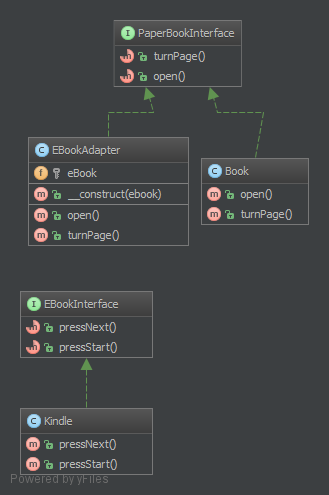
- 示例代码
PaperBookInterface.php
<?php
namespace DesignPatterns\Structural\Adapter;

/**
 * PaperBookInterface 是纸质书接口
 */
interface PaperBookInterface
{
    /**
     * 翻页方法
     *
     * @return mixed
     */
    public function turnPage();

    /**
     * 打开书的方法
     *
     * @return mixed
     */
    public function open();
}
Book.php
<?php
namespace DesignPatterns\Structural\Adapter;

/**
 * Book 是纸质书实现类
 */
class Book implements PaperBookInterface
{
    /**
     * {@inheritdoc}
     */
    public function open()
    {
    }

    /**
     * {@inheritdoc}
     */
    public function turnPage()
    {
    }
}
EBookAdapter.php
<?php
namespace DesignPatterns\Structural\Adapter;

/**
 * EBookAdapter 是电子书适配器类
 *
 * 该适配器实现了 PaperBookInterface 接口,
 * 但是你不必修改客户端使用纸质书的代码
 */
class EBookAdapter implements PaperBookInterface
{
    /**
     * @var EBookInterface
     */
    protected $eBook;

    /**
     * 注意该构造函数注入了电子书接口EBookInterface
     *
     * @param EBookInterface $ebook
     */
    public function __construct(EBookInterface $ebook)
    {
        $this->eBook = $ebook;
    }

    /**
     * 电子书将纸质书接口方法转换为电子书对应方法
     */
    public function open()
    {
        $this->eBook->pressStart();
    }

    /**
     * 纸质书翻页转化为电子书翻页
     */
    public function turnPage()
    {
        $this->eBook->pressNext();
    }
}
EBookInterface.php
<?php
namespace DesignPatterns\Structural\Adapter;

/**
 * EBookInterface 是电子书接口
 */
interface EBookInterface
{
    /**
     * 电子书翻页
     *
     * @return mixed
     */
    public function pressNext();

    /**
     * 打开电子书
     *
     * @return mixed
     */
    public function pressStart();
}
Kindle.php
<?php
namespace DesignPatterns\Structural\Adapter;

/**
 * Kindle 是电子书实现类
 */
class Kindle implements EBookInterface
{
    /**
     * {@inheritdoc}
     */
    public function pressNext()
    {
    }

    /**
     * {@inheritdoc}
     */
    public function pressStart()
    {
    }
}
- 测试代码
Tests/AdapterTest.php
<?php
namespace DesignPatterns\Structural\Adapter\Tests;

use DesignPatterns\Structural\Adapter\EBookAdapter;
use DesignPatterns\Structural\Adapter\Kindle;
use DesignPatterns\Structural\Adapter\PaperBookInterface;
use DesignPatterns\Structural\Adapter\Book;

/**
 * AdapterTest 用于测试适配器模式
 */
class AdapterTest extends \PHPUnit_Framework_TestCase
{
    /**
     * @return array
     */
    public function getBook()
    {
        return array(
            array(new Book()),
            // 我们在适配器中引入了电子书
            array(new EBookAdapter(new Kindle()))
        );
    }

    /**
     * 客户端只知道有纸质书,实际上第二本书是电子书,
     * 但是对客户来说代码一致,不需要做任何改动
     *
     * @param PaperBookInterface $book
     *
     * @dataProvider getBook
     */
    public function testIAmAnOldClient(PaperBookInterface $book)
    {
        $this->assertTrue(method_exists($book, 'open'));
        $this->assertTrue(method_exists($book, 'turnPage'));
    }
}
- 拓展
适配器模式:将一个类的接口转换成客户希望的另外一个接口,使得原本由于接口不兼容而不能一起工作的那些类可以在一起工作。
// 设置书的接口
// 书接口
interface BookInterface
{
    // 翻页方法
    public function turnPage();

    // 打开书方法
    public function open();
}
// 纸质书实现类
class Book implements BookInterface
{
    public function turnPage()
    {
        echo "纸质书翻页". "<br>";
    }

    public function open()
    {
        echo "纸质书打开". "<br>";
    }
}
客户端测试:
// 客户端测试
$book = new Book();
$book->open();
$book->turnPage();
输出结果:
纸质书打开
纸质书翻页
这时候,你想创建一个可以复用的类,该类可以与其他不相关的类或不可预见的类(即那些接口可能不一定兼容的类)协同工作。
如下:
// 待适配对象
class Kindle
{
    public function turnPage()
    {
        echo "电子书翻页". "<br>";
    }

    public function open()
    {
        echo "电子书打开". "<br>";
    }
}
// 适配器
class KindleAdapter implements BookInterface
{
    protected $_kindle;

    public function __construct($obj)
    {
        $this->_kindle = $obj;
    }


    public function turnPage()
    {
        $this->_kindle->turnPage();
    }

    public function open()
    {
        $this->_kindle->open();
    }
}
// 客户端测试
$kindle = new KindleAdapter(new Kindle());
$kindle->open();
$kindle->turnPage();
// 输出结果
电子书打开
电子书翻页
- 总结
与类似接口的区别:
- 适配器模式 —— 适配器模式为它所适配的对象提供了一个不同的接口,目的是将已存在的东西(接口)转换成适合我们所利用的东西。
- 代理模式 —— 代理类继承自被代理类,对被代理类进行控制和拓展,访问者与代理类进行交互。
- 装饰器模式 —— 装饰器通过依赖注入,为注入对象进行后续装饰,装饰器提供了与被装饰类相同的方法。
- 委托模式 —— 被委托类和委托类无继承关系,在委托类中依赖注入被委托类,访问者与委托类进行交互,被委托类和委托类方法不一样。
桥接模式(Bridge)
- 模式定义
系统设计中,总是充满了各种变数,这是防不慎防的。比如客户代表可能要求修改某个需求,增加某种功能等等。 面对这样那样的变动,你只能去不停的修改设计和代码,并且要开始新的一轮测试…… 那采取什么样的方式可以较好的解决变化带给系统的影响? 你可以分析变化的种类,将不变的框架使用抽象类定义出来,然后再将变化的内容使用具体的子类来分别实现。 这样面向客户的只是一个抽象类,这种方式可以较好的避免为抽象类中现有接口添加新的实现所带来的影响,缩小了变化带来的影响。 但是这可能会造成子类数量的爆炸,并且在某些时候不是很灵活。 但是当你各个子类的行为经常发生变化,或者有一定的重复和组合关系时, 我们不妨将这些行为提取出来,也采用接口的方式提供出来,然后以组合的方式将服务提供给原来的子类。 这样就达到了前端和被使用的后端独立的变化,而且还达到了后端的重用。 其实这就是桥梁模式的诞生。 桥梁模式(Bridge)也叫做桥接模式,用于将抽象和实现解耦,使得两者可以独立地变化。 桥梁模式完全是为了解决继承的缺点而提出的设计模式。在该模式下,实现可以不受抽象的约束,不用再绑定在一个固定的抽象层次上。
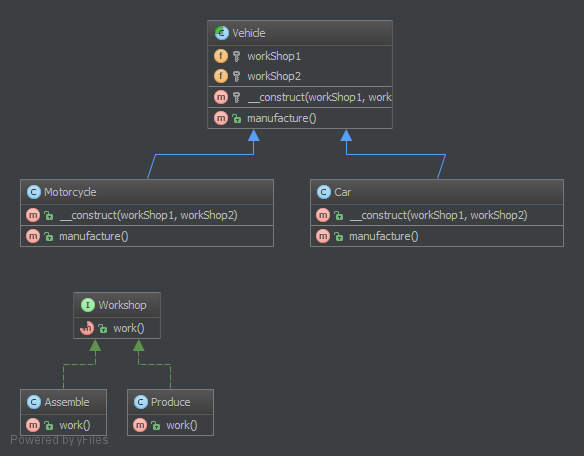
- UML类图
我们以汽车制造厂生产汽车为例,Vehicle 是抽象生产类,Motorcycle 和 Car 是具体实现子类, 制造汽车分为生产和组装两部分完成,这意味着我们要在制造方法 manufacture 中实现生产和组装工作, 这里我们将这一实现过程分离出去成为一个新的接口 Workshop,由该接口的实现类 Produce 和 Assemble 负责具体生产及组装, 从而实现抽象(Vehicle)与实现(Workshop)的分离,让两者可以独立变化而不相互影响:
- 示例代码
Workshop.php
<?php
namespace DesignPatterns\Structural\Bridge;

/**
 * 实现
 */
interface Workshop
{

    public function work();
}
Assemble.php
<?php
namespace DesignPatterns\Structural\Bridge;

/**
 * 具体实现:Assemble
 */
class Assemble implements Workshop
{
    public function work()
    {
        print 'Assembled';
    }
}
Produce.php
<?php
namespace DesignPatterns\Structural\Bridge;

/**
 * 具体实现:Produce
 */
class Produce implements Workshop
{

    public function work()
    {
        print 'Produced ';
    }
}
Vehicle.php
<?php
namespace DesignPatterns\Structural\Bridge;

/**
 * 抽象
 */
abstract class Vehicle
{

    protected $workShop1;
    protected $workShop2;

    protected function __construct(Workshop $workShop1, Workshop $workShop2)
    {
        $this->workShop1 = $workShop1;
        $this->workShop2 = $workShop2;
    }

    public function manufacture()
    {
    }
}
Motorcycle.php
<?php
namespace DesignPatterns\Structural\Bridge;

/**
 * 经过改良的抽象实现:Motorcycle
 */
class Motorcycle extends Vehicle
{

    public function __construct(Workshop $workShop1, Workshop $workShop2)
    {
        parent::__construct($workShop1, $workShop2);
    }

    public function manufacture()
    {
        print 'Motorcycle ';
        $this->workShop1->work();
        $this->workShop2->work();
    }
}
Car.php
<?php
namespace DesignPatterns\Structural\Bridge;

/**
 * 经过改良的抽象实现:Car
 */
class Car extends Vehicle
{

    public function __construct(Workshop $workShop1, Workshop $workShop2)
    {
        parent::__construct($workShop1, $workShop2);
    }

    public function manufacture()
    {
        print 'Car ';
        $this->workShop1->work();
        $this->workShop2->work();
    }
}
- 测试代码
Tests/BridgeTest.php
<?php
namespace DesignPatterns\Structural\Bridge\Tests;

use DesignPatterns\Structural\Bridge\Assemble;
use DesignPatterns\Structural\Bridge\Car;
use DesignPatterns\Structural\Bridge\Motorcycle;
use DesignPatterns\Structural\Bridge\Produce;

class BridgeTest extends \PHPUnit_Framework_TestCase
{
    public function testCar()
    {
        $vehicle = new Car(new Produce(), new Assemble());
        $this->expectOutputString('Car Produced Assembled');
        $vehicle->manufacture();
    }

    public function testMotorcycle()
    {
        $vehicle = new Motorcycle(new Produce(), new Assemble());
        $this->expectOutputString('Motorcycle Produced Assembled');
        $vehicle->manufacture();
    }
}
- 总结
系统设计时,发现类的继承有 N 层时,可以考虑使用桥梁模式。 使用桥梁模式时主要考虑如何拆分抽象和实现,并不是一涉及继承就要考虑使用该模式。 桥梁模式的意图还是对变化的封装,尽量把可能变化的因素封装到最细、最小的逻辑单元中,避免风险扩散。
- 拓展
桥接模式:将两个原本不相关的类结合在一起,然后利用两个类中的方法和属性,输出一份新的结果。
案例1. 模拟毛笔
需求:现在需要准备三种粗细(大中小),并且有五种颜色的笔
如果使用蜡笔,我们需要准备3*5=15支蜡笔,也就是说必须准备15个具体的蜡笔类。而如果使用毛笔的话,只需要3种型号的毛笔, 外加5个颜料盒,用3+5=8个类就可以实现15支蜡笔的功能。
实际上,蜡笔和毛笔的关键一个区别就在于笔和颜色是否能够分离。即将抽象化(Abstraction)与实现化(Implementation)脱耦, 使得二者可以独立地变化”。关键就在于能否脱耦。蜡笔由于无法将笔与颜色分离,造成笔与颜色两个自由度无法单独变化, 使得只有创建15种对象才能完成任务。而毛笔与颜料能够很好的脱耦(笔和颜色是分开的),抽象层面的概念是:”毛笔用颜料作画”, 每个参与者(毛笔与颜料)都可以在自己的自由度上随意转换。
Bridge模式将继承关系转换为组合关系,从而降低了系统间的耦合,减少了代码编写量。
案例2. 模拟企业分组发短信
需求:公司现在需要按分组(临时工、正式工、管理层等)以多种形式(QQ、Email、微博等)给员工发送通知。
适用性:
- 类的抽象以及它的实现都应该可以通过生成子类的方法加以扩充。通过使用Bridge模式对不同的抽象接口和实现部分进行组合,并分别对它们进行扩充。
- 不希望在抽象和它的实现部分之间有一个固定的绑定关系。
- 一个构件有多于一个的抽象化角色和实现化角色,系统需要它们之间进行动态耦合。
效果:
- Bridge模式使用“对象间的组合关系”解耦了抽象和实现之间固有的绑定关系,使得抽象和实现可以沿着各自的维度来变化。
- 所谓抽象和实现沿着各自维度的变化,即“子类化”它们,得到各个子类之后,便可以任意它们,从而获得不同员工组和不同信息发送模式。
- Bridge模式的应用一般在“两个非常强的变化维度”,有时候即使有两个变化的维度, 但是某个方向的变化维度并不剧烈——换言之两个变化不会导致纵横交错的结果,并不一定要使用Bridge模式。
看一下示例实现
员工分组:
abstract class Staff
{
    abstract public function staffData();
}

class CommonStaff extends Staff
{
    public function staffData()
    {
        return "小名,小红,小黑";
    }
}

class VipStaff extends Staff
{
    public function staffData()
    {
        return '小星、小龙';
    }
}
发送形式:
// 抽象父类
abstract class SendType
{
    abstract public function send($to, $content);
}

class QQSend extends SendType
{
    public function __construct()
    {
        // 与QQ接口连接方式
    }

    public function send($to, $content)
    {
        return $content. '(To '. $to . ' From QQ)<br>';
    }
}
桥接容器:
class SendInfo
{
    protected $_level;
    protected $_method;

    public function __construct($level, $method)
    {
        //  这里可以使用单例控制资源的消耗
        $this->_level = $level;
        $this->_method = $method;
    }

    public function sending($content)
    {
        $staffArr = $this->_level->staffData();
        $result = $this->_method->send($staffArr, $content);
        echo $result;
    }
}
客户端调用:
$info = new SendInfo(new VipStaff(), new QQSend());
$info->sending( '回家吃饭');

$info = new SendInfo(new CommonStaff(), new QQSend());
$info->sending( '继续上班');
输出结果:
回家吃饭(To 小星、小龙 From QQ)
继续上班(To 小名,小红,小黑 From QQ)
从上面可以看出,如果增加分组或者是发送信息的类型,都可以直接创建一个类,来拓展,十分方便。
但是Bridge模式虽然是一个非常有用的模式,也非常复杂,它很好的符合了开放-封闭原则和优先使用对象,而不是继承这两个面向对象原则。
组合模式(Composite)
- 模式定义
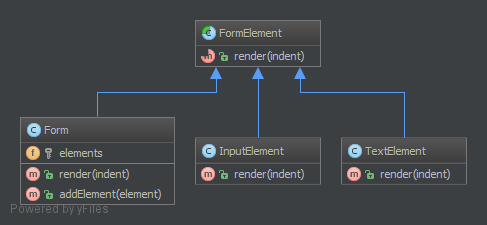
组合模式(Composite Pattern)有时候又叫做部分-整体模式,用于将对象组合成树形结构以表示“部分-整体”的层次关系。 组合模式使得用户对单个对象和组合对象的使用具有一致性。
常见使用场景:如树形菜单、文件夹菜单、部门组织架构图等。
- UML类图
- 示例代码
FormElement.php
<?php
namespace DesignPatterns\Structural\Composite;

/**
 * FormElement类
 */
abstract class FormElement
{
    /**
     * renders the elements' code
     *
     * @param int $indent
     *
     * @return mixed
     */
    abstract public function render($indent = 0);
}
Form.php
<?php
namespace DesignPatterns\Structural\Composite;

/**
 * 组合节点必须实现组件接口,这对构建组件树而言是强制的
 */
class Form extends FormElement
{
    /**
     * @var array|FormElement[]
     */
    protected $elements;

    /**
     * 遍历所有元素并调用它们的render()方法, 然后返回返回完整的表单显示
     *
     * 但是从外部来看, 并没有看见组合过程, 就像是单个表单实例一样
     *
     * @param int $indent
     *
     * @return string
     */
    public function render($indent = 0)
    {
        $formCode = '';

        foreach ($this->elements as $element) {
            $formCode .= $element->render($indent + 1) . PHP_EOL;
        }

        return $formCode;
    }

    /**
     * @param FormElement $element
     */
    public function addElement(FormElement $element)
    {
        $this->elements[] = $element;
    }
}
InputElement.php
<?php
namespace DesignPatterns\Structural\Composite;

/**
 * InputElement类
 */
class InputElement extends FormElement
{
    /**
     * 渲染input元素HTML
     *
     * @param int $indent
     *
     * @return mixed|string
     */
    public function render($indent = 0)
    {
        return str_repeat('  ', $indent) . '<input type="text" />';
    }
}
TextElement.php
<?php
namespace DesignPatterns\Structural\Composite;

/**
 * TextElement类
 */
class TextElement extends FormElement
{
    /**
     * 渲染文本元素
     *
     * @param int $indent
     *
     * @return mixed|string
     */
    public function render($indent = 0)
    {
        return str_repeat('  ', $indent) . 'this is a text element';
    }
}
- 测试代码
Tests/CompositeTest.php
<?php
namespace DesignPatterns\Structural\Composite\Tests;

use DesignPatterns\Structural\Composite;

/**
 * FormTest用于测试表单的组合模式
 */
class CompositeTest extends \PHPUnit_Framework_TestCase
{
    public function testRender()
    {
        $form = new Composite\Form();
        $form->addElement(new Composite\TextElement());
        $form->addElement(new Composite\InputElement());
        $embed = new Composite\Form();
        $embed->addElement(new Composite\TextElement());
        $embed->addElement(new Composite\InputElement());
        $form->addElement($embed);  // 这里我们添加一个嵌套树到表单

        $this->assertRegExp('#^\s{4}#m', $form->render());
    }

    /**
     * 组合模式最关键之处在于如果你想要构建组件树每个组件必须实现组件接口
     */
    public function testFormImplementsFormElement()
    {
        $className = 'DesignPatterns\Structural\Composite\Form';
        $abstractName = 'DesignPatterns\Structural\Composite\FormElement';
        $this->assertTrue(is_subclass_of($className, $abstractName));
    }
}
数据映射模式(Data Mapper)
- 模式定义
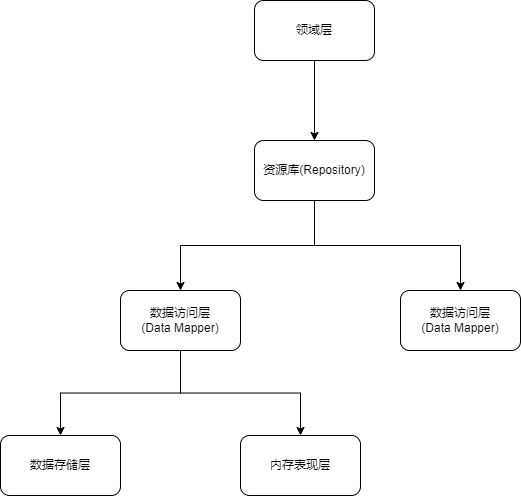
在了解数据映射模式之前,先了解下数据映射,它是在持久化数据存储层(通常是关系型数据库)和驻于内存的数据表现层之间进行双向数据传输的数据访问层。
数据映射模式的目的是让持久化数据存储层、驻于内存的数据表现层、以及数据映射本身三者相互独立、互不依赖。 这个数据访问层由一个或多个映射器(或者数据访问对象)组成,用于实现数据传输。通用的数据访问层可以处理不同的实体类型,而专用的则处理一个或几个。
数据映射模式的核心在于它的数据模型遵循单一职责原则(Single Responsibility Principle), 这也是和 Active Record 模式的不同之处。 最典型的数据映射模式例子就是数据库 ORM 模型 (Object Relational Mapper)。
ORM,即 Object-Relational Mapping(对象关系映射),它的作用是在关系型数据库和业务实体对象之间作一个映射, 这样,我们在操作具体的 业务对象时,就不需要再去和复杂的SQL语句打交道,只需简单的操作对象的属性和方法即可。
ORM 两种最常见的实现方式是 ActiveRecord 和 DataMapper,ActiveRecord 尤其流行,在很多框架中都能看到它的身影。 两者的区别主要在于 ActiveRecord 中模型与数据表一一对应,而 DataMapper 中模型与数据表是完全分离的。
更多关于 Data Mapper 与 Active Record 的区别 .
准确来说数据映射模式是个架构模式。
- UML类图
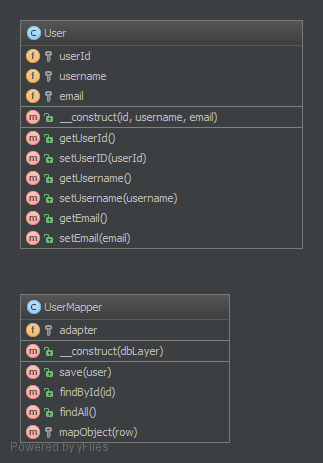
- 示例代码
User.php
<?php
namespace DesignPatterns\Structural\DataMapper;

/**
 *
 * 这是数据库记录在内存的表现层
 *
 * 验证也在该对象中进行
 *
 */
class User
{
    /**
     * @var int
     */
    protected $userId;

    /**
     * @var string
     */
    protected $username;

    /**
     * @var string
     */
    protected $email;

    /**
     * @param null $id
     * @param null $username
     * @param null $email
     */
    public function __construct($id = null, $username = null, $email = null)
    {
        $this->userId = $id;
        $this->username = $username;
        $this->email = $email;
    }

    /**
     * @return int
     */
    public function getUserId()
    {
        return $this->userId;
    }

    /**
     * @param int $userId
     */
    public function setUserID($userId)
    {
        $this->userId = $userId;
    }

    /**
     * @return string
     */
    public function getUsername()
    {
        return $this->username;
    }

    /**
     * @param string $username
     */
    public function setUsername($username)
    {
        $this->username = $username;
    }

    /**
     * @return string
     */
    public function getEmail()
    {
        return $this->email;
    }

    /**
     * @param string $email
     */
    public function setEmail($email)
    {
        $this->email = $email;
    }
}
UserMapper.php
<?php
namespace DesignPatterns\Structural\DataMapper;

/**
 * UserMapper类(数据映射类)
 */
class UserMapper
{
    /**
     * @var DBAL
     */
    protected $adapter;

    /**
     * @param DBAL $dbLayer
     */
    public function __construct(DBAL $dbLayer)
    {
        $this->adapter = $dbLayer;
    }

    /**
     * 将用户对象保存到数据库
     *
     * @param User $user
     *
     * @return boolean
     */
    public function save(User $user)
    {
        /* $data的键名对应数据库表字段 */
        $data = array(
            'userid'   => $user->getUserId(),
            'username' => $user->getUsername(),
            'email'    => $user->getEmail(),
        );

        /* 如果没有指定ID则在数据库中创建新纪录,否则更新已有记录 */
        if (null === ($id = $user->getUserId())) {
            unset($data['userid']);
            $this->adapter->insert($data);

            return true;
        } else {
            $this->adapter->update($data, array('userid = ?' => $id));

            return true;
        }
    }

    /**
     * 基于ID在数据库中查找用户并返回用户实例
     *
     * @param int $id
     *
     * @throws \InvalidArgumentException
     * @return User
     */
    public function findById($id)
    {
        $result = $this->adapter->find($id);

        if (0 == count($result)) {
            throw new \InvalidArgumentException("User #$id not found");
        }
        $row = $result->current();

        return $this->mapObject($row);
    }

    /**
     * 获取数据库所有记录并返回用户实例数组
     *
     * @return array
     */
    public function findAll()
    {
        $resultSet = $this->adapter->findAll();
        $entries   = array();

        foreach ($resultSet as $row) {
            $entries[] = $this->mapObject($row);
        }

        return $entries;
    }

    /**
     * 映射表记录到对象
     *
     * @param array $row
     *
     * @return User
     */
    protected function mapObject(array $row)
    {
        $entry = new User();
        $entry->setUserID($row['userid']);
        $entry->setUsername($row['username']);
        $entry->setEmail($row['email']);

        return $entry;
    }
}
- 测试代码
Tests/DataMapperTest.php
<?php
namespace DesignPatterns\Structural\DataMapper\Tests;

use DesignPatterns\Structural\DataMapper\UserMapper;
use DesignPatterns\Structural\DataMapper\User;

/**
 * UserMapperTest用于测试数据映射模式
 */
class DataMapperTest extends \PHPUnit_Framework_TestCase
{
    /**
     * @var UserMapper
     */
    protected $mapper;

    /**
     * @var DBAL
     */
    protected $dbal;

    protected function setUp()
    {
        $this->dbal = $this->getMockBuilder('DesignPatterns\Structural\DataMapper\DBAL')
                ->disableAutoload()
                ->setMethods(array('insert', 'update', 'find', 'findAll'))
                ->getMock();

        $this->mapper = new UserMapper($this->dbal);
    }

    public function getNewUser()
    {
        return array(array(new User(null, 'Odysseus', 'Odysseus@ithaca.gr')));
    }

    public function getExistingUser()
    {
        return array(array(new User(1, 'Odysseus', 'Odysseus@ithaca.gr')));
    }

    /**
     * @dataProvider getNewUser
     */
    public function testPersistNew(User $user)
    {
        $this->dbal->expects($this->once())
                ->method('insert');
        $this->mapper->save($user);
    }

    /**
     * @dataProvider getExistingUser
     */
    public function testPersistExisting(User $user)
    {
        $this->dbal->expects($this->once())
                ->method('update');
        $this->mapper->save($user);
    }

    /**
     * @dataProvider getExistingUser
     */
    public function testRestoreOne(User $existing)
    {
        $row = array(
            'userid'   => 1,
            'username' => 'Odysseus',
            'email'    => 'Odysseus@ithaca.gr'
        );
        $rows = new \ArrayIterator(array($row));
        $this->dbal->expects($this->once())
                ->method('find')
                ->with(1)
                ->will($this->returnValue($rows));

        $user = $this->mapper->findById(1);
        $this->assertEquals($existing, $user);
    }

    /**
     * @dataProvider getExistingUser
     */
    public function testRestoreMulti(User $existing)
    {
        $rows = array(array('userid' => 1, 'username' => 'Odysseus', 'email' => 'Odysseus@ithaca.gr'));
        $this->dbal->expects($this->once())
                ->method('findAll')
                ->will($this->returnValue($rows));

        $user = $this->mapper->findAll();
        $this->assertEquals(array($existing), $user);
    }

    /**
     * @expectedException \InvalidArgumentException
     * @expectedExceptionMessage User #404 not found
     */
    public function testNotFound()
    {
        $this->dbal->expects($this->once())
                ->method('find')
                ->with(404)
                ->will($this->returnValue(array()));

        $user = $this->mapper->findById(404);
    }
}
DBAL(Database Abstraction Layer) with many features for database schema introspection and management. 地址
- 总结
与类似接口的区别:
- 数据映射模式 —— 是持久化数据存储层(通常是关系型数据库)和驻于内存的数据表现层之间的数据访问层。
- 资源库模式 —— 是仓库管理员,仓库中可以有多种资源的数据映射。
装饰器模式(Decorator)
- 模式定义
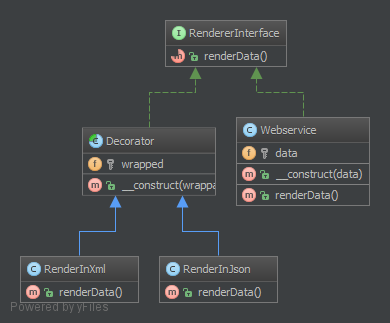
装饰器模式能够从一个对象的外部动态地给对象添加功能。 通常给对象添加功能,要么直接修改对象添加相应的功能,要么派生对应的子类来扩展,抑或是使用对象组合的方式。 显然,直接修改对应的类这种方式并不可取。在面向对象的设计中,我们也应该尽量使用对象组合,而不是对象继承来扩展和复用功能。 装饰器模式就是基于对象组合的方式,可以很灵活的给对象添加所需要的功能。装饰器模式的本质就是动态组合。 动态是手段,组合才是目的。 常见的使用示例:Web服务层 —— 为 REST 服务提供 JSON 和 XML 装饰器。
- UML类图
- 示例代码
RendererInterface.php
<?php
namespace DesignPatterns\Structural\Decorator;

/**
 * RendererInterface接口
 */
interface RendererInterface
{
    /**
     * render data
     *
     * @return mixed
     */
    public function renderData();
}
Webservice.php
<?php
namespace DesignPatterns\Structural\Decorator;

/**
 * Webservice类
 */
class Webservice implements RendererInterface
{
    /**
     * @var mixed
     */
    protected $data;

    /**
     * @param mixed $data
     */
    public function __construct($data)
    {
        $this->data = $data;
    }

    /**
     * @return string
     */
    public function renderData()
    {
        return $this->data;
    }
}
Decorator.php
<?php
namespace DesignPatterns\Structural\Decorator;

/**
 * 装饰器必须实现 RendererInterface 接口, 这是装饰器模式的主要特点,
 * 否则的话就不是装饰器而只是个包裹类
 */

/**
 * Decorator类
 */
abstract class Decorator implements RendererInterface
{
    /**
     * @var RendererInterface
     */
    protected $wrapped;

    /**
     * 必须类型声明装饰组件以便在子类中可以调用renderData()方法
     *
     * @param RendererInterface $wrappable
     */
    public function __construct(RendererInterface $wrappable)
    {
        $this->wrapped = $wrappable;
    }
}
RenderInXml.php
<?php
namespace DesignPatterns\Structural\Decorator;

/**
 * RenderInXml类
 */
class RenderInXml extends Decorator
{
    /**
     * render data as XML
     *
     * @return mixed|string
     */
    public function renderData()
    {
        $output = $this->wrapped->renderData();

        // do some fancy conversion to xml from array ...

        $doc = new \DOMDocument();

        foreach ($output as $key => $val) {
            $doc->appendChild($doc->createElement($key, $val));
        }

        return $doc->saveXML();
    }
}
RenderInJson.php
<?php
namespace DesignPatterns\Structural\Decorator;

/**
 * RenderInJson类
 */
class RenderInJson extends Decorator
{
    /**
     * render data as JSON
     *
     * @return mixed|string
     */
    public function renderData()
    {
        $output = $this->wrapped->renderData();

        return json_encode($output);
    }
}
- 测试代码
Tests/DecoratorTest.php
<?php
namespace DesignPatterns\Structural\Decorator\Tests;

use DesignPatterns\Structural\Decorator;

/**
 * DecoratorTest 用于测试装饰器模式
 */
class DecoratorTest extends \PHPUnit_Framework_TestCase
{
    protected $service;

    protected function setUp()
    {
        $this->service = new Decorator\Webservice(array('foo' => 'bar'));
    }

    public function testJsonDecorator()
    {
        // Wrap service with a JSON decorator for renderers
        $service = new Decorator\RenderInJson($this->service);
        // Our Renderer will now output JSON instead of an array
        $this->assertEquals('{"foo":"bar"}', $service->renderData());
    }

    public function testXmlDecorator()
    {
        // Wrap service with a XML decorator for renderers
        $service = new Decorator\RenderInXml($this->service);
        // Our Renderer will now output XML instead of an array
        $xml = '<?xml version="1.0"?><foo>bar</foo>';
        $this->assertXmlStringEqualsXmlString($xml, $service->renderData());
    }

    /**
     * The first key-point of this pattern :
     */
    public function testDecoratorMustImplementsRenderer()
    {
        $className = 'DesignPatterns\Structural\Decorator\Decorator';
        $interfaceName = 'DesignPatterns\Structural\Decorator\RendererInterface';
        $this->assertTrue(is_subclass_of($className, $interfaceName));
    }

    /**
     * Second key-point of this pattern : the decorator is type-hinted
     *
     * @expectedException \PHPUnit_Framework_Error
     */
    public function testDecoratorTypeHinted()
    {
        if (version_compare(PHP_VERSION, '7', '>=')) {
            throw new \PHPUnit_Framework_Error('Skip test for PHP 7', 0, __FILE__, __LINE__);
        }

        $this->getMockForAbstractClass('DesignPatterns\Structural\Decorator\Decorator', array(new \stdClass()));
    }

    /**
     * Second key-point of this pattern : the decorator is type-hinted
     *
     * @requires PHP 7
     * @expectedException TypeError
     */
    public function testDecoratorTypeHintedForPhp7()
    {
        $this->getMockForAbstractClass('DesignPatterns\Structural\Decorator\Decorator', array(new \stdClass()));
    }

    /**
     * The decorator implements and wraps the same interface
     */
    public function testDecoratorOnlyAcceptRenderer()
    {
        $mock = $this->getMock('DesignPatterns\Structural\Decorator\RendererInterface');
        $dec = $this->getMockForAbstractClass('DesignPatterns\Structural\Decorator\Decorator', array($mock));
        $this->assertNotNull($dec);
    }
}
- 总结
与类似接口的区别:
- 装饰器模式 —— 装饰器通过依赖注入,为注入对象进行后续装饰,装饰器提供了与被装饰类相同的方法。
- 委托模式 —— 被委托类和委托类无继承关系,在委托类中依赖注入被委托类,访问者与委托类进行交互,被委托类和委托类方法不一样。
- 适配器模式 —— 适配器模式为它所适配的对象提供了一个不同的接口,目的是将已存在的东西(接口)转换成适合我们所利用的东西。
- 代理模式 —— 代理类继承自被代理类,对被代理类进行控制和拓展,访问者与代理类进行交互。
依赖注入(Dependence Injection)
- 模式定义
依赖注入(Dependency Injection)是控制反转(Inversion of Control)的一种实现方式。
我们先来看看什么是控制反转。
当调用者需要被调用者的协助时,在传统的程序设计过程中,通常由调用者来创建被调用者的实例,但在这里,创建被调用者的工作不再由调用者来完成, 而是将被调用者的创建移到调用者的外部,从而反转被调用者的创建,消除了调用者对被调用者创建的控制,因此称为控制反转。
要实现控制反转,通常的解决方案是将创建被调用者实例的工作交由 IoC 容器来完成,然后在调用者中注入被调用者(通过构造器/方法注入实现), 这样我们就实现了调用者与被调用者的解耦,该过程被称为依赖注入。
依赖注入不是目的,它是一系列工具和手段,最终的目的是帮助我们开发出松散耦合(loose coupled)、可维护、可测试的代码和程序。 这条原则的做法是大家熟知的面向接口,或者说是面向抽象编程。
- UML类图
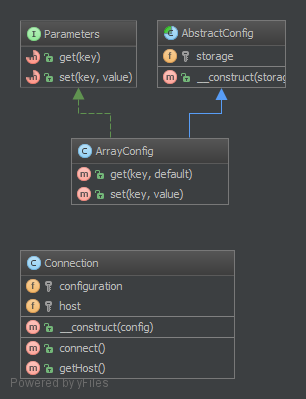
(这里Connection类构造函数中的config参数就是上面ArrayConfig对象,一般写法是在Connection类构造函数中自己实例化ArrayConfig类, 这里是在外面实例化好ArrayConfig对象后,通过作为构造函数的参数注入到Connection对象中。 注意这里是不存在 IoC容器 的,如果存在IoC容器,则在Connection类中自己通过IoC容器去获取ArrayConfig对象。)
- 示例代码
在本例中,我们在 Connection 类(调用者)的构造方法中依赖注入 Parameters 接口的实现类(被调用者), 如果不使用依赖注入的话,则必须在 Connection 中创建该接口的实现类实例,这就形成紧耦合代码, 如果我们要切换成该接口的其它实现类则必须要修改代码,这对到测试和扩展而言都是极为不利的。
AbstractConfig.php
<?php
namespace DesignPatterns\Structural\DependencyInjection;

/**
 * AbstractConfig类
 */
abstract class AbstractConfig
{
    /**
     * @var Storage of data
     */
    protected $storage;

    public function __construct($storage)
    {
        $this->storage = $storage;
    }
}
Parameters.php
<?php
namespace DesignPatterns\Structural\DependencyInjection;

/**
 * Parameters接口
 */
interface Parameters
{
    /**
     * 获取参数
     *
     * @param string|int $key
     *
     * @return mixed
     */
    public function get($key);

    /**
     * 设置参数
     *
     * @param string|int $key
     * @param mixed      $value
     */
    public function set($key, $value);
}
ArrayConfig.php
<?php
namespace DesignPatterns\Structural\DependencyInjection;

/**
 * ArrayConfig类
 *
 * 使用数组作为数据源
 */
class ArrayConfig extends AbstractConfig implements Parameters
{
    /**
     * 获取参数
     *
     * @param string|int $key
     * @param null $default
     * @return mixed
     */
    public function get($key, $default = null)
    {
        if (isset($this->storage[$key])) {
            return $this->storage[$key];
        }
        return $default;
    }

    /**
     * 设置参数
     *
     * @param string|int $key
     * @param mixed $value
     */
    public function set($key, $value)
    {
        $this->storage[$key] = $value;
    }
}
Connection.php
<?php
namespace DesignPatterns\Structural\DependencyInjection;

/**
 * Connection类
 */
class Connection
{
    /**
     * @var Configuration
     */
    protected $configuration;

    /**
     * @var Currently connected host
     */
    protected $host;

    /**
     * @param Parameters $config
     */
    public function __construct(Parameters $config)
    {
        $this->configuration = $config;
    }

    /**
     * connection using the injected config
     */
    public function connect()
    {
        $host = $this->configuration->get('host');
        // connection to host, authentication etc...

        //if connected
        $this->host = $host;
    }

    /*
     * 获取当前连接的主机
     *
     * @return string
     */
    public function getHost()
    {
        return $this->host;
    }
}
- 测试代码
Tests/DependencyInjectionTest.php
<?php
namespace DesignPatterns\Structural\DependencyInjection\Tests;

use DesignPatterns\Structural\DependencyInjection\ArrayConfig;
use DesignPatterns\Structural\DependencyInjection\Connection;

class DependencyInjectionTest extends \PHPUnit_Framework_TestCase
{
    protected $config;
    protected $source;

    public function setUp()
    {
        $this->source = include 'config.php';
        $this->config = new ArrayConfig($this->source);
    }

    public function testDependencyInjection()
    {
        $connection = new Connection($this->config);
        $connection->connect();
        $this->assertEquals($this->source['host'], $connection->getHost());
    }
}
Tests/config.php
<?php
return array('host' => 'github.com');
- 拓展
依赖倒置原则(Dependence Inversion Principle, DIP)
DIP是一种软件设计的指导思想。传统软件设计中,上层代码依赖于下层代码,当下层出现变动时, 上层代码也要相应变化,维护成本较高。 而DIP的核心思想是上层定义接口,下层实现这个接口, 从而使得下层依赖于上层,降低耦合度,提高整个系统的弹性。这是一种经实践证明的有效策略。
控制反转(Inversion of Control, IoC)
IoC就是DIP的一种具体思路,DIP只是一种理念、思想,而IoC是一种实现DIP的方法。
IoC的核心是将类(上层)所依赖的单元(下层)的实例化过程交由第三方来实现。
一个简单的特征, 就是类中不对所依赖的单元有诸如 $component = new yii\component\SomeClass() 的实例化语句。
依赖注入(Dependence Injection, DI)
DI是IoC的一种设计模式,是一种套路,按照DI的套路,就可以实现IoC,就能符合DIP原则。 DI的核心是把类所依赖的单元的实例化过程,放到类的外面去实现。
控制反转容器(IoC Container)
当项目比较大时,依赖关系可能会很复杂。 而IoC Container提供了动态地创建、注入依赖单元, 映射依赖关系等功能,减少了许多代码量。 Yii 设计了一个 yii\di\Container 来实现了 DI Container。
具体实例,可以看一下 深入理解Yii2.0 依赖注入和依赖注入容器 。
门面模式(Facade)
- 模式定义
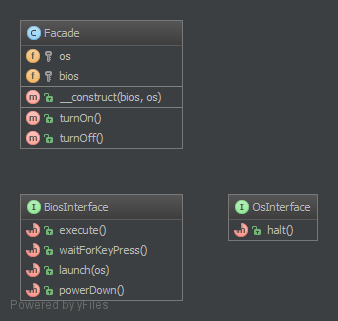
门面模式(Facade)又称外观模式,用于为子系统中的一组接口提供一个一致的界面。 门面模式定义了一个高层接口,这个接口使得子系统更加容易使用:引入门面角色之后,用户只需要直接与门面角色交互, 用户与子系统之间的复杂关系由门面角色来实现,从而降低了系统的耦合度。
- UML类图
- 示例代码
Facade.php
<?php
namespace DesignPatterns\Structural\Facade;

/**
 * 门面类
 */
class Facade
{
    /**
     * @var OsInterface
     */
    protected $os;

    /**
     * @var BiosInterface
     */
    protected $bios;

    /**
     * This is the perfect time to use a dependency injection container
     * to create an instance of this class
     *
     * @param BiosInterface $bios
     * @param OsInterface   $os
     */
    public function __construct(BiosInterface $bios, OsInterface $os)
    {
        $this->bios = $bios;
        $this->os = $os;
    }

    /**
     * turn on the system
     */
    public function turnOn()
    {
        $this->bios->execute();
        $this->bios->waitForKeyPress();
        $this->bios->launch($this->os);
    }

    /**
     * turn off the system
     */
    public function turnOff()
    {
        $this->os->halt();
        $this->bios->powerDown();
    }
}
OsInterface.php
<?php
namespace DesignPatterns\Structural\Facade;

/**
 * OsInterface接口
 */
interface OsInterface
{
    /**
     * halt the OS
     */
    public function halt();
}
BiosInterface.php
<?php
namespace DesignPatterns\Structural\Facade;

/**
 * BiosInterface接口
 */
interface BiosInterface
{
    /**
     * execute the BIOS
     */
    public function execute();

    /**
     * wait for halt
     */
    public function waitForKeyPress();

    /**
     * launches the OS
     *
     * @param OsInterface $os
     */
    public function launch(OsInterface $os);

    /**
     * power down BIOS
     */
    public function powerDown();
}
- 测试代码
Tests/FacadeTest.php
<?php
namespace DesignPatterns\Structural\Facade\Tests;

use DesignPatterns\Structural\Facade\Facade as Computer;
use DesignPatterns\Structural\Facade\OsInterface;

/**
 * FacadeTest用于测试门面模式
 */
class FacadeTest extends \PHPUnit_Framework_TestCase
{

    public function getComputer()
    {
        $bios = $this->getMockBuilder('DesignPatterns\Structural\Facade\BiosInterface')
                ->setMethods(array('launch', 'execute', 'waitForKeyPress'))
                ->disableAutoload()
                ->getMock();
        $os = $this->getMockBuilder('DesignPatterns\Structural\Facade\OsInterface')
                ->setMethods(array('getName'))
                ->disableAutoload()
                ->getMock();
        $bios->expects($this->once())
                ->method('launch')
                ->with($os);
        $os->expects($this->once())
                ->method('getName')
                ->will($this->returnValue('Linux'));

        $facade = new Computer($bios, $os);
        return array(array($facade, $os));
    }

    /**
     * @dataProvider getComputer
     */
    public function testComputerOn(Computer $facade, OsInterface $os)
    {
        // interface is simpler :
        $facade->turnOn();
        // but I can access to lower component
        $this->assertEquals('Linux', $os->getName());
    }
}
- 总结
门面模式对客户屏蔽子系统组件,因而减少了客户处理的对象的数目并使得子系统使用起来更加方便; 实现了子系统与客户之间的松耦合关系,而子系统内部的功能组件往往是紧耦合的,松耦合关系使得子系统的组件变化不会影响到它的客户; 如果应用需要,门面模式并不限制客户程序使用子系统类,因此你可以让客户程序在系统易用性和通用性之间加以选择。 Laravel 中门面模式的使用也很广泛,基本上每个服务容器中注册的服务提供者类都对应一个门面类。
与类似接口的区别:
- 门面模式 —— 为一组接口提供一个一致的界面,用户只需要直接与门面角色交互,从而降低了系统的耦合度。
- 命令模式 —— 将调用者与被调用者之间进行解耦,调用者中注入命令对象,命令对象中注入被调用者并进行相应命令调用。
- 中介者模式 —— 用一个中介对象来封装一系列的对象交互,每一个对象中都注入中介,对象只与中介交互。
流接口模式(Fluent Interface)
- 模式定义
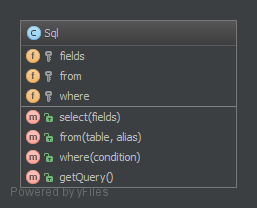
在软件工程中,流接口(Fluent Interface)是指实现一种面向对象的、能提高代码可读性的 API 的方法, 其目的就是可以编写具有自然语言一样可读性的代码,我们对这种代码编写方式还有一个通俗的称呼 —— 方法链。 Laravel 中流接口模式有着广泛使用,比如查询构建器,邮件等等。
- UML类图
- 示例代码
Sql.php
<?php
namespace DesignPatterns\Structural\FluentInterface;

/**
 * SQL 类
 */
class Sql
{
    /**
     * @var array
     */
    protected $fields = array();

    /**
     * @var array
     */
    protected $from = array();

    /**
     * @var array
     */
    protected $where = array();

    /**
     * 添加 select 字段
     *
     * @param array $fields
     *
     * @return SQL
     */
    public function select(array $fields = array())
    {
        $this->fields = $fields;

        return $this;
    }

    /**
     * 添加 FROM 子句
     *
     * @param string $table
     * @param string $alias
     *
     * @return SQL
     */
    public function from($table, $alias)
    {
        $this->from[] = $table . ' AS ' . $alias;

        return $this;
    }

    /**
     * 添加 WHERE 条件
     *
     * @param string $condition
     *
     * @return SQL
     */
    public function where($condition)
    {
        $this->where[] = $condition;

        return $this;
    }

    /**
     * 生成查询语句
     *
     * @return string
     */
    public function getQuery()
    {
        return 'SELECT ' . implode(',', $this->fields)
                . ' FROM ' . implode(',', $this->from)
                . ' WHERE ' . implode(' AND ', $this->where);
    }
}
- 测试代码
Tests/FluentInterfaceTest.php
<?php
namespace DesignPatterns\Structural\FluentInterface\Tests;

use DesignPatterns\Structural\FluentInterface\Sql;

/**
 * FluentInterfaceTest 测试流接口SQL
 */
class FluentInterfaceTest extends \PHPUnit_Framework_TestCase
{
    public function testBuildSQL()
    {
        $instance = new Sql();
        $query = $instance->select(array('foo', 'bar'))
                ->from('foobar', 'f')
                ->where('f.bar = ?')
                ->getQuery();

        $this->assertEquals('SELECT foo,bar FROM foobar AS f WHERE f.bar = ?', $query);
    }
}
代理模式(Proxy)
- 模式定义
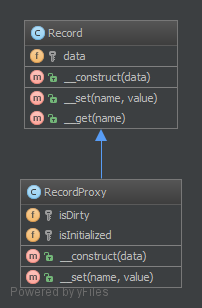
代理模式(Proxy)为其他对象提供一种代理以控制对这个对象的访问。使用代理模式创建代理对象, 让代理对象控制目标对象的访问(目标对象可以是远程的对象、创建开销大的对象或需要安全控制的对象), 并且可以在不改变目标对象的情况下添加一些额外的功能。
在某些情况下,一个客户不想或者不能直接引用另一个对象,而代理对象可以在客户端和目标对象之间起到中介的作用, 并且可以通过代理对象去掉客户不能看到的内容和服务或者添加客户需要的额外服务。
经典例子就是网络代理,你想访问 Facebook 或者 Twitter ,如何绕过 GFW?找个代理网站。
- UML类图
- 示例代码
Record.php
<?php
namespace DesignPatterns\Structural\Proxy;

/**
 * Record类
 */
class Record
{
    /**
     * @var array|null
     */
    protected $data;

    /**
     * @param null $data
     */
    public function __construct($data = null)
    {
        $this->data = (array) $data;
    }

    /**
     * magic setter
     *
     * @param string $name
     * @param mixed  $value
     *
     * @return void
     */
    public function __set($name, $value)
    {
        $this->data[(string) $name] = $value;
    }

    /**
     * magic getter
     *
     * @param string $name
     *
     * @return mixed|null
     */
    public function __get($name)
    {
        if (array_key_exists($name, $this->data)) {
            return $this->data[(string) $name];
        } else {
            return null;
        }
    }
}
RecordProxy.php
<?php
namespace DesignPatterns\Structural\Proxy;

/**
 * RecordProxy类
 */
class RecordProxy extends Record
{
    /**
     * @var bool
     */
    protected $isDirty = false;

    /**
     * @var bool
     */
    protected $isInitialized = false;

    /**
     * @param array $data
     */
    public function __construct($data)
    {
        parent::__construct($data);

        // when the record has data, mark it as initialized
        // since Record will hold our business logic, we don't want to
        // implement this behaviour there, but instead in a new proxy class
        // that extends the Record class
        if (null !== $data) {
            $this->isInitialized = true;
            $this->isDirty = true;
        }
    }

    /**
     * magic setter
     *
     * @param string $name
     * @param mixed  $value
     *
     * @return void
     */
    public function __set($name, $value)
    {
        $this->isDirty = true;
        parent::__set($name, $value);
    }
}
- 测试代码
ProxyTest.php
<?php
namespace DesignPatterns\Structural\Proxy\Tests;

use DesignPatterns\Structural\Proxy\Record;
use DesignPatterns\Structural\Proxy\RecordProxy;

class ProxyTest extends \PHPUnit_Framework_TestCase
{
    public function testSetAttribute(){
        $data = [];
        $proxy = new RecordProxy($data);
        $proxy->xyz = false;
        $this->assertTrue($proxy->xyz===false);
    }
}
- 总结
代理模式在很多情况下都非常有用,特别是你想强行控制一个对象的时候,比如延迟加载、监视状态变更的方法等等。
与类似接口的区别:
- 代理模式 —— 代理类继承自被代理类,对被代理类进行控制和拓展,访问者与代理类进行交互。
- 适配器模式 —— 适配器模式为它所适配的对象提供了一个不同的接口,目的是将已存在的东西(接口)转换成适合我们所利用的东西。
- 装饰器模式 —— 装饰器通过依赖注入,为注入对象进行后续装饰,装饰器提供了与被装饰类相同的方法。
- 委托模式 —— 被委托类和委托类无继承关系,在委托类中依赖注入被委托类,访问者与委托类进行交互,被委托类和委托类方法不一样。
注册模式(Registry)
- 模式定义
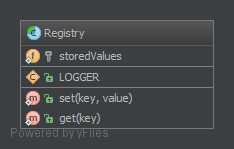
注册模式(Registry)也叫做注册树模式、注册器模式。 注册模式为应用中经常使用的对象创建一个中央存储器来存放这些对象 —— 通常通过一个只包含静态方法的抽象类来实现(或者通过单例模式)。
- UML类图
- 示例代码
Registry.php
<?php
namespace DesignPatterns\Structural\Registry;

/**
 * class Registry
 */
abstract class Registry
{
    const LOGGER = 'logger';

    /**
     * @var array
     */
    protected static $storedValues = array();

    /**
     * sets a value
     *
     * @param string $key
     * @param mixed  $value
     *
     * @static
     * @return void
     */
    public static function set($key, $value)
    {
        self::$storedValues[$key] = $value;
    }

    /**
     * gets a value from the registry
     *
     * @param string $key
     *
     * @static
     * @return mixed
     */
    public static function get($key)
    {
        return self::$storedValues[$key];
    }

    // typically there would be methods to check if a key has already been registered and so on ...
}
- 测试代码
Tests/RegistryTest.php
<?php
namespace DesignPatterns\Structural\Registry\Tests;

use DesignPatterns\Structural\Registry\Registry;

class RegistryTest extends \PHPUnit_Framework_TestCase
{

    public function testSetAndGetLogger()
    {
        Registry::set(Registry::LOGGER, new \StdClass());

        $logger = Registry::get(Registry::LOGGER);
        $this->assertInstanceOf('StdClass', $logger);
    }
}
- 总结
与类似接口的区别:
- 注册模式 —— 把实例化好的类放在一个注册的容器中,使用时从容器中获取。
- 服务定位器模式 —— 把服务在服务定位器中注册好,使用时可以由服务定位器或返回新的实例、或返回实例化好的实例。
- 享元模式 —— 没有注册这一步,使用时直接从Factory类获取,Factory类决定怎么创建对象和返回。
- 单例模式 —— 单例模式的作用就是保证在整个应用程序的生命周期中,任何一个时刻,单例类的实例都只存在一个。
- 对象池模式 —— 对象池是一组已经初始化过且可以直接使用的对象集合,使用对象时可以从对象池中获取对象并进行操作,在不需要时归还给对象池。
享元模式(Flyweight)
- 模式定义
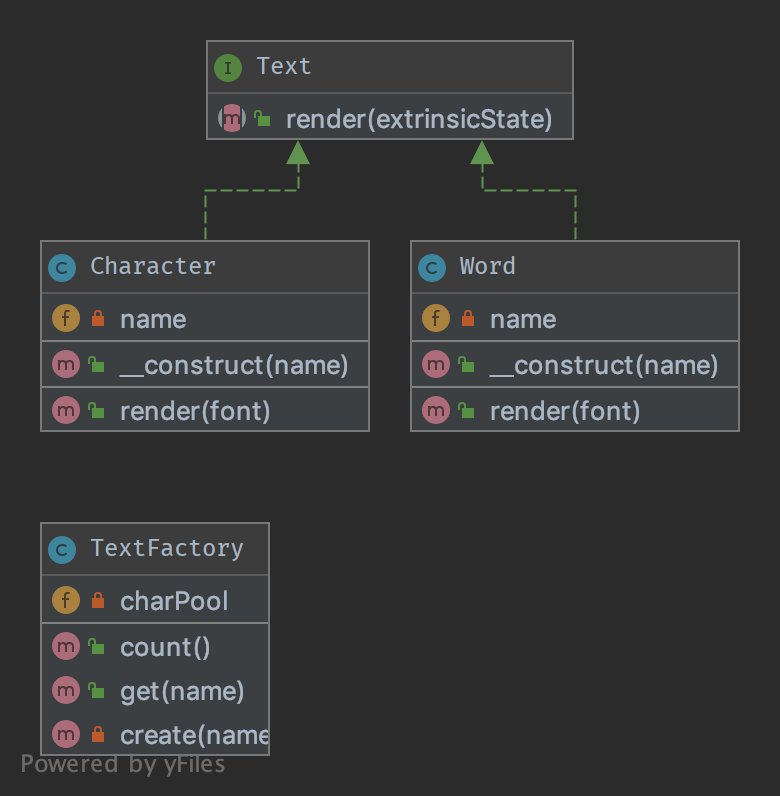
To minimise memory usage, a Flyweight shares as much as possible memory with similar objects. It is needed when a large amount of objects is used that don’t differ much in state. A common practice is to hold state in external data structures and pass them to the flyweight object when needed.
为了最大限度地减少内存使用,Flyweight尽可能多地与类似对象共享内存 (如下面例子中Character{a}对象,与另一个Character{a}对象,里面只有个别属性不同,就可以共享内存, 把这几个属性都写在一个类中,实例化时给相应属性赋值,获取时获取指定的对象结构,不必单独保存两个对象浪费内存)。 当使用大量状态差别不大的对象时,就需要它。 通常的做法是在外部数据结构中保存状态,并在需要时将它们传递给flyweight对象。
- UML类图
- 示例代码
Text.php
<?php
namespace DesignPatterns\Structural\Flyweight;

/**
 * This is the interface that all flyweights need to implement
 */
interface Text
{
    public function render(string $extrinsicState): string;
}
Word.php
<?php
namespace DesignPatterns\Structural\Flyweight;

class Word implements Text
{
    private string $name;

    public function __construct(string $name)
    {
        $this->name = $name;
    }

    public function render(string $font): string
    {
        return sprintf('Word %s with font %s', $this->name, $font);
    }
}
Character.php
<?php
namespace DesignPatterns\Structural\Flyweight;

/**
 * Implements the flyweight interface and adds storage for intrinsic state, if any.
 * Instances of concrete flyweights are shared by means of a factory.
 */
class Character implements Text
{
    /**
     * Any state stored by the concrete flyweight must be independent of its context.
     * For flyweights representing characters, this is usually the corresponding character code.
     */
    private string $name;

    public function __construct(string $name)
    {
        $this->name = $name;
    }

    public function render(string $font): string
    {
         // Clients supply the context-dependent information that the flyweight needs to draw itself
         // For flyweights representing characters, extrinsic state usually contains e.g. the font.

        return sprintf('Character %s with font %s', $this->name, $font);
    }
}
TextFactory.php
<?php
namespace DesignPatterns\Structural\Flyweight;

use Countable;

/**
 * A factory manages shared flyweights. Clients should not instantiate them directly,
 * but let the factory take care of returning existing objects or creating new ones.
 */
class TextFactory implements Countable
{
    /**
     * @var Text[]
     */
    private array $charPool = [];

    public function get(string $name): Text
    {
        if (!isset($this->charPool[$name])) {
            $this->charPool[$name] = $this->create($name);
        }

        return $this->charPool[$name];
    }

    private function create(string $name): Text
    {
        if (strlen($name) == 1) {
            return new Character($name);
        } else {
            return new Word($name);
        }
    }

    public function count(): int
    {
        return count($this->charPool);
    }
}
- 测试代码
FlyweightTest.php
<?php
namespace DesignPatterns\Structural\Flyweight\Tests;

use DesignPatterns\Structural\Flyweight\TextFactory;
use PHPUnit\Framework\TestCase;

class FlyweightTest extends TestCase
{
    private array $characters = ['a', 'b', 'c', 'd', 'e', 'f', 'g', 'h', 'i', 'j', 'k',
        'l', 'm', 'n', 'o', 'p', 'q', 'r', 's', 't', 'u', 'v', 'w', 'x', 'y', 'z'];

    private array $fonts = ['Arial', 'Times New Roman', 'Verdana', 'Helvetica'];

    public function testFlyweight()
    {
        $factory = new TextFactory();

        for ($i = 0; $i <= 10; $i++) {
            foreach ($this->characters as $char) {
                foreach ($this->fonts as $font) {
                    $flyweight = $factory->get($char);
                    $rendered = $flyweight->render($font);

                    $this->assertSame(sprintf('Character %s with font %s', $char, $font), $rendered);
                }
            }
        }

        foreach ($this->fonts as $word) {
            $flyweight = $factory->get($word);
            $rendered = $flyweight->render('foobar');

            $this->assertSame(sprintf('Word %s with font foobar', $word), $rendered);
        }

        // Flyweight pattern ensures that instances are shared
        // instead of having hundreds of thousands of individual objects
        // there must be one instance for every char that has been reused for displaying in different fonts
        $this->assertCount(count($this->characters) + count($this->fonts), $factory);
    }
}
- 总结
与类似接口的区别:
- 享元模式 —— 没有注册这一步,使用时直接从Factory类获取,Factory类决定怎么创建对象和返回。
- 注册模式 —— 把实例化好的类放在一个注册的容器中,使用时从容器中获取。
- 服务定位器模式 —— 把服务在服务定位器中注册好,使用时可以由服务定位器或返回新的实例、或返回实例化好的实例。
- 单例模式 —— 单例模式的作用就是保证在整个应用程序的生命周期中,任何一个时刻,单例类的实例都只存在一个。
- 对象池模式 —— 对象池是一组已经初始化过且可以直接使用的对象集合,使用对象时可以从对象池中获取对象并进行操作,在不需要时归还给对象池。
参考资料
PHP 常用设计模式 https://ibaiyang.github.io/blog/php/2019/07/30/PHP-常用设计模式.html
常见软件架构模式 https://ibaiyang.github.io/blog/架构/2019/07/30/常见软件架构模式.html
DesignPatternsPHP https://github.com/domnikl/DesignPatternsPHP
PHP 设计模式系列 https://laravelacademy.org/books/php-design-pattern
PHP 设计模式(Design Pattern For PHP) https://www.cnblogs.com/wilburxu/category/910011.html
php-the-right-way 设计模式 http://laravel-china.github.io/php-the-right-way/pages/Design-Patterns.html
DesignPatternsPHP https://designpatternsphp.readthedocs.io/en/latest/
DesignPatternsPHP(PHP设计模式范例) https://designpatternsphp.readthedocs.io/zh_CN/latest/README.html
PHP 设计模式概述 https://segmentfault.com/a/1190000016629282
PHP设计模式(七)适配器模式(Adapter For PHP) https://www.cnblogs.com/wilburxu/p/6200570.html
PHP设计模式(八)桥接模式(Bridge For PHP) https://www.cnblogs.com/wilburxu/p/6202097.html
PHP八大设计模式 https://blog.csdn.net/flitrue/article/details/52614599
php各种设计模式简单实践思考 https://www.cnblogs.com/aksir/p/6777595.html
设计模式之Composite(组合) https://www.jdon.com/designpatterns/composite.htm