正文
Nginx(“engine x”)是一款是由俄罗斯的程序设计师Igor Sysoev所开发高性能的 Web和 反向代理 服务器,也是一个 IMAP/POP3/SMTP 代理服务器。
Nginx常用功能
Http代理,反向代理
Http代理,反向代理:作为web服务器最常用的功能之一,尤其是反向代理。
正向代理与反响代理图:
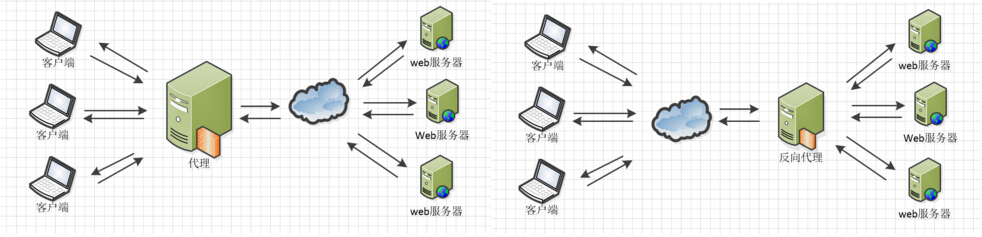
代理会隐藏客户端的真实信息(IP、端口),以自己的身份代替客户端在互联网上发起请求,并将返回结果转发给客户端。 代理可以保护客户端、代理可以帮助客户端访问自己无法到达的网络。 客户端需要将特定请求或全部请求主动配置为请求代理服务器。
反向代理会隐藏服务端真实信息(IP、端口),把自己作为服务端暴露在互联网中, 通过把请求转发给真实服务器处理拿到结果后再返回,来对外提供服务。 反向代理客户有效保护服务端,隔离网络环境,并进行多个真实服务器的负载均衡。 服务端需要将自己配置到反向代理中,然后将反向代理暴露在公网。
Nginx在做反向代理时,提供性能稳定,并且能够提供配置灵活的转发功能。Nginx可以根据不同的正则匹配,采取不同的转发策略, 比如图片文件结尾的走文件服务器,动态页面走web服务器,只要你正则写的没问题,又有相对应的服务器解决方案, 你就可以随心所欲的玩。并且Nginx对返回结果进行错误页跳转,异常判断等。如果被分发的服务器存在异常, 他可以将请求重新转发给另外一台服务器,然后自动去除异常服务器。
负载均衡
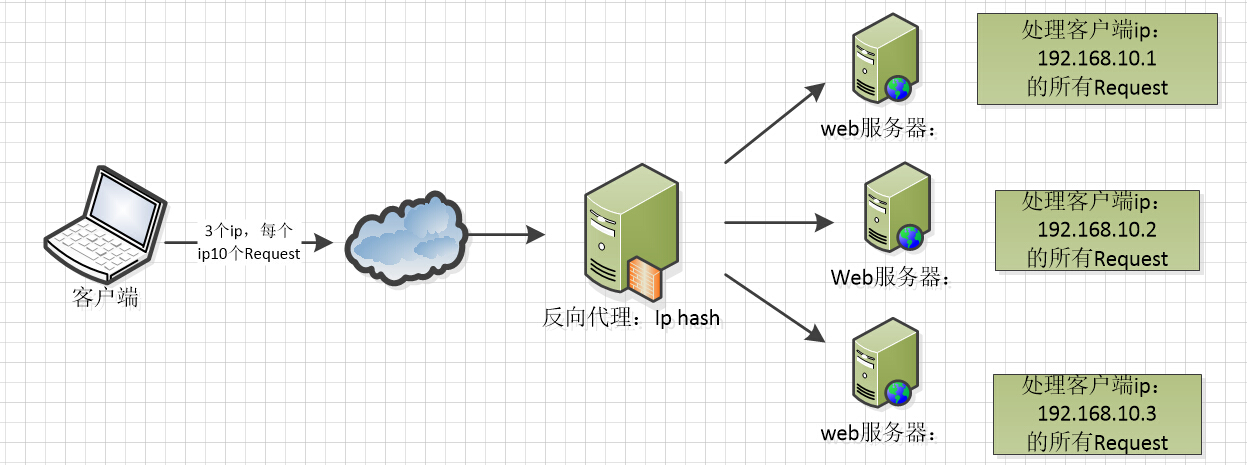
Nginx提供的负载均衡策略有2种:内置策略和扩展策略。内置策略为轮询,加权轮询,Ip hash。 扩展策略,就天马行空,只有你想不到的没有他做不到的啦,你可以参照所有的负载均衡算法,给他一一找出来做下实现。

Ip hash算法,对客户端请求的ip进行hash操作,然后根据hash结果将同一个客户端ip的请求分发给同一台服务器进行处理,可以解决session不共享的问题。
web缓存
Nginx可以对不同的文件做不同的缓存处理,配置灵活,并且支持FastCGI_Cache,主要用于对FastCGI的动态程序进行缓存。 配合着第三方的ngx_cache_purge,对制定的URL缓存内容可以进行增删管理。
配置文件分析
Nginx的配置文件默认位置为:/etc/nginx/nginx.conf
看一下结构:
user nobody;
pid /run/nginx.pid;

events {
    worker_connections  1024;
}

http {
    include       mime.types;
    default_type  application/octet-stream;
    sendfile        on;

    server {
        listen       80;
        server_name  localhost;

        location / {
            root   html;
            index  index.html index.htm;
        }

        error_page   500 502 503 504  /50x.html;

        location = /50x.html {
            root   html;
        }
    }

    # another virtual host using mix of IP-, name-, and port-based configuration
    #
    #server {
    #    listen       8000;
    #    listen       somename:8080;
    #    server_name  somename  alias  another.alias;

    #    location / {
    #        root   html;
    #        index  index.html index.htm;
    #    }
    #}


    # HTTPS server
    #
    #server {
    #    listen       443 ssl;
    #    server_name  localhost;

    #    ssl_certificate      cert.pem;
    #    ssl_certificate_key  cert.key;

    #    ssl_session_cache    shared:SSL:1m;
    #    ssl_session_timeout  5m;

    #    ssl_ciphers  HIGH:!aNULL:!MD5;
    #    ssl_prefer_server_ciphers  on;

    #    location / {
    #        root   html;
    #        index  index.html index.htm;
    #    }
    #}
}
可以看出其文件结构:
...              #全局块

events {         #events块
   ...
}

http      #http块
{
    ...   #http全局块
    server        #server块
    {
        ...       #server全局块
        location [PATTERN]   #location块
        {
            ...
        }
        location [PATTERN]
        {
            ...
        }
    }

    server
    {
      ...
    }

    ...     #http全局块
}
- 全局块:配置影响nginx全局的指令。一般有运行nginx服务器的用户组,nginx进程pid存放路径,日志存放路径,配置文件引入,允许生成worker process数等。
- events块:配置影响nginx服务器或与用户的网络连接。有每个进程的最大连接数,选取哪种事件驱动模型处理连接请求,是否允许同时接受多个网路连接,开启多个网络连接序列化等。
- http块:可以嵌套多个server,配置代理,缓存,日志定义等绝大多数功能和第三方模块的配置。如文件引入,mime-type定义,日志自定义,是否使用sendfile传输文件,连接超时时间,单连接请求数等。
- server块:配置虚拟主机的相关参数,一个http中可以有多个server。
- location块:配置请求的路由,以及各种页面的处理情况。
具体配置文件分析:
########### 每个指令必须有分号结束。#################
#user administrator administrators;  #配置用户或者组,默认为nobody nobody。
#worker_processes 2;  #允许生成的进程数,默认为1
#pid /nginx/pid/nginx.pid;   #指定nginx进程运行文件存放地址
error_log log/error.log debug;  #制定日志路径,级别。这个设置可以放入全局块,http块,server块,级别以此为:debug|info|notice|warn|error|crit|alert|emerg

events {
    accept_mutex on;   #设置网路连接序列化,防止惊群现象发生,默认为on
    multi_accept on;  #设置一个进程是否同时接受多个网络连接,默认为off
    #use epoll;      #事件驱动模型,select|poll|kqueue|epoll|resig|/dev/poll|eventport
    worker_connections  1024;    #最大连接数,默认为512
}

http {
    include       mime.types;   #文件扩展名与文件类型映射表
    default_type  application/octet-stream; #默认文件类型,默认为text/plain
    #access_log off; #取消服务日志
    log_format myFormat '$remote_addr–$remote_user [$time_local] $request $status $body_bytes_sent $http_referer $http_user_agent $http_x_forwarded_for'; #自定义格式
    access_log log/access.log myFormat;  #combined为日志格式的默认值
    sendfile on;   #允许sendfile方式传输文件,默认为off,可以在http块,server块,location块。
    sendfile_max_chunk 100k;  #每个进程每次调用传输数量不能大于设定的值,默认为0,即不设上限。
    keepalive_timeout 65;  #连接超时时间,默认为75s,可以在http,server,location块。

    upstream mysvr {
      server 127.0.0.1:7878;
      server 192.168.10.121:3333 backup;  #热备
    }
    error_page 404 https://www.baidu.com; #错误页

    server {
        keepalive_requests 120; #单连接请求上限次数。
        listen       4545;   #监听端口
        server_name  127.0.0.1;   #监听地址

        location  ~*^.+$ {       #请求的url过滤,正则匹配,~为区分大小写,~*为不区分大小写。
           #root path;  #根目录
           #index vv.txt;  #设置默认页
           proxy_pass  http://mysvr;  #请求转向mysvr 定义的服务器列表
           deny 127.0.0.1;  #拒绝的ip
           allow 172.18.5.54; #允许的ip
        }
    }
}
再看一个:
# nginx运行的用户名
user nginx;
# nginx启动进程,通常设置成和cpu的数量相等,这里为自动
worker_processes auto;

# errorlog文件位置
error_log /var/log/nginx/error.log;
# pid文件地址,记录了nginx的pid,方便进程管理
pid /run/nginx.pid;

# Load dynamic modules. See /usr/share/nginx/README.dynamic.
# 用来加载其他动态模块的配置
include /usr/share/nginx/modules/*.conf;

# 工作模式和连接数上限
events {
    # 每个worker_processes的最大并发链接数
    # 并发总数:worker_processes*worker_connections
    worker_connections 1024;
}

# 与提供http服务相关的一些配置参数类似的还有mail
http {
    # 设置日志的格式
    log_format  main  '$remote_addr - $remote_user [$time_local] "$request" '
                      '$status $body_bytes_sent "$http_referer" '
                      '"$http_user_agent" "$http_x_forwarded_for"';

    # access_log记录访问的用户、页面、浏览器、ip和其他的访问信息
    access_log  /var/log/nginx/access.log  main;

    # 这部分下面会单独解释
    # 设置nginx是否使用sendfile函数输出文件
    sendfile            on;
    # 数据包最大时发包(使用Nagle算法)
    tcp_nopush          on;
    # 立刻发送数据包(禁用Nagle算法)
    tcp_nodelay         on;
    # 链接超时时间
    keepalive_timeout   65;
    # 这个我也不清楚...
    types_hash_max_size 2048;

    # 引入文件扩展名与文件类型映射表
    include             /etc/nginx/mime.types;
    # 默认文件类型
    default_type        application/octet-stream;

    # Load modular configuration files from the /etc/nginx/conf.d directory.
    # See http://nginx.org/en/docs/ngx_core_module.html#include
    # for more information.
    include /etc/nginx/conf.d/*.conf;

    # http服务上支持若干虚拟主机。
    # 每个虚拟主机一个对应的server配置项
    # 配置项里面包含该虚拟主机相关的配置。
    server {
        # 端口
        listen       80 default_server;
        listen       [::]:80 default_server;
        # 访问的域名
        server_name  _;
        # 默认网站根目录(www目录)
        root         /usr/share/nginx/html;

        # Load configuration files for the default server block.

        include /etc/nginx/default.d/*.conf;

        # 默认请求
        location / {
        }

        # 错误页(404)
        error_page 404 /404.html;
            location = /40x.html {
        }

        # 错误页(50X)
        error_page 500 502 503 504 /50x.html;
            location = /50x.html {
        }
    }
}
php fastcgi配置。因为只是配置PHP的服务器,而且只使用一个端口所以只需要改动server部分。
server {
    listen       80 default_server;
    listen       [::]:80 default_server;
    # 这里改动了,也可以写你的域名
    server_name  192.168.17.26;

    # 默认网站根目录(www目录)
    root         /var/www/;

    # Load configuration files for the default server block.
    include /etc/nginx/default.d/*.conf;

    location / {
        # 这里改动了 定义首页索引文件的名称
        index index.php index.html index.htm;
    }

    error_page 404 /404.html;
        location = /40x.html {
    }

    error_page 500 502 503 504 /50x.html;
        location = /50x.html {
    }

    # 这里新加的
    # PHP 脚本请求全部转发到 FastCGI处理. 使用FastCGI协议默认配置.
    # Fastcgi服务器和程序(PHP,Python)沟通的协议.
    location ~ \.php$ {
        # 设置监听端口
        fastcgi_pass   127.0.0.1:9000;
        # 设置nginx的默认首页文件(上面已经设置过了,可以删除)
        fastcgi_index  index.php;
        # 设置脚本文件请求的路径
        fastcgi_param  SCRIPT_FILENAME  $document_root$fastcgi_script_name;
        # 引入fastcgi的配置文件
        include        fastcgi_params;
    }
}
关于fastcgi:fastcgi是一种进程管理器,管理cgi进程。市面上有多种实现了fastcgi功能的进程管理器,php-fpm就是其中的一种。
再提一点,php-fpm作为一种fast-cgi进程管理服务,会监听端口,一般默认监听9000端口,并且是监听本机,
也就是只接收来自本机的端口请求,所以我们通常输入命令 netstat -nlpt|grep php-fpm 会得到:
tcp 0 0 127.0.0.1:9000 0.0.0.0:* LISTEN 1057/php-fpm
这里的127.0.0.1:9000 就是监听本机9000端口的意思。
本地实例
我本地运行的是deepin OS,我们看一下自己的nginx配置。
cat /etc/nginx/nginx.conf
输出:
user www-data;
worker_processes auto;
pid /run/nginx.pid;
include /etc/nginx/modules-enabled/*.conf;

events {
    worker_connections 768;
    # multi_accept on;
}

http {

    ##
    # Basic Settings
    ##

    sendfile on;
    tcp_nopush on;
    tcp_nodelay on;
    keepalive_timeout 65;
    types_hash_max_size 2048;
    # server_tokens off;

    # server_names_hash_bucket_size 64;
    # server_name_in_redirect off;

    include /etc/nginx/mime.types;
    default_type application/octet-stream;

    ##
    # SSL Settings
    ##

    ssl_protocols TLSv1 TLSv1.1 TLSv1.2; # Dropping SSLv3, ref: POODLE
    ssl_prefer_server_ciphers on;

    ##
    # Logging Settings
    ##

    access_log /var/log/nginx/access.log;
    error_log /var/log/nginx/error.log;

    ##
    # Gzip Settings
    ##

    gzip on;
    gzip_disable "msie6";

    # gzip_vary on;
    # gzip_proxied any;
    # gzip_comp_level 6;
    # gzip_buffers 16 8k;
    # gzip_http_version 1.1;
    # gzip_types text/plain text/css application/json application/javascript text/xml application/xml application/xml+rss text/javascript;

    ##
    # Virtual Host Configs
    ##

    include /etc/nginx/conf.d/*.conf;
    include /etc/nginx/sites-enabled/*;

    # 具体项目nginx配置所在位置及文件
    include /var/www/vhost/*.conf;
}


#mail {
#    # See sample authentication script at:
#    # http://wiki.nginx.org/ImapAuthenticateWithApachePhpScript
#
#    # auth_http localhost/auth.php;
#    # pop3_capabilities "TOP" "USER";
#    # imap_capabilities "IMAP4rev1" "UIDPLUS";
#
#    server {
#        listen     localhost:110;
#        protocol   pop3;
#        proxy      on;
#    }
#
#    server {
#        listen     localhost:143;
#        protocol   imap;
#        proxy      on;
#    }
#}
看一下具体项目的配置:
cat /var/www/vhost/crm.host.conf
输出:
server {
    charset utf-8;
    client_max_body_size 128M;

    listen 80; ## listen for ipv4
    #listen [::]:80 default_server ipv6only=on; ## listen for ipv6

    server_name crm.host;
    root        /var/www/crm/web;
    index       index.php;

    access_log  /var/www/log/access/crm.host.log;
    error_log   /var/www/log/error/crm.host.log;

    location / {
        # Redirect everything that isn't a real file to index.php
        try_files $uri $uri/ /index.php$is_args$args;
    }

    # uncomment to avoid processing of calls to non-existing static files by Yii
    #location ~ \.(js|css|png|jpg|gif|swf|ico|pdf|mov|fla|zip|rar)$ {
    #    try_files $uri =404;
    #}
    #error_page 404 /404.html;

    location ~ \.php$ {
        include fastcgi_params;
        fastcgi_param SCRIPT_FILENAME $document_root$fastcgi_script_name;
        fastcgi_pass 127.0.0.1:9000;
        #fastcgi_pass unix:/var/run/php/php7.0-fpm.sock;
        try_files $uri =404;
    }

    location ~* /\. {
        deny all;
    }
}
https配置
nginx配置https:
server {
    listen 443 ssl;  # 1.1版本后这样写
    server_name www.domain.com; #填写绑定证书的域名
    ssl_certificate 1_www.domain.com_bundle.crt;  # 指定证书的位置,绝对路径
    ssl_certificate_key 2_www.domain.com.key;  # 绝对路径,同上
    ssl_session_timeout 5m;
    ssl_protocols TLSv1 TLSv1.1 TLSv1.2; #按照这个协议配置
    ssl_ciphers ECDHE-RSA-AES128-GCM-SHA256:HIGH:!aNULL:!MD5:!RC4:!DHE;#按照这个套件配置
    ssl_prefer_server_ciphers on;
    location / {
        root   html; #站点目录,绝对路径
        index  index.html index.htm;
    }
}
上面是静态网站的配置,如果是php项目,还需要配置FastCGI。
如果按照上面的配置访问yii2项目,在需要登录的页面会跳转到http协议的site/login地址,并没有跳转到https协议的地址,这不是我们想要的。 因为如果我们配置Nginx访问http地址时重定向到https地址,而因为没登录,又会被重定向到http地址,就会形成死循环。 追踪下逻辑。
在控制器基类BaseController中判断了用户身份:
public function behaviors()
{
    return [
        'access' => [
            'class' => AccessControl::className(),
            'rules' => [
                [
                    'allow' => true,
                    'roles' => ['@'],
                ],
            ],
        ],
    ];
}
yii\filters\AccessControl中对非认证用户进行了跳转处理:
<?php
/**
 * @link http://www.yiiframework.com/
 * @copyright Copyright (c) 2008 Yii Software LLC
 * @license http://www.yiiframework.com/license/
 */

namespace yii\filters;

use Yii;
use yii\base\Action;
use yii\base\ActionFilter;
use yii\di\Instance;
use yii\web\User;
use yii\web\ForbiddenHttpException;

/**
 * AccessControl provides simple access control based on a set of rules.
 *
 * AccessControl is an action filter. It will check its [[rules]] to find
 * the first rule that matches the current context variables (such as user IP address, user role).
 * The matching rule will dictate whether to allow or deny the access to the requested controller
 * action. If no rule matches, the access will be denied.
 *
 * To use AccessControl, declare it in the `behaviors()` method of your controller class.
 * For example, the following declarations will allow authenticated users to access the "create"
 * and "update" actions and deny all other users from accessing these two actions.
 *
 *
 * public function behaviors()
 * {
 *     return [
 *         'access' => [
 *             'class' => \yii\filters\AccessControl::className(),
 *             'only' => ['create', 'update'],
 *             'rules' => [
 *                 // deny all POST requests
 *                 [
 *                     'allow' => false,
 *                     'verbs' => ['POST']
 *                 ],
 *                 // allow authenticated users
 *                 [
 *                     'allow' => true,
 *                     'roles' => ['@'],
 *                 ],
 *                 // everything else is denied
 *             ],
 *         ],
 *     ];
 * }
 *
 *
 * @author Qiang Xue <qiang.xue@gmail.com>
 * @since 2.0
 */
class AccessControl extends ActionFilter
{
    /**
     * @var User|array|string the user object representing the authentication status or the ID of the user application component.
     * Starting from version 2.0.2, this can also be a configuration array for creating the object.
     */
    public $user = 'user';
    /**
     * @var callable a callback that will be called if the access should be denied
     * to the current user. If not set, [[denyAccess()]] will be called.
     *
     * The signature of the callback should be as follows:
     *
     * ```php
     * function ($rule, $action)
     * ```
     *
     * where `$rule` is the rule that denies the user, and `$action` is the current [[Action|action]] object.
     * `$rule` can be `null` if access is denied because none of the rules matched.
     */
    public $denyCallback;
    /**
     * @var array the default configuration of access rules. Individual rule configurations
     * specified via [[rules]] will take precedence when the same property of the rule is configured.
     */
    public $ruleConfig = ['class' => 'yii\filters\AccessRule'];
    /**
     * @var array a list of access rule objects or configuration arrays for creating the rule objects.
     * If a rule is specified via a configuration array, it will be merged with [[ruleConfig]] first
     * before it is used for creating the rule object.
     * @see ruleConfig
     */
    public $rules = [];


    /**
     * Initializes the [[rules]] array by instantiating rule objects from configurations.
     */
    public function init()
    {
        parent::init();
        $this->user = Instance::ensure($this->user, User::className());
        foreach ($this->rules as $i => $rule) {
            if (is_array($rule)) {
                $this->rules[$i] = Yii::createObject(array_merge($this->ruleConfig, $rule));
            }
        }
    }

    /**
     * This method is invoked right before an action is to be executed (after all possible filters.)
     * You may override this method to do last-minute preparation for the action.
     * @param Action $action the action to be executed.
     * @return bool whether the action should continue to be executed.
     */
    public function beforeAction($action)
    {
        $user = $this->user;
        $request = Yii::$app->getRequest();
        /* @var $rule AccessRule */
        foreach ($this->rules as $rule) {
            if ($allow = $rule->allows($action, $user, $request)) {
                return true;
            } elseif ($allow === false) {
                if (isset($rule->denyCallback)) {
                    call_user_func($rule->denyCallback, $rule, $action);
                } elseif ($this->denyCallback !== null) {
                    call_user_func($this->denyCallback, $rule, $action);
                } else {
                    $this->denyAccess($user);
                }
                return false;
            }
        }
        if ($this->denyCallback !== null) {
            call_user_func($this->denyCallback, null, $action);
        } else {
            $this->denyAccess($user);
        }
        return false;
    }

    /**
     * Denies the access of the user.
     * The default implementation will redirect the user to the login page if he is a guest;
     * if the user is already logged, a 403 HTTP exception will be thrown.
     * @param User $user the current user
     * @throws ForbiddenHttpException if the user is already logged in.
     */
    protected function denyAccess($user)
    {
        if ($user->getIsGuest()) {
            $user->loginRequired();
        } else {
            throw new ForbiddenHttpException(Yii::t('yii', 'You are not allowed to perform this action.'));
        }
    }
}
如果用户无权限访问该路径,则调用denyAccess方法,如果是访客则调用user组件的loginRequired方法:
/**
 * @var string|array the URL for login when [[loginRequired()]] is called.
 * If an array is given, [[UrlManager::createUrl()]] will be called to create the corresponding URL.
 * The first element of the array should be the route to the login action, and the rest of
 * the name-value pairs are GET parameters used to construct the login URL. For example,
 *
 *
 * ['site/login', 'ref' => 1]
 *
 *
 * If this property is `null`, a 403 HTTP exception will be raised when [[loginRequired()]] is called.
 */
public $loginUrl = ['site/login'];

/**
 * Redirects the user browser to the login page.
 *
 * Before the redirection, the current URL (if it's not an AJAX url) will be kept as [[returnUrl]] so that
 * the user browser may be redirected back to the current page after successful login.
 *
 * Make sure you set [[loginUrl]] so that the user browser can be redirected to the specified login URL after
 * calling this method.
 *
 * Note that when [[loginUrl]] is set, calling this method will NOT terminate the application execution.
 *
 * @param bool $checkAjax whether to check if the request is an AJAX request. When this is true and the request
 * is an AJAX request, the current URL (for AJAX request) will NOT be set as the return URL.
 * @param bool $checkAcceptHeader whether to check if the request accepts HTML responses. Defaults to `true`. When this is true and
 * the request does not accept HTML responses the current URL will not be SET as the return URL. Also instead of
 * redirecting the user an ForbiddenHttpException is thrown. This parameter is available since version 2.0.8.
 * @return Response the redirection response if [[loginUrl]] is set
 * @throws ForbiddenHttpException the "Access Denied" HTTP exception if [[loginUrl]] is not set or a redirect is
 * not applicable.
 */
public function loginRequired($checkAjax = true, $checkAcceptHeader = true)
{
    $request = Yii::$app->getRequest();
    $canRedirect = !$checkAcceptHeader || $this->checkRedirectAcceptable();
    if ($this->enableSession
        && $request->getIsGet()
        && (!$checkAjax || !$request->getIsAjax())
        && $canRedirect
    ) {
        $this->setReturnUrl($request->getUrl());
    }
    if ($this->loginUrl !== null && $canRedirect) {
        $loginUrl = (array) $this->loginUrl;
        if ($loginUrl[0] !== Yii::$app->requestedRoute) {
            return Yii::$app->getResponse()->redirect($this->loginUrl);
        }
    }
    throw new ForbiddenHttpException(Yii::t('yii', 'Login Required'));
}
再调用 Yii::$app->getResponse()->redirect($this->loginUrl); 实现重定向:
    /**
     * Redirects the browser to the specified URL.
     *
     * This method adds a "Location" header to the current response. Note that it does not send out
     * the header until [[send()]] is called. In a controller action you may use this method as follows:
     *
     * ```php
     * return Yii::$app->getResponse()->redirect($url);
     * ```
     *
     * In other places, if you want to send out the "Location" header immediately, you should use
     * the following code:
     *
     * ```php
     * Yii::$app->getResponse()->redirect($url)->send();
     * return;
     * ```
     *
     * In AJAX mode, this normally will not work as expected unless there are some
     * client-side JavaScript code handling the redirection. To help achieve this goal,
     * this method will send out a "X-Redirect" header instead of "Location".
     *
     * If you use the "yii" JavaScript module, it will handle the AJAX redirection as
     * described above. Otherwise, you should write the following JavaScript code to
     * handle the redirection:
     *
     * ```javascript
     * $document.ajaxComplete(function (event, xhr, settings) {
     *     var url = xhr && xhr.getResponseHeader('X-Redirect');
     *     if (url) {
     *         window.location = url;
     *     }
     * });
     * ```
     *
     * @param string|array $url the URL to be redirected to. This can be in one of the following formats:
     *
     * - a string representing a URL (e.g. "http://example.com")
     * - a string representing a URL alias (e.g. "@example.com")
     * - an array in the format of `[$route, ...name-value pairs...]` (e.g. `['site/index', 'ref' => 1]`).
     *   Note that the route is with respect to the whole application, instead of relative to a controller or module.
     *   [[Url::to()]] will be used to convert the array into a URL.
     *
     * Any relative URL will be converted into an absolute one by prepending it with the host info
     * of the current request.
     *
     * @param int $statusCode the HTTP status code. Defaults to 302.
     * See <http://www.w3.org/Protocols/rfc2616/rfc2616-sec10.html>
     * for details about HTTP status code
     * @param bool $checkAjax whether to specially handle AJAX (and PJAX) requests. Defaults to true,
     * meaning if the current request is an AJAX or PJAX request, then calling this method will cause the browser
     * to redirect to the given URL. If this is false, a `Location` header will be sent, which when received as
     * an AJAX/PJAX response, may NOT cause browser redirection.
     * Takes effect only when request header `X-Ie-Redirect-Compatibility` is absent.
     * @return $this the response object itself
     */
    public function redirect($url, $statusCode = 302, $checkAjax = true)
    {
        if (is_array($url) && isset($url[0])) {
            // ensure the route is absolute
            $url[0] = '/' . ltrim($url[0], '/');
        }
        $url = Url::to($url);
        if (strpos($url, '/') === 0 && strpos($url, '//') !== 0) {
            $url = Yii::$app->getRequest()->getHostInfo() . $url;
        }

        if ($checkAjax) {
            if (Yii::$app->getRequest()->getIsAjax()) {
                if (Yii::$app->getRequest()->getHeaders()->get('X-Ie-Redirect-Compatibility') !== null && $statusCode === 302) {
                    // Ajax 302 redirect in IE does not work. Change status code to 200. See https://github.com/yiisoft/yii2/issues/9670
                    $statusCode = 200;
                }
                if (Yii::$app->getRequest()->getIsPjax()) {
                    $this->getHeaders()->set('X-Pjax-Url', $url);
                } else {
                    $this->getHeaders()->set('X-Redirect', $url);
                }
            } else {
                $this->getHeaders()->set('Location', $url);
            }
        } else {
            $this->getHeaders()->set('Location', $url);
        }

        $this->setStatusCode($statusCode);

        return $this;
    }
在这里拼装url时,用到了 Yii::$app->getRequest()->getHostInfo() 方法:
    /**
     * Returns the schema and host part of the current request URL.
     *
     * The returned URL does not have an ending slash.
     *
     * By default this value is based on the user request information. This method will
     * return the value of `$_SERVER['HTTP_HOST']` if it is available or `$_SERVER['SERVER_NAME']` if not.
     * You may want to check out the [PHP documentation](http://php.net/manual/en/reserved.variables.server.php)
     * for more information on these variables.
     *
     * You may explicitly specify it by setting the [[setHostInfo()|hostInfo]] property.
     *
     * > Warning: Dependent on the server configuration this information may not be
     * > reliable and [may be faked by the user sending the HTTP request](https://www.acunetix.com/vulnerabilities/web/host-header-attack).
     * > If the webserver is configured to serve the same site independent of the value of
     * > the `Host` header, this value is not reliable. In such situations you should either
     * > fix your webserver configuration or explicitly set the value by setting the [[setHostInfo()|hostInfo]] property.
     * > If you don't have access to the server configuration, you can setup [[\yii\filters\HostControl]] filter at
     * > application level in order to protect against such kind of attack.
     *
     * @property string|null schema and hostname part (with port number if needed) of the request URL
     * (e.g. `http://www.yiiframework.com`), null if can't be obtained from `$_SERVER` and wasn't set.
     * See [[getHostInfo()]] for security related notes on this property.
     * @return string|null schema and hostname part (with port number if needed) of the request URL
     * (e.g. `http://www.yiiframework.com`), null if can't be obtained from `$_SERVER` and wasn't set.
     * @see setHostInfo()
     */
    public function getHostInfo()
    {
        if ($this->_hostInfo === null) {
            $secure = $this->getIsSecureConnection();
            $http = $secure ? 'https' : 'http';
            if (isset($_SERVER['HTTP_HOST'])) {
                $this->_hostInfo = $http . '://' . $_SERVER['HTTP_HOST'];
            } elseif (isset($_SERVER['SERVER_NAME'])) {
                $this->_hostInfo = $http . '://' . $_SERVER['SERVER_NAME'];
                $port = $secure ? $this->getSecurePort() : $this->getPort();
                if (($port !== 80 && !$secure) || ($port !== 443 && $secure)) {
                    $this->_hostInfo .= ':' . $port;
                }
            }
        }

        return $this->_hostInfo;
    }

    /**
     * Return if the request is sent via secure channel (https).
     * @return bool if the request is sent via secure channel (https)
     */
    public function getIsSecureConnection()
    {
        return isset($_SERVER['HTTPS']) && (strcasecmp($_SERVER['HTTPS'], 'on') === 0 || $_SERVER['HTTPS'] == 1)
            || isset($_SERVER['HTTP_X_FORWARDED_PROTO']) && strcasecmp($_SERVER['HTTP_X_FORWARDED_PROTO'], 'https') === 0;
    }

    /**
     * Returns the port to use for secure requests.
     * Defaults to 443, or the port specified by the server if the current
     * request is secure.
     * @return int port number for secure requests.
     * @see setSecurePort()
     */
    public function getSecurePort()
    {
        if ($this->_securePort === null) {
            $this->_securePort = $this->getIsSecureConnection() && isset($_SERVER['SERVER_PORT']) ? (int) $_SERVER['SERVER_PORT'] : 443;
        }

        return $this->_securePort;
    }
在这里看到了这几个$_SERVER属性:
$_SERVER['HTTPS']
$_SERVER['HTTP_X_FORWARDED_PROTO']
常规Nginx配置,这两个参数php-fpm是获取不到的,我们需要配置Nginx,让Nginx调用fastcgi时,把这个参数带过去。
追踪逻辑后,我们知道,这两个参数我们只要配置一个就可以了。
$_SERVER['HTTPS']配置
使用$_SERVER['HTTPS']来判断是http还是https,但在Nginx+PHP-FPM架构下,
nginx使用fastcgi_pass指令将请求传递给PHP-FPM,但是在使用fastcgi_pass时,Nginx默认不会将HTTPS传递给PHP-FPM。
修改方法如下:
方法1:增加 一个fastcgi_param 环境变量即可。
fastcgi_param HTTPS 'on';
将上述代码添加至网站对应的Nginx配置文件中。 但要注意,按我理解,这样也会导致一个问题。因为这种方式属于写死环境变量,在此环境变量生效的区域, 服务器无法判断是http请求还是https请求。如果你的站点两种请求都支持, 建议把两种请求的配置分开写, 类似与人工预设请求的类型。我的网站决定已经只支持https, 所以这种方式问题不大,http的请求也设置了跳转至https。所以我只需要是写在虚拟机配置文件中即可。
方法2:修改web程序的判断方式
不要只根据环境变量来判断,增加一个请求的端口的判断条件。 我们一般HTTP请求都使用80端口,而HTTPS则使用443端口。
$_SERVER['HTTP_X_FORWARDED_PROTO']配置
Nginx配置文件中增加一行 proxy_set_header X-Forwarded-Proto $scheme;
location ~ \.php$ {
    ...
    proxy_set_header X-Forwarded-Proto $scheme;
}
location配置
1.location 是在 server 块中配置。
2.可以根据不同的 URI 使用不同的配置(location 中配置),来处理不同的请求。
3.location 是有顺序的,会被第一个匹配的location 处理。
语法规则:
location [ = | ~ | ~* | ^~ ] uri { ... }location @name { ... }
| 规则 | 说明 |
|---|---|
location = /uri |
=开头表示精确匹配,只有完全匹配上才能生效 |
location ^~ /uri |
^~ 开头对URL路径进行前缀匹配,并且在正则之前 |
location ~ 正则表达式 |
~开头表示区分大小写的正则匹配 |
location ~* 正则表达式 |
~*开头表示不区分大小写的正则匹配 |
location !~ 正则表达式 |
!~区分大小写不匹配的正则 |
location !~* 正则表达式 |
!~*不区分大小写不匹配的正则 |
location /uri |
不带任何修饰符,也表示前缀匹配,但是在正则匹配之后 |
location / |
通用匹配,任何未匹配到其它location的请求都会匹配到,相当于switch中的default |
location @名称 |
nginx内部跳转 |
4、location匹配顺序
(location =) > (location 完整路径) > (location ^~ 路径) > (location ~,~* 正则顺序) > (location 部分起始路径) > (/)
1.首先匹配=
2.其次匹配^~
3.再其次按照配置文件的顺序进行正则匹配
4.最后是交给/进行通用匹配
提示:当有匹配成功时,立刻停止匹配,按照当前匹配规则处理请求
特别注意:
1、字符串匹配优先搜索,但是只是记录下最长的匹配 ( 如果 ^~ 是最长的匹配,则会直接命中,停止搜索正则 ), 然后继续搜索正则匹配,如果有正则匹配,则命中正则匹配,如果没有正则匹配,则命中最长的字符串匹配., 需要注意的是正则表达式按照配置文件里的顺序测试。找到第一个匹配的正则表达式将停止搜索。
2、一般情况下,匹配成功了普通字符串location后还会进行正则表达式location匹配。有两种方法改变这种行为, 其一就是使用“=”前缀,这时执行的是严格匹配,并且匹配成功后立即停止其他匹配,同时处理这个请求; 另外一种就是使用“^~”前缀,如果把这个前缀用于一个常规字符串,那么告诉nginx 如果路径匹配,那么不测试正则表达式。
location匹配的nginx变量是 $request_uri
3、location实例说明
(1)= 精确匹配
location = / {
    #规则
}

# 则匹配到 `http://www.example.com/` 这种请求。
(2)~ 大小写敏感
location ~ /Example/ {
        #规则
}

#请求示例
#http://www.example.com/Example/  [成功]
#http://www.example.com/example/  [失败]
(3)~* 大小写忽略
location ~* /Example/ {
            #规则
}

# 则会忽略 uri 部分的大小写
#http://www.example.com/Example/  [成功]
#http://www.example.com/example/  [成功]
(4)^~ 只匹配以 uri 开头
location ^~ /img/ {
        #规则
}

#以 /img/ 开头的请求,都会匹配上
#http://www.example.com/img/a.jpg   [成功]
#http://www.example.com/img/b.mp4 [成功]
(5)@ nginx内部跳转
location /img/ {
    error_page 404 @img_err;
}

location @img_err {
    # 规则
}

#以 /img/ 开头的请求,如果链接的状态为 404。则会匹配到 @img_err 这条规则上。
rewrite配置
rewrite功能就是使用nginx提供的全局变量或自己设置的变量,结合正则表达式和标记位实现URL重写以及重定向
比如:更换域名后需要保持旧的域名能跳转但新的域名上,某网页发生改变需要跳转到新的页面、网站防盗链等等需求。 具体可以参考下面案例中的 SEO优化、文件夹重写。
rewrite只能放在sever{},location{},if{}中,并且默认只能对域名后边的除去传递的参数外的字符起作用
| 字符 | 描述 |
|---|---|
| \ | 将后面接着的字符标记为一个特殊字符或一个原义字符或一个向后引用。如\n匹配一个换行符,而\$则匹配$ |
| ^ | 匹配输入字符串的起始位置 |
| $ | 匹配输入字符串的结束位置 |
| * | 匹配前面的字符零次或多次。如ol*能匹配o及ol、oll |
| + | 匹配前面的字符一次或多次。如ol+能匹配ol及oll、oll,但不能匹配o |
| ? | 匹配前面的字符零次或一次,例如do(es)?能匹配do或者does,?等效于{0,1} |
| . | 匹配除\n之外的任何单个字符,若要匹配包括\n在内的任意字符,请使用诸如[.\n] 之类的模式。 |
| (pattern) | 匹配括号内pattern并可以在后面获取对应的匹配,常用$0…$9属性获取小括号中的匹配内容,要匹配圆括号字符需要(Content) |
try_files配置
官网文档地址 http://nginx.org/en/docs/http/ngx_http_core_module.html#try_files
具体使用示例,可以看下 https://blog.csdn.net/zhuyongxin_6688/article/details/121408216
try_files是nginx中http_core核心模块所带的指令,主要是能替代一些rewrite的指令,提高解析效率。
1、try_files的语法规则:
- 格式1:
try_files file ... uri; - 格式2:
try_files file ... =code;
可应用的上下文:server,location段
2、try_files的语法解释: Checks the existence of files in the specified order and uses the first found file for request processing; the processing is performed in the current context. The path to a file is constructed from the fileparameter according to the root and alias directives. It is possible to check directory’s existence by specifying a slash at the end of a name, e.g. “$uri/”. If none of the files were found, an internal redirect to the uri specified in the last parameter is made
- 关键点1:按指定的file顺序查找存在的文件,并使用第一个找到的文件进行请求处理
- 关键点2:查找路径是按照给定的root或alias为根路径来查找的
- 关键点3:如果给出的file都没有匹配到,则重新请求最后一个参数给定的uri,就是新的location匹配
- 关键点4:如果是格式2,如果最后一个参数是 = 404 ,若给出的file都没有匹配到,则最后返回404的响应码
3、举例说明:
location /images/ {
    root /opt/html/;
    try_files $uri $uri/ /images/default,gif;
}
比如 请求 127.0.0.1/images/test.gif 会依次查找
- 文件
/opt/html/images/test.gif - 文件夹
/opt/html/images/test.gif/下的index文件 - 请求
127.0.0.1/images/default.gif
4、其他注意事项
1.try-files 如果不写上 $uri/,当直接访问一个目录路径时,并不会去匹配目录下的索引页
即 访问127.0.0.1/images/ 不会去访问 127.0.0.1/images/index.html
5、其他用法
location /{
    try_files /system/maintenance.html
              $uri $uri/index.html uri.html;
              @test
}

location @test {
    proxy_pass http://test;
}
以上中若未找到给定顺序的文件,则将会交给location @test处理(相当于匹配到了@test来匹配)
案例
SEO优化
要把一个 http://www.abc.com/tags.php?/xyz/ 的请求转发为 http://www.abc.com/tag/xyz/ ,Nginx中怎么配置?
这个处理了好长时间,首先想到的是:
rewrite ^/tags.php\?(.*)$ http://www.abc.com/tag$1 permanent;
结果发现请求时301到 http://www.abc.com/tag?/xyz/ ,没达到效果。查询好长时间后,发现是对 $query_string 请求参数进行匹配:
if ($query_string ~* "(/.*/)$") {
    set $a $1;
    rewrite ^/tags.php http://www.abc.com/tag$a? permanent;
}
现在再访问就可以了。
rewrite 那里只是对 $uri 进行匹配,不包含请求参数,所以总是不成功。
看一下Nginx中的参数。
 1 $args                    #请求中的参数值
 2 $query_string            #同 $args
 3 $arg_NAME                #GET请求中NAME的值
 4 $is_args                 #如果请求中有参数,值为"?",否则为空字符串
 5 $uri                     #请求中的当前URI(不带请求参数,参数位于$args),可以不同于浏览器传递的$request_uri的值,它可以通过内部重定向,或者使用index指令进行修改,$uri不包含主机名,如"/foo/bar.html"。
 6 $document_uri            #同 $uri
 7 $document_root           #当前请求的文档根目录或别名
 8 $host                    #优先级:HTTP请求行的主机名>"HOST"请求头字段>符合请求的服务器名.请求中的主机头字段,如果请求中的主机头不可用,则为服务器处理请求的服务器名称
 9 $hostname                #主机名
10 $https                   #如果开启了SSL安全模式,值为"on",否则为空字符串。
11 $binary_remote_addr      #客户端地址的二进制形式,固定长度为4个字节
12 $body_bytes_sent         #传输给客户端的字节数,响应头不计算在内;这个变量和Apache的mod_log_config模块中的"%B"参数保持兼容
13 $bytes_sent              #传输给客户端的字节数
14 $connection              #TCP连接的序列号
15 $connection_requests     #TCP连接当前的请求数量
16 $content_length          #"Content-Length" 请求头字段
17 $content_type            #"Content-Type" 请求头字段
18 $cookie_name             #cookie名称
19 $limit_rate              #用于设置响应的速度限制
20 $msec                    #当前的Unix时间戳
21 $nginx_version           #nginx版本
22 $pid                     #工作进程的PID
23 $pipe                    #如果请求来自管道通信,值为"p",否则为"."
24 $proxy_protocol_addr     #获取代理访问服务器的客户端地址,如果是直接访问,该值为空字符串
25 $realpath_root           #当前请求的文档根目录或别名的真实路径,会将所有符号连接转换为真实路径
26 $remote_addr             #客户端地址
27 $remote_port             #客户端端口
28 $remote_user             #用于HTTP基础认证服务的用户名
29 $request                 #代表客户端的请求地址
30 $request_body            #客户端的请求主体:此变量可在location中使用,将请求主体通过proxy_pass,fastcgi_pass,uwsgi_pass和scgi_pass传递给下一级的代理服务器
31 $request_body_file       #将客户端请求主体保存在临时文件中。文件处理结束后,此文件需删除。如果需要之一开启此功能,需要设置client_body_in_file_only。如果将次文件传 递给后端的代理服务器,需要禁用request body,即设置proxy_pass_request_body off,fastcgi_pass_request_body off,uwsgi_pass_request_body off,or scgi_pass_request_body off
32 $request_completion      #如果请求成功,值为"OK",如果请求未完成或者请求不是一个范围请求的最后一部分,则为空
33 $request_filename        #当前连接请求的文件路径,由root或alias指令与URI请求生成
34 $request_length          #请求的长度 (包括请求的地址,http请求头和请求主体)
35 $request_method          #HTTP请求方法,通常为"GET"或"POST"
36 $request_time            #处理客户端请求使用的时间,单位为秒,精度毫秒; 从读入客户端的第一个字节开始,直到把最后一个字符发送给客户端后进行日志写入为止。
37 $request_uri             #这个变量等于包含一些客户端请求参数的原始URI,它无法修改,请查看$uri更改或重写URI,不包含主机名,例如:"/cnphp/test.php?arg=freemouse"
38 $scheme                  #请求使用的Web协议,"http" 或 "https"
39 $server_addr             #服务器端地址,需要注意的是:为了避免访问linux系统内核,应将ip地址提前设置在配置文件中
40 $server_name             #服务器名
41 $server_port             #服务器端口
42 $server_protocol         #服务器的HTTP版本,通常为 "HTTP/1.0" 或 "HTTP/1.1"
43 $status                  #HTTP响应代码
44 $time_iso8601            #服务器时间的ISO 8610格式
45 $time_local              #服务器时间(LOG Format 格式)
46 $cookie_NAME             #客户端请求Header头中的cookie变量,前缀"$cookie_"加上cookie名称的变量,该变量的值即为cookie名称的值
47 $http_NAME               #匹配任意请求头字段;变量名中的后半部分NAME可以替换成任意请求头字段,如在配置文件中需要获取http请求头:"Accept-Language",$http_accept_language即可
48 $http_cookie        #请求的所有cookie
49 $http_host               #请求地址,即浏览器中你输入的地址(IP或域名)
50 $http_referer            #url跳转来源,用来记录从那个页面链接访问过来的
51 $http_user_agent         #用户终端浏览器等信息
52 $http_x_forwarded_for    #客户端的IP和代理服务器的IP,以逗号隔开;可伪造
53 $http_x_forwarded_proto  #请求的协议
54 $sent_http_NAME          #可以设置任意http响应头字段;变量名中的后半部分NAME可以替换成任意响应头字段,如需要设置响应头Content-length,$sent_http_content_length即可
55 $sent_http_cache_control
56 $sent_http_connection
57 $sent_http_content_type
58 $sent_http_keep_alive
59 $sent_http_last_modified
60 $sent_http_location
PHP中fastcgi_param对应参数:
fastcgi_param  SCRIPT_FILENAME    $document_root$fastcgi_script_name;#脚本文件请求的路径
fastcgi_param  QUERY_STRING       $query_string; #请求的参数;如?app=123
fastcgi_param  REQUEST_METHOD     $request_method; #请求的动作(GET,POST)
fastcgi_param  CONTENT_TYPE       $content_type; #请求头中的Content-Type字段
fastcgi_param  CONTENT_LENGTH     $content_length; #请求头中的Content-length字段。

fastcgi_param  SCRIPT_NAME        $fastcgi_script_name; #脚本名称
fastcgi_param  REQUEST_URI        $request_uri; #请求的地址不带参数
fastcgi_param  DOCUMENT_URI       $document_uri; #与$uri相同。
fastcgi_param  DOCUMENT_ROOT      $document_root; #网站的根目录。在server配置中root指令中指定的值
fastcgi_param  SERVER_PROTOCOL    $server_protocol; #请求使用的协议,通常是HTTP/1.0或HTTP/1.1。

fastcgi_param  GATEWAY_INTERFACE  CGI/1.1;#cgi 版本
fastcgi_param  SERVER_SOFTWARE    nginx/$nginx_version;#nginx 版本号,可修改、隐藏

fastcgi_param  REMOTE_ADDR        $remote_addr; #客户端IP
fastcgi_param  REMOTE_PORT        $remote_port; #客户端端口
fastcgi_param  SERVER_ADDR        $server_addr; #服务器IP地址
fastcgi_param  SERVER_PORT        $server_port; #服务器端口
fastcgi_param  SERVER_NAME        $server_name; #服务器名,域名在server配置中指定的server_name
反向代理
碰到一个需求,用FastAdmin框架开发了一个企业模块enterprise,需要用一个域名来直接访问该模块,这里就需要用到反向代理。
下面说下宝塔中的实现。
- 在宝塔页面 - 网站 - 添加站点 进行 创建站点 操作,如配置域名 enterprise.test.com;
- 点击该条记录后的 设置 按钮,在 伪静态 中写入内容,如:
location / { proxy_pass https://test.com/enterprise; } location /enterprise { proxy_pass https://test.com/enterprise; } location /assets { proxy_pass https://test.com/assets; } - 在宝塔首页,点击 Nginx 图标,在弹出页选择 服务,点击 重载配置,然后浏览器访问 域名 enterprise.test.com,查看效果。
文件夹重写
碰到这样一个需求,访问时从项目下一个文件夹跳转到项目下另一个文件夹, 如访问 http://www.test.com/old_folder/abc.html 到 http://www.test.com/new_folder/abc.html
配置:
location /project/old_folder {
    rewrite ^/project/old_folder/(.*) /project/new_folder/$1 redirect;
}
- rewrite:表示这是一个重写规则;
^/project/old_folder/(.*):表示匹配以/project/old_folder/开头的请求,并捕获其中的任意字符作为$1;/project/new_folder/$1:表示将匹配到的请求重写为/project/new_folder/,并将之前捕获的$1作为新路径的一部分;- redirect:表示这是一个临时重定向,浏览器将在请求新路径后继续使用旧路径进行缓存和其他操作。
或者直接写项目绝对路径:
location ^~ /old_folder/ {
    rewrite /www/wwwroot/test/new_folder permanent;
}
nginx 下rewrite 中 redirect 和 permanent 有什么区别?
在 nginx 的 rewrite 规则中,redirect 和 permanent 都是重定向标志,但它们之间有一些区别。
- redirect:表示这是一个临时重定向,浏览器将在请求新路径后继续使用旧路径进行缓存和其他操作。 这是默认的重定向标志,如果没有指定标志,nginx 将使用 redirect。
- permanent:表示这是一个永久重定向,浏览器将在新路径请求后删除旧路径,并将新路径用于缓存和其他操作。 使用 permanent 标志可以告诉浏览器,这个重定向是永久的,而不是临时的。
在实践中,使用 permanent 标志通常更为合适,因为它可以确保浏览器在请求新路径后不再使用旧路径。 而使用 redirect 标志可能会导致浏览器在后续请求中仍然使用旧路径,这可能会影响缓存和其他操作的效果。
docker伪静态配置
我们在docker环境中使用伪静态方式部署一个项目test,下面看下示例配置:
server {
    listen       80;
    server_name test.test;

    #charset koi8-r;
    #access_log  /var/log/nginx/host.access.log  main;

    location / {
        root   /usr/share/nginx/html/test;
        index  index.php;
        if (!-e $request_filename) {
               rewrite  ^(.*)$  /index.php?s=/$1  last;
               break;
         }
    }

    #error_page  404              /404.html;

    # redirect server error pages to the static page /50x.html
    #
    error_page   500 502 503 504  /50x.html;
    location = /50x.html {
        root   /usr/share/nginx/html;
    }

    # proxy the PHP scripts to Apache listening on 127.0.0.1:80
    #
    #location ~ \.php$ {
    #    proxy_pass   http://127.0.0.1;
    #}

    # pass the PHP scripts to FastCGI server listening on 127.0.0.1:9000
    #
    location ~ \.php$ {
        root   /var/www/html/test;
        fastcgi_pass   php:9000;
        fastcgi_param  SCRIPT_FILENAME  $document_root$fastcgi_script_name;
        include        fastcgi_params;
    }

    # deny access to .htaccess files, if Apache's document root
    # concurs with nginx's one
    #
    #location ~ /\.ht {
    #    deny  all;
    #}
}
FastAdmin项目部署
我们在docker环境中部署FastAdmin项目fastadmin_test_231207,因为前台和API支持伪静态, 后台禁用了路由,需要分开配置,下面看下示例配置:
server {
    listen       80;
    server_name fastadmin_test_231207.test;
    root   /usr/share/nginx/www/fastadmin_test_231207/public;

    #charset koi8-r;
    #access_log  /var/log/nginx/host.access.log  main;

    location / {
        index  index.php;
        if (!-e $request_filename) {
               rewrite  ^(.*)$  /index.php?s=/$1  last;
               break;
         }
    }

    #error_page  404              /404.html;

    # redirect server error pages to the static page /50x.html
    #
    error_page   500 502 503 504  /50x.html;
    location = /50x.html {
        root   /usr/share/nginx/html;
    }

    # proxy the PHP scripts to Apache listening on 127.0.0.1:80
    #
    #location ~ \.php$ {
    #    proxy_pass   http://127.0.0.1;
    #}

    # pass the PHP scripts to FastCGI server listening on 127.0.0.1:9000
    #
    location ~ \.php(.*)$ {
        fastcgi_pass   php:9000;
        root   /var/www/html/fastadmin_test_231207/public;
        fastcgi_param  SCRIPT_FILENAME  $document_root$fastcgi_script_name;
        fastcgi_param  PATH_INFO  $1;
        include        fastcgi_params;
    }

    # deny access to .htaccess files, if Apache's document root
    # concurs with nginx's one
    #
    #location ~ /\.ht {
    #    deny  all;
    #}
}
重点注意 location ~ \.php(.*)$ 和 fastcgi_param PATH_INFO $1; 。
参考资料
Nginx官网 http://nginx.org/
Nginx 安装配置 https://www.runoob.com/linux/nginx-install-setup.html
Nginx 配置详解 https://www.runoob.com/w3cnote/nginx-setup-intro.html
Nginx和PHP的配置 https://www.jianshu.com/p/39ae9f01d127
Nginx与php工作原理 https://www.jianshu.com/p/d0b858ed5030
Nginx+php 架构下解决不输出 $_SERVER[‘HTTPS’] 问题 https://www.cnblogs.com/centos-python/articles/11068301.html
Nginx配置X-Forwarded-Proto https://blog.csdn.net/weixin_30598225/article/details/97532885
Nginx配置https证书 https://www.cnblogs.com/chnmig/p/10343890.html
nginx中location配置及匹配详解 https://blog.51cto.com/longlei/2142957
Nginx URL重写(rewrite)配置及信息详解 https://blog.csdn.net/hejingdong123/article/details/108345326
nginx配置location总结及rewrite规则写法 https://segmentfault.com/a/1190000002797606
Nginx中location匹配及rewrite重写 https://blog.51cto.com/u_15060510/4256242
Nginx 变量参数 https://www.cnblogs.com/linguoguo/p/11547822.html
Nginx配置反向代理 https://www.cnblogs.com/LiPengFeiii/p/15419676.html
宝塔面板使用Nginx反向代理解决跨域问题 https://blog.csdn.net/SoSalty/article/details/125580039
nginx日常报错解决 https://www.cnblogs.com/chengjiawei/p/15813657.html
nginx配置php服务(多个) https://mp.weixin.qq.com/s/oxHdVj7cJTlPHFgGEW6fWQ