正文
在VirtualBox官网下载最新版 Oracle VM VirtualBox 安装。
在Centos官网下载iso安装包 Centos download ,保存到指定位置。
安装
启动 VirtualBox,点击新建:
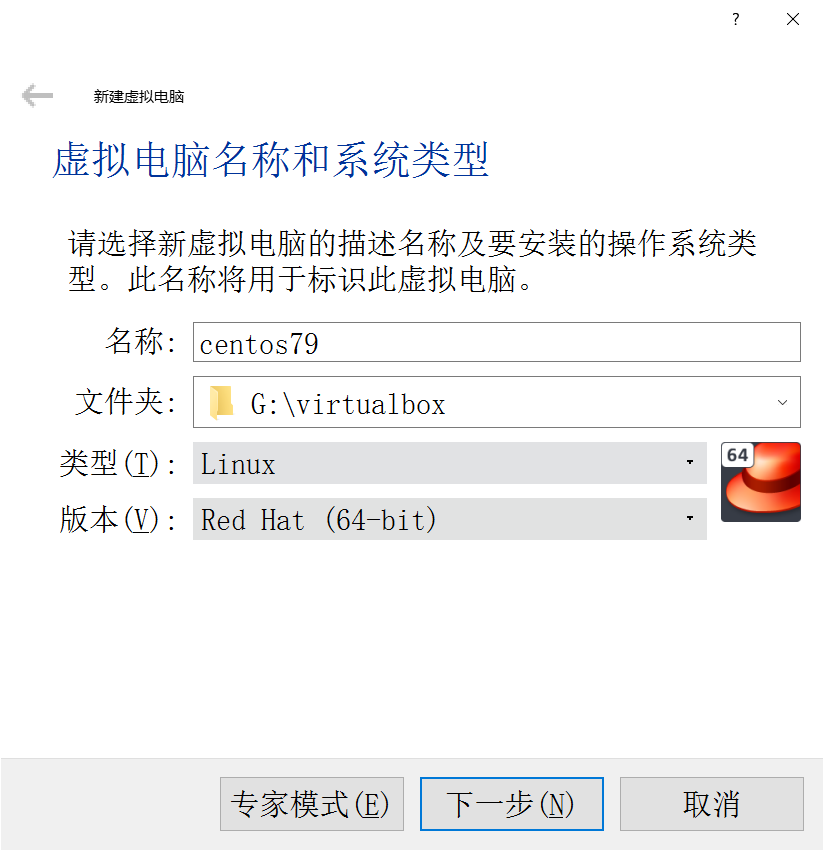
下一步,选择内存大小,如为 4096 MB。
下一步,虚拟硬盘,选择 现在创建虚拟硬盘;下一步,虚拟硬盘,选择 VDI(VirtualBox 磁盘映像); 下一步,存储在物理硬盘上,选择 动态分配(D);下一步,文件位置和大小,如配置为 20.00 GB。
点击创建,完成容器创建。
点击该容器,点击 设置,点击 存储:
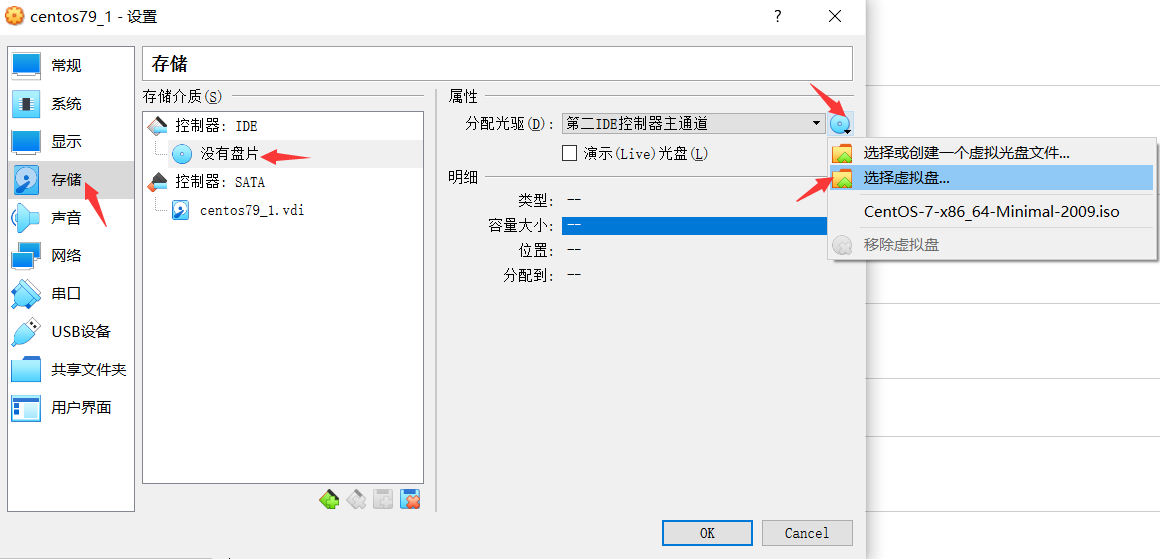
选中自己保存的 iso安装包。点击 OK 返回。
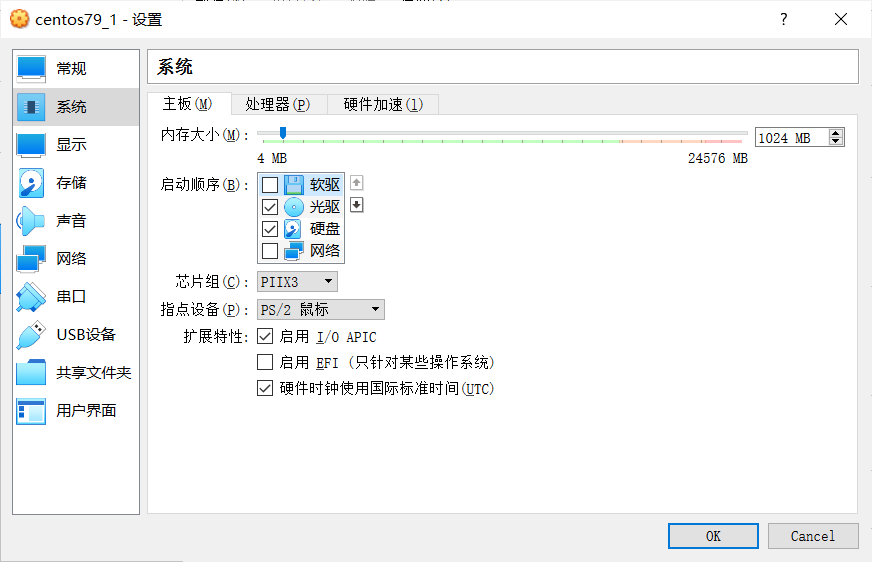
点击该容器,点击 设置,点击 系统,在 主板 配置启动顺序:
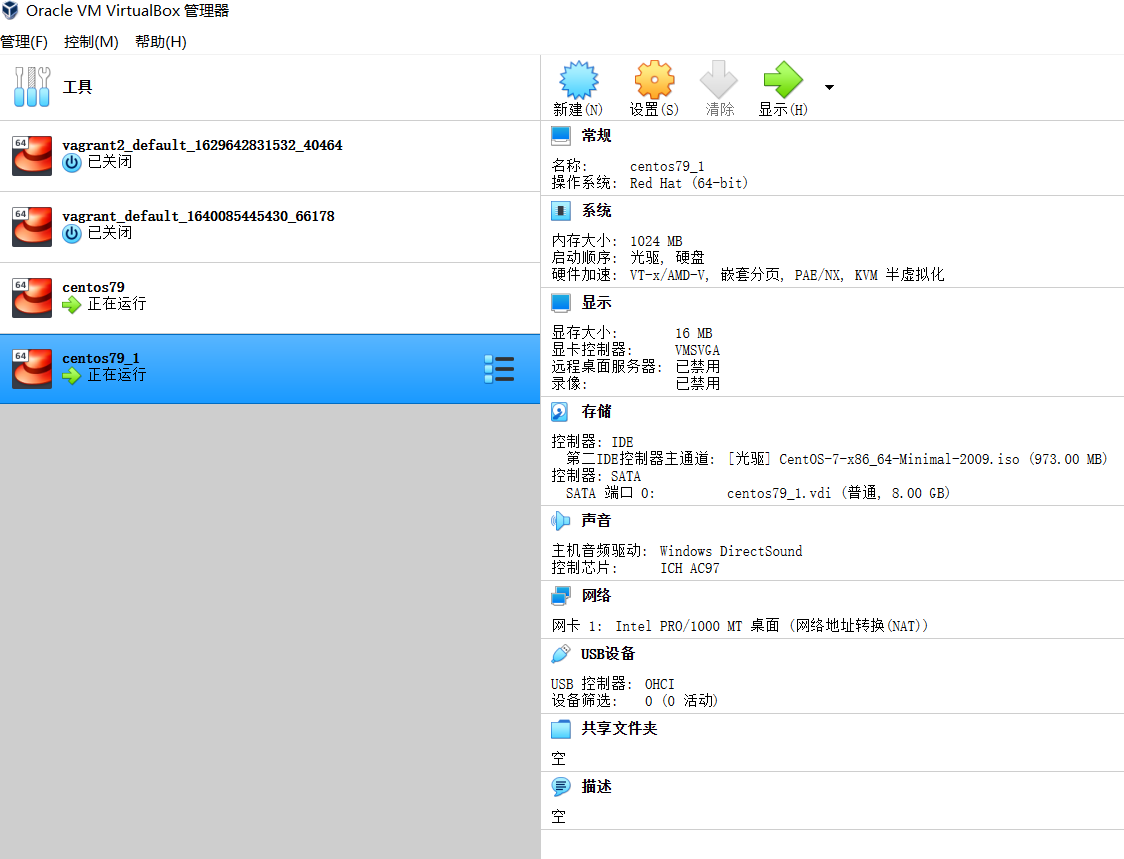
看一下详细信息:
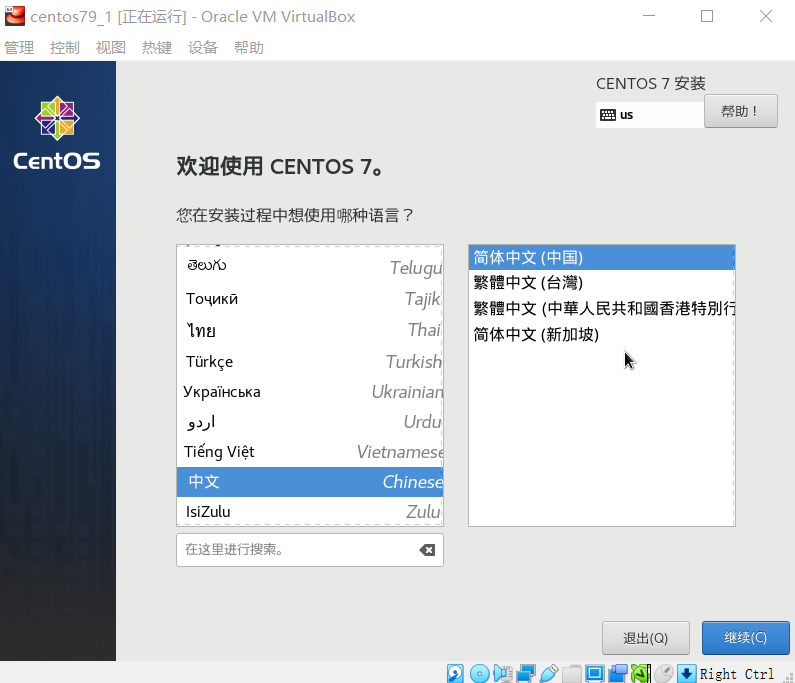
点击 启动,进行安装,选择 中文(中国):
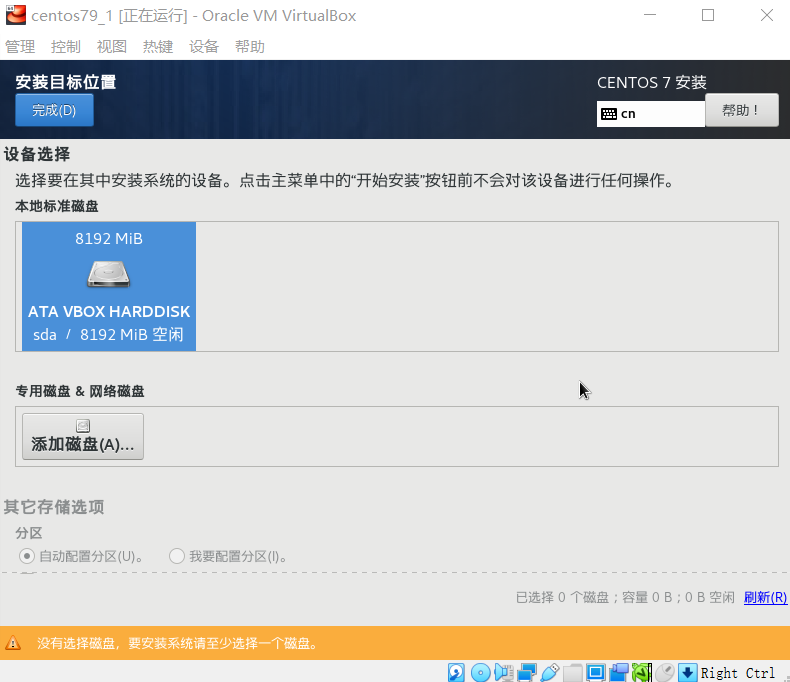
系统 安装位置(D) ,选择我们分配的硬盘:
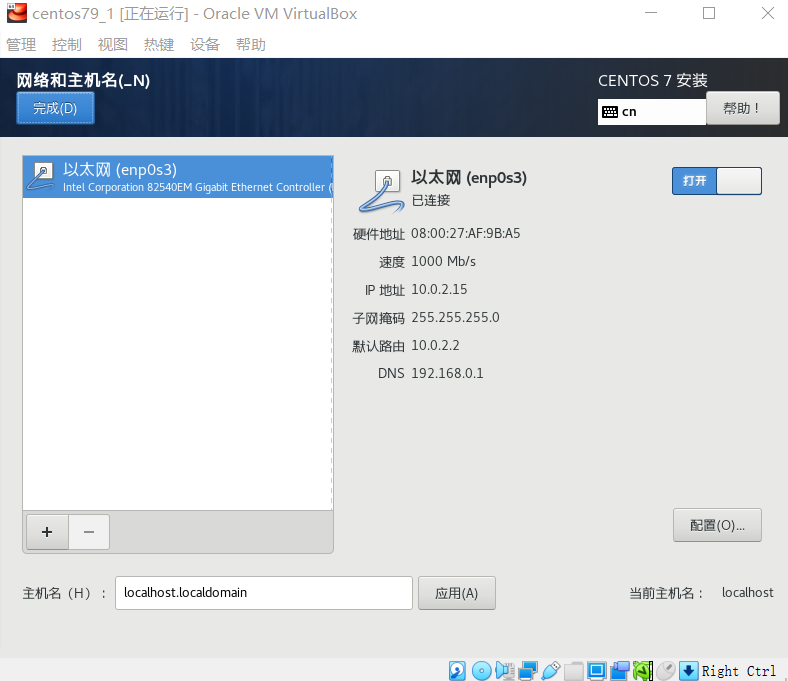
系统 网络和主机名(N) ,选中网卡,切换到 打开 状态:
开始安装。
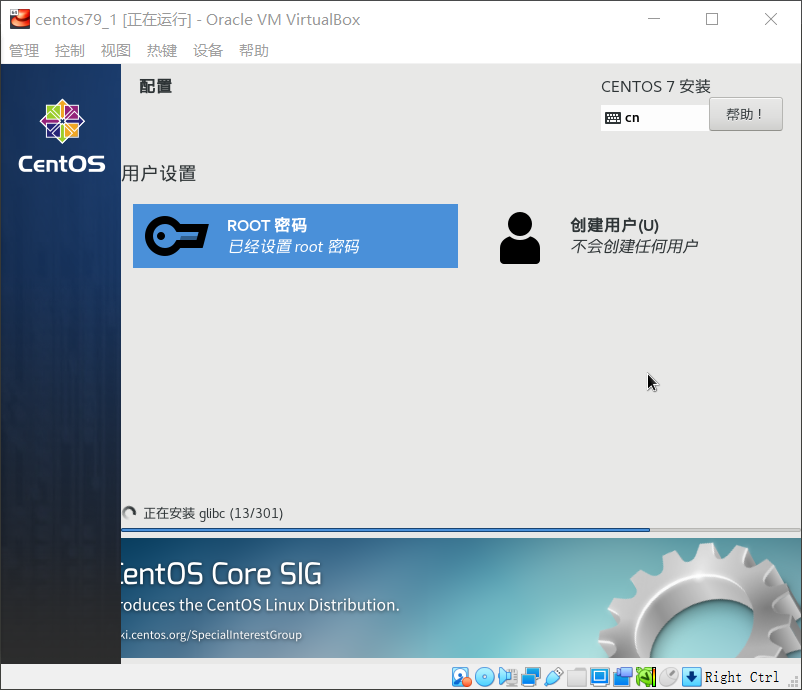
安装过程中,设置 ROOT密码:
等待安装完成,点击 重启。
输入ROOT账号密码登录。
安装 wget:
yum install -y wget
安装 vim:
yum install -y vim
安装 gcc:
yum install -y gcc gcc-devel gcc-c++ gcc-c++-devel make kernel kernel-devel bzip2
网络配置
查看网卡:
ip addr
[root@localhost ~]# ip addr
1: lo: <LOOPBACK,UP,LOWER_UP> mtu 65536 qdisc noqueue state UNKNOWN group default qlen 1000
    link/loopback 00:00:00:00:00:00 brd 00:00:00:00:00:00
    inet 127.0.0.1/8 scope host lo
       valid_lft forever preferred_lft forever
    inet6 ::1/128 scope host
       valid_lft forever preferred_lft forever
2: enp0s3: <BROADCAST,MULTICAST,UP,LOWER_UP> mtu 1500 qdisc pfifo_fast state UP group default qlen 1000
    link/ether 08:00:27:43:ae:ba brd ff:ff:ff:ff:ff:ff
    inet 10.0.2.15/24 brd 10.0.2.255 scope global noprefixroute dynamic enp0s3
       valid_lft 81574sec preferred_lft 81574sec
    inet6 fe80::b3c6:7975:e3ea:3dc9/64 scope link noprefixroute
       valid_lft forever preferred_lft forever
[root@localhost ~]#
我们可以访问外网:
ping www.baidu.com
但主机无法访问虚拟机,需要配置。
关机,一般是关闭虚拟机窗口,选择 正常关闭。
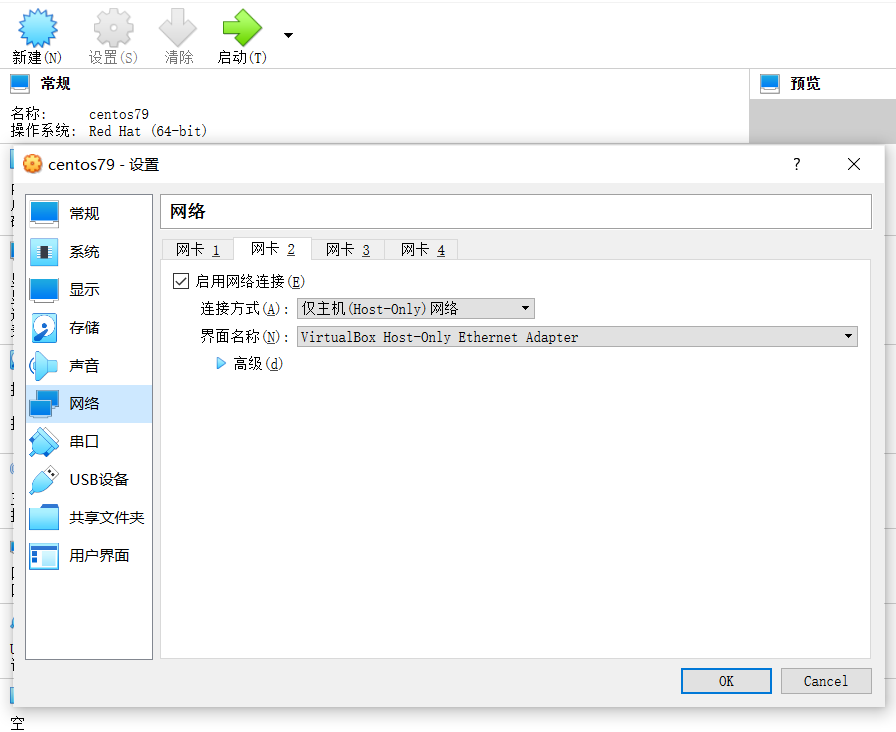
点击该容器,点击 设置,点击 网络,启用 网卡2,选择 Host-Only 网络:
配置网卡:
cd /etc/sysconfig/network-scripts
ls
[root@localhost ~]# cd /etc/sysconfig/network-scripts/
[root@localhost network-scripts]#
[root@localhost network-scripts]# ls
ifcfg-enp0s3  ifdown-bnep  ifdown-isdn    ifdown-sit       ifup          ifup-ippp  ifup-plusb   ifup-sit       ifup-wireless
ifcfg-lo      ifdown-eth   ifdown-post    ifdown-Team      ifup-aliases  ifup-ipv6  ifup-post    ifup-Team      init.ipv6-global
ifdown        ifdown-ippp  ifdown-ppp     ifdown-TeamPort  ifup-bnep     ifup-isdn  ifup-ppp     ifup-TeamPort  network-functions
              ifdown-ipv6  ifdown-routes  ifdown-tunnel    ifup-eth      ifup-plip  ifup-routes  ifup-tunnel    network-functions-ipv6
[root@localhost network-scripts]#
复制网卡配置文件:
cp ifcfg-enp0s3 ifcfg-enp0s8
编辑网卡配置文件:
vi ifcfg-enp0s8
在 VirtualBox管理器 管理 - 主机网络管理器 查看主机网卡IP 为 192.168.56.1,这里配置虚拟机的IP,如配置IP为 192.168.56.108:
TYPE="Ethernet"
PROXY_METHOD="none"
BROWSER_ONLY="no"
BOOTPROTO="static"
DEFROUTE="yes"
IPV4_FAILURE_FATAL="no"
IPV6INIT="yes"
IPV6_AUTOCONF="yes"
IPV6_DEFROUTE="yes"
IPV6_FAILURE_FATAL="no"
IPV6_ADDR_GEN_MODE="stable-privacy"
NAME="enp0s8"
UUID="2c874efd8-469f-4991-bfe0-6dd215c8de7d"
DEVICE="enp0s8"
ONBOOT="yes"
IPADDR=192.168.56.108
GATEWAY=192.168.56.1
NETMASK=255.255.255.0
重载网卡配置:
nmcli c reload
重启网络服务或重启系统(reboot):
> systemctl restart netwoek
查看网卡:
ip addr
[root@localhost ~]# ip addr
1: lo: <LOOPBACK,UP,LOWER_UP> mtu 65536 qdisc noqueue state UNKNOWN group default qlen 1000
    link/loopback 00:00:00:00:00:00 brd 00:00:00:00:00:00
    inet 127.0.0.1/8 scope host lo
       valid_lft forever preferred_lft forever
    inet6 ::1/128 scope host
       valid_lft forever preferred_lft forever
2: enp0s3: <BROADCAST,MULTICAST,UP,LOWER_UP> mtu 1500 qdisc pfifo_fast state UP group default qlen 1000
    link/ether 08:00:27:9a:f5:c4 brd ff:ff:ff:ff:ff:ff
    inet 10.0.2.15/24 brd 10.0.2.255 scope global noprefixroute dynamic enp0s3
       valid_lft 83148sec preferred_lft 83148sec
    inet6 fe80::c8da:b480:5500:c6e/64 scope link noprefixroute
       valid_lft forever preferred_lft forever
3: enp0s8: <BROADCAST,MULTICAST,UP,LOWER_UP> mtu 1500 qdisc pfifo_fast state UP group default qlen 1000
    link/ether 08:00:27:20:68:ab brd ff:ff:ff:ff:ff:ff
    inet 192.168.56.108/24 brd 192.168.56.255 scope global noprefixroute enp0s8
       valid_lft forever preferred_lft forever
    inet6 fe80::f458:be7a:2271:ab78/64 scope link noprefixroute
       valid_lft forever preferred_lft forever
[root@localhost ~]#
SSH 连接
查看 SSH 服务状态:
systemctl status sshd
[root@localhost ~]# systemctl status sshd
● sshd.service - OpenSSH server daemon
   Loaded: loaded (/usr/lib/systemd/system/sshd.service; enabled; vendor preset: enabled)
   Active: active (running) since 三 2022-02-16 09:35:05 CST; 1h 14min ago
     Docs: man:sshd(8)
           man:sshd_config(5)
 Main PID: 1130 (sshd)
   CGroup: /system.slice/sshd.service
           └─1130 /usr/sbin/sshd -D

2月 16 09:35:05 localhost.localdomain systemd[1]: Starting OpenSSH server daemon...
2月 16 09:35:05 localhost.localdomain sshd[1130]: Server listening on 0.0.0.0 port 22.
2月 16 09:35:05 localhost.localdomain sshd[1130]: Server listening on :: port 22.
2月 16 09:35:05 localhost.localdomain systemd[1]: Started OpenSSH server daemon.
[root@localhost ~]#
如果未安装,安装:
yum install -y openssh-server
如果未启动,设置开机自启动:
systemctl enable sshd
也可以直接启动:
systemctl start sshd
我们可以看一下SSH的服务配置:
cat /etc/ssh/sshd_config
[root@localhost ~]# cat /etc/ssh/sshd_config
#       $OpenBSD: sshd_config,v 1.100 2016/08/15 12:32:04 naddy Exp $

# This is the sshd server system-wide configuration file.  See
# sshd_config(5) for more information.

# This sshd was compiled with PATH=/usr/local/bin:/usr/bin

# The strategy used for options in the default sshd_config shipped with
# OpenSSH is to specify options with their default value where
# possible, but leave them commented.  Uncommented options override the
# default value.

# If you want to change the port on a SELinux system, you have to tell
# SELinux about this change.
# semanage port -a -t ssh_port_t -p tcp #PORTNUMBER
#
#Port 22
#AddressFamily any
#ListenAddress 0.0.0.0
#ListenAddress ::

HostKey /etc/ssh/ssh_host_rsa_key
#HostKey /etc/ssh/ssh_host_dsa_key
HostKey /etc/ssh/ssh_host_ecdsa_key
HostKey /etc/ssh/ssh_host_ed25519_key

# Ciphers and keying
#RekeyLimit default none

# Logging
#SyslogFacility AUTH
SyslogFacility AUTHPRIV
#LogLevel INFO

# Authentication:

#LoginGraceTime 2m
#PermitRootLogin yes
#StrictModes yes
#MaxAuthTries 6
#MaxSessions 10

#PubkeyAuthentication yes

# The default is to check both .ssh/authorized_keys and .ssh/authorized_keys2
# but this is overridden so installations will only check .ssh/authorized_keys
AuthorizedKeysFile      .ssh/authorized_keys

#AuthorizedPrincipalsFile none

#AuthorizedKeysCommand none
#AuthorizedKeysCommandUser nobody

# For this to work you will also need host keys in /etc/ssh/ssh_known_hosts
#HostbasedAuthentication no
# Change to yes if you don't trust ~/.ssh/known_hosts for
# HostbasedAuthentication
#IgnoreUserKnownHosts no
# Don't read the user's ~/.rhosts and ~/.shosts files
#IgnoreRhosts yes

# To disable tunneled clear text passwords, change to no here!
#PasswordAuthentication yes
#PermitEmptyPasswords no
PasswordAuthentication yes

# Change to no to disable s/key passwords
#ChallengeResponseAuthentication yes
ChallengeResponseAuthentication no

# Kerberos options
#KerberosAuthentication no
#KerberosOrLocalPasswd yes
#KerberosTicketCleanup yes
#KerberosGetAFSToken no
#KerberosUseKuserok yes

# GSSAPI options
GSSAPIAuthentication yes
GSSAPICleanupCredentials no
#GSSAPIStrictAcceptorCheck yes
#GSSAPIKeyExchange no
#GSSAPIEnablek5users no

# Set this to 'yes' to enable PAM authentication, account processing,
# and session processing. If this is enabled, PAM authentication will
# be allowed through the ChallengeResponseAuthentication and
# PasswordAuthentication.  Depending on your PAM configuration,
# PAM authentication via ChallengeResponseAuthentication may bypass
# the setting of "PermitRootLogin without-password".
# If you just want the PAM account and session checks to run without
# PAM authentication, then enable this but set PasswordAuthentication
# and ChallengeResponseAuthentication to 'no'.
# WARNING: 'UsePAM no' is not supported in Red Hat Enterprise Linux and may cause several
# problems.
UsePAM yes

#AllowAgentForwarding yes
#AllowTcpForwarding yes
#GatewayPorts no
X11Forwarding yes
#X11DisplayOffset 10
#X11UseLocalhost yes
#PermitTTY yes
#PrintMotd yes
#PrintLastLog yes
#TCPKeepAlive yes
#UseLogin no
#UsePrivilegeSeparation sandbox
#PermitUserEnvironment no
#Compression delayed
#ClientAliveInterval 0
#ClientAliveCountMax 3
#ShowPatchLevel no
#UseDNS yes
#PidFile /var/run/sshd.pid
#MaxStartups 10:30:100
#PermitTunnel no
#ChrootDirectory none
#VersionAddendum none

# no default banner path
#Banner none

# Accept locale-related environment variables
AcceptEnv LANG LC_CTYPE LC_NUMERIC LC_TIME LC_COLLATE LC_MONETARY LC_MESSAGES
AcceptEnv LC_PAPER LC_NAME LC_ADDRESS LC_TELEPHONE LC_MEASUREMENT
AcceptEnv LC_IDENTIFICATION LC_ALL LANGUAGE
AcceptEnv XMODIFIERS

# override default of no subsystems
Subsystem       sftp    /usr/libexec/openssh/sftp-server

# Example of overriding settings on a per-user basis
#Match User anoncvs
#       X11Forwarding no
#       AllowTcpForwarding no
#       PermitTTY no
#       ForceCommand cvs server
[root@localhost ~]#
在主机用 putty 连接虚拟机。
共享文件夹

一番瞎折腾:
[root@localhost ~]# df
文件系统                   1K-块    已用     可用 已用% 挂载点
devtmpfs                 2960176       0  2960176    0% /dev
tmpfs                    2972164       0  2972164    0% /dev/shm
tmpfs                    2972164    8812  2963352    1% /run
tmpfs                    2972164       0  2972164    0% /sys/fs/cgroup
/dev/mapper/centos-root 17811456 2004672 15806784   12% /
/dev/sda1                1038336  184876   853460   18% /boot
tmpfs                     594436       0   594436    0% /run/user/0
[root@localhost ~]#
[root@localhost ~]#
[root@localhost ~]#
[root@localhost ~]# lsscsi
[0:0:0:0]    cd/dvd  VBOX     CD-ROM           1.0   /dev/sr0
[2:0:0:0]    disk    ATA      VBOX HARDDISK    1.0   /dev/sda
[root@localhost ~]#
[root@localhost ~]# mkdir -p /var/www
[root@localhost ~]#
[root@localhost ~]# ll /var/www
总用量 0
[root@localhost ~]#
[root@localhost ~]# mount /dev/sr0 /var/www
mount: /dev/sr0 写保护,将以只读方式挂载
[root@localhost ~]#
[root@localhost ~]# ll /var/www
总用量 46893
-r--r--r--. 1 root root      763 2月  20 2020 AUTORUN.INF
-r-xr-xr-x. 1 root root     6384 7月  29 2021 autorun.sh
dr-xr-xr-x. 2 root root      792 7月  29 2021 cert
dr-xr-xr-x. 2 root root     1824 7月  29 2021 NT3x
dr-xr-xr-x. 2 root root     2652 7月  29 2021 OS2
-r-xr-xr-x. 1 root root     4821 7月  29 2021 runasroot.sh
-r--r--r--. 1 root root      547 7月  29 2021 TRANS.TBL
-r--r--r--. 1 root root  3992706 7月  29 2021 VBoxDarwinAdditions.pkg
-r-xr-xr-x. 1 root root     3949 7月  29 2021 VBoxDarwinAdditionsUninstall.tool
-r-xr-xr-x. 1 root root  7433652 7月  29 2021 VBoxLinuxAdditions.run
-r--r--r--. 1 root root  9411584 7月  29 2021 VBoxSolarisAdditions.pkg
-r-xr-xr-x. 1 root root 16889104 7月  29 2021 VBoxWindowsAdditions-amd64.exe
-r-xr-xr-x. 1 root root   270840 7月  29 2021 VBoxWindowsAdditions.exe
-r-xr-xr-x. 1 root root  9995064 7月  29 2021 VBoxWindowsAdditions-x86.exe
[root@localhost ~]#
[root@localhost ~]# unmount /dev/sr0
-bash: unmount: 未找到命令
[root@localhost ~]#
[root@localhost ~]# umount /dev/sr0
[root@localhost ~]#
[root@localhost ~]# ll /var/www
总用量 0
[root@localhost ~]#
[root@localhost ~]# ll /media
总用量 0
[root@localhost ~]#
[root@localhost ~]# mkdir -p /media/cdrom
[root@localhost ~]#
[root@localhost ~]# ll /media
总用量 0
drwxr-xr-x. 2 root root 6 2月  16 21:39 cdrom
[root@localhost ~]#
[root@localhost ~]# mount /dev/sr0 /media/cdrom
mount: /dev/sr0 写保护,将以只读方式挂载
[root@localhost ~]#
[root@localhost ~]# umount /dev/sr0
[root@localhost ~]#
[root@localhost ~]# chmod 0777 /media/cdrom/
[root@localhost ~]#
[root@localhost ~]# ll /media
总用量 0
drwxrwxrwx. 2 root root 6 2月  16 21:39 cdrom
[root@localhost ~]#
[root@localhost ~]# mount /dev/sr0 /media/cdrom
mount: /dev/sr0 写保护,将以只读方式挂载
[root@localhost ~]#
[root@localhost ~]# ll /media/cdrom/
总用量 46893
-r--r--r--. 1 root root      763 2月  20 2020 AUTORUN.INF
-r-xr-xr-x. 1 root root     6384 7月  29 2021 autorun.sh
dr-xr-xr-x. 2 root root      792 7月  29 2021 cert
dr-xr-xr-x. 2 root root     1824 7月  29 2021 NT3x
dr-xr-xr-x. 2 root root     2652 7月  29 2021 OS2
-r-xr-xr-x. 1 root root     4821 7月  29 2021 runasroot.sh
-r--r--r--. 1 root root      547 7月  29 2021 TRANS.TBL
-r--r--r--. 1 root root  3992706 7月  29 2021 VBoxDarwinAdditions.pkg
-r-xr-xr-x. 1 root root     3949 7月  29 2021 VBoxDarwinAdditionsUninstall.tool
-r-xr-xr-x. 1 root root  7433652 7月  29 2021 VBoxLinuxAdditions.run
-r--r--r--. 1 root root  9411584 7月  29 2021 VBoxSolarisAdditions.pkg
-r-xr-xr-x. 1 root root 16889104 7月  29 2021 VBoxWindowsAdditions-amd64.exe
-r-xr-xr-x. 1 root root   270840 7月  29 2021 VBoxWindowsAdditions.exe
-r-xr-xr-x. 1 root root  9995064 7月  29 2021 VBoxWindowsAdditions-x86.exe
[root@localhost ~]#
[root@localhost ~]# cd /media/cdrom/
[root@localhost cdrom]#
[root@localhost cdrom]# ll
总用量 46893
-r--r--r--. 1 root root      763 2月  20 2020 AUTORUN.INF
-r-xr-xr-x. 1 root root     6384 7月  29 2021 autorun.sh
dr-xr-xr-x. 2 root root      792 7月  29 2021 cert
dr-xr-xr-x. 2 root root     1824 7月  29 2021 NT3x
dr-xr-xr-x. 2 root root     2652 7月  29 2021 OS2
-r-xr-xr-x. 1 root root     4821 7月  29 2021 runasroot.sh
-r--r--r--. 1 root root      547 7月  29 2021 TRANS.TBL
-r--r--r--. 1 root root  3992706 7月  29 2021 VBoxDarwinAdditions.pkg
-r-xr-xr-x. 1 root root     3949 7月  29 2021 VBoxDarwinAdditionsUninstall.tool
-r-xr-xr-x. 1 root root  7433652 7月  29 2021 VBoxLinuxAdditions.run
-r--r--r--. 1 root root  9411584 7月  29 2021 VBoxSolarisAdditions.pkg
-r-xr-xr-x. 1 root root 16889104 7月  29 2021 VBoxWindowsAdditions-amd64.exe
-r-xr-xr-x. 1 root root   270840 7月  29 2021 VBoxWindowsAdditions.exe
-r-xr-xr-x. 1 root root  9995064 7月  29 2021 VBoxWindowsAdditions-x86.exe
[root@localhost cdrom]#
[root@localhost cdrom]# sh ./VBoxLinuxAdditions.run
Verifying archive integrity... All good.
Uncompressing VirtualBox 6.1.26 Guest Additions for Linux........
VirtualBox Guest Additions installer
Copying additional installer modules ...
Installing additional modules ...
VirtualBox Guest Additions: Starting.
VirtualBox Guest Additions: Building the VirtualBox Guest Additions kernel
modules.  This may take a while.
VirtualBox Guest Additions: To build modules for other installed kernels, run
VirtualBox Guest Additions:   /sbin/rcvboxadd quicksetup <version>
VirtualBox Guest Additions: or
VirtualBox Guest Additions:   /sbin/rcvboxadd quicksetup all
VirtualBox Guest Additions: Kernel headers not found for target kernel
3.10.0-1160.el7.x86_64. Please install them and execute
  /sbin/rcvboxadd setup
modprobe vboxguest failed
The log file /var/log/vboxadd-setup.log may contain further information.
[root@localhost cdrom]#
[root@localhost cdrom]# ll ../
总用量 3
dr-xr-xr-x. 5 root root 2408 7月  29 2021 cdrom
[root@localhost cdrom]#
[root@localhost cdrom]# Kernel headers not found for target kernel
-bash: Kernel: 未找到命令
[root@localhost cdrom]# 3.10.0-1160.el7.x86_64. Please install them and execute
-bash: 3.10.0-1160.el7.x86_64.: 未找到命令
[root@localhost cdrom]#
[root@localhost cdrom]# yum update -y kernel
已加载插件:fastestmirror
Loading mirror speeds from cached hostfile
 * base: mirrors.ustc.edu.cn
 * extras: mirrors.ustc.edu.cn
 * updates: mirrors.ustc.edu.cn
No packages marked for update
[root@localhost cdrom]#
[root@localhost cdrom]# cat /etc/redhat-release
CentOS Linux release 7.9.2009 (Core)
[root@localhost cdrom]#
[root@localhost cdrom]# yum install -y kernel-headers perl kernel-devel
已加载插件:fastestmirror
Loading mirror speeds from cached hostfile
 * base: mirrors.ustc.edu.cn
 * extras: mirrors.ustc.edu.cn
 * updates: mirrors.ustc.edu.cn
软件包 kernel-headers-3.10.0-1160.53.1.el7.x86_64 已安装并且是最新版本
软件包 4:perl-5.16.3-299.el7_9.x86_64 已安装并且是最新版本
软件包 kernel-devel-3.10.0-1160.53.1.el7.x86_64 已安装并且是最新版本
无须任何处理
[root@localhost cdrom]#
[root@localhost cdrom]# /sbin/rcvboxadd setup
VirtualBox Guest Additions: Starting.
VirtualBox Guest Additions: Building the VirtualBox Guest Additions kernel
modules.  This may take a while.
VirtualBox Guest Additions: To build modules for other installed kernels, run
VirtualBox Guest Additions:   /sbin/rcvboxadd quicksetup <version>
VirtualBox Guest Additions: or
VirtualBox Guest Additions:   /sbin/rcvboxadd quicksetup all
VirtualBox Guest Additions: Kernel headers not found for target kernel
3.10.0-1160.el7.x86_64. Please install them and execute
  /sbin/rcvboxadd setup
modprobe vboxguest failed
The log file /var/log/vboxadd-setup.log may contain further information.
[root@localhost cdrom]#
重启之后:
[root@localhost ~]# cd /media/cdrom/
[root@localhost cdrom]#
[root@localhost cdrom]# ll
总用量 0
[root@localhost cdrom]#
[root@localhost cdrom]# df
文件系统                    1K-块     已用     可用 已用% 挂载点
devtmpfs                  2960384        0  2960384    0% /dev
tmpfs                     2972160        0  2972160    0% /dev/shm
tmpfs                     2972160     8760  2963400    1% /run
tmpfs                     2972160        0  2972160    0% /sys/fs/cgroup
/dev/mapper/centos-root  17811456  1923608 15887848   11% /
/dev/sda1                 1038336   198192   840144   20% /boot
tmpfs                      594436        0   594436    0% /run/user/0
www                     146799612 62141008 84658604   43% /media/sf_www
[root@localhost cdrom]#
[root@localhost cdrom]# ll /media/sf_www
总用量 3
drwxrwx---. 1 root vboxsf  4096 8月  20 2020 test
[root@localhost cdrom]#
[root@localhost cdrom]#
防火墙设置
下面装了nginx后,主机始终无法访问虚拟机的80端口,最后发现是防火墙的问题,需要提前进行设置。
方法一
停止防火墙服务:
systemctl stop firewalld
[root@localhost ~]# systemctl status firewalld
● firewalld.service - firewalld - dynamic firewall daemon
   Loaded: loaded (/usr/lib/systemd/system/firewalld.service; enabled; vendor preset: enabled)
   Active: active (running) since 四 2022-02-17 18:13:56 CST; 2h 16min ago
     Docs: man:firewalld(1)
 Main PID: 722 (firewalld)
   CGroup: /system.slice/firewalld.service
           └─722 /usr/bin/python2 -Es /usr/sbin/firewalld --nofork --nopid

2月 17 18:14:03 localhost.localdomain firewalld[722]: WARNING: COMMAND_FAILED: '/usr/sbin/iptables -w10 -t n...?).
2月 17 18:14:03 localhost.localdomain firewalld[722]: WARNING: COMMAND_FAILED: '/usr/sbin/iptables -w10 -t n...?).
2月 17 18:14:03 localhost.localdomain firewalld[722]: WARNING: COMMAND_FAILED: '/usr/sbin/iptables -w10 -t n...me.
2月 17 18:14:03 localhost.localdomain firewalld[722]: WARNING: COMMAND_FAILED: '/usr/sbin/iptables -w10 -t n...me.
2月 17 18:14:03 localhost.localdomain firewalld[722]: WARNING: COMMAND_FAILED: '/usr/sbin/iptables -w10 -t f...me.
2月 17 18:14:03 localhost.localdomain firewalld[722]: WARNING: COMMAND_FAILED: '/usr/sbin/iptables -w10 -t f...me.
2月 17 18:14:03 localhost.localdomain firewalld[722]: WARNING: COMMAND_FAILED: '/usr/sbin/iptables -w10 -t f...me.
2月 17 18:14:03 localhost.localdomain firewalld[722]: WARNING: COMMAND_FAILED: '/usr/sbin/iptables -w10 -t f...me.
2月 17 18:14:03 localhost.localdomain firewalld[722]: WARNING: COMMAND_FAILED: '/usr/sbin/iptables -w10 -D F...?).
2月 17 18:14:04 localhost.localdomain firewalld[722]: WARNING: COMMAND_FAILED: '/usr/sbin/iptables -w10 -D F...?).
Hint: Some lines were ellipsized, use -l to show in full.
[root@localhost ~]#
[root@localhost ~]# systemctl stop firewalld
[root@localhost ~]#
[root@localhost ~]# systemctl status firewalld
● firewalld.service - firewalld - dynamic firewall daemon
   Loaded: loaded (/usr/lib/systemd/system/firewalld.service; enabled; vendor preset: enabled)
   Active: inactive (dead) since 四 2022-02-17 20:30:55 CST; 3min 53s ago
     Docs: man:firewalld(1)
  Process: 722 ExecStart=/usr/sbin/firewalld --nofork --nopid $FIREWALLD_ARGS (code=exited, status=0/SUCCESS)
 Main PID: 722 (code=exited, status=0/SUCCESS)

2月 17 18:14:03 localhost.localdomain firewalld[722]: WARNING: COMMAND_FAILED: '/usr/sbin/iptables -w10 -t n...me.
2月 17 18:14:03 localhost.localdomain firewalld[722]: WARNING: COMMAND_FAILED: '/usr/sbin/iptables -w10 -t n...me.
2月 17 18:14:03 localhost.localdomain firewalld[722]: WARNING: COMMAND_FAILED: '/usr/sbin/iptables -w10 -t f...me.
2月 17 18:14:03 localhost.localdomain firewalld[722]: WARNING: COMMAND_FAILED: '/usr/sbin/iptables -w10 -t f...me.
2月 17 18:14:03 localhost.localdomain firewalld[722]: WARNING: COMMAND_FAILED: '/usr/sbin/iptables -w10 -t f...me.
2月 17 18:14:03 localhost.localdomain firewalld[722]: WARNING: COMMAND_FAILED: '/usr/sbin/iptables -w10 -t f...me.
2月 17 18:14:03 localhost.localdomain firewalld[722]: WARNING: COMMAND_FAILED: '/usr/sbin/iptables -w10 -D F...?).
2月 17 18:14:04 localhost.localdomain firewalld[722]: WARNING: COMMAND_FAILED: '/usr/sbin/iptables -w10 -D F...?).
2月 17 20:30:52 localhost.localdomain systemd[1]: Stopping firewalld - dynamic firewall daemon...
2月 17 20:30:55 localhost.localdomain systemd[1]: Stopped firewalld - dynamic firewall daemon.
Hint: Some lines were ellipsized, use -l to show in full.
[root@localhost ~]#
防火墙不再开机自启动:
systemctl disable firewalld
方法二
开放端口的情况:
> firewall-cmd --list-all
[root@localhost ~]# firewall-cmd --list-all
public (active)
  target: default
  icmp-block-inversion: no
  interfaces: enp0s3 enp0s8
  sources:
  services: dhcpv6-client ssh
  ports:
  protocols:
  masquerade: no
  forward-ports:
  source-ports:
  icmp-blocks:
  rich rules:

[root@localhost ~]#
services: dhcpv6-client ssh 表示 ssh 服务是放行的,而 ports: 这里为空,表示无端口号放行。
接下来通过以下命令开放http 80 端口:
> sudo firewall-cmd --add-service=http --permanent
>
> sudo firewall-cmd --add-port=80/tcp --permanent
命令末尾的--permanent表示永久有效;不加这句,重启后刚才开放的端口就又失效了。
然后重启防火墙:
> sudo firewall-cmd --reload
再次查看端口的开放情况:
> sudo firewall-cmd --list-all
[root@localhost ~]# firewall-cmd --add-service=http --permanent
success
[root@localhost ~]#
[root@localhost ~]# firewall-cmd --add-port=80/tcp --permanent
success
[root@localhost ~]#
[root@localhost ~]# firewall-cmd --reload
success
[root@localhost ~]#
[root@localhost ~]# firewall-cmd --list-all
public (active)
  target: default
  icmp-block-inversion: no
  interfaces: enp0s3 enp0s8
  sources:
  services: dhcpv6-client http ssh
  ports: 80/tcp
  protocols:
  masquerade: no
  forward-ports:
  source-ports:
  icmp-blocks:
  rich rules:

[root@localhost ~]#
方法三
通过 iptables
PHP安装
PHP和Nginx服务的安装,我们可以以下面的方式在本机直接安装,也可以用Docker实现。 建议Docker实现,使用Docker会使环境干净好维护。
安装源准备
我们使用Remi源安装PHP7.4。
安装 EPEL 存储库
yum install -y epel-release
安装Remi存储库
rpm -Uvh http://rpms.famillecollet.com/enterprise/remi-release-7.rpm
[root@localhost ~]# yum install epel-release -y
已加载插件:fastestmirror, product-id, search-disabled-repos, subscription-manager

This system is not registered with an entitlement server. You can use subscription-manager to register.

Loading mirror speeds from cached hostfile
 * base: mirrors.ustc.edu.cn
 * extras: mirrors.ustc.edu.cn
 * updates: mirrors.ustc.edu.cn
base                                                               | 3.6 kB  00:00:00
extras                                                             | 2.9 kB  00:00:00
updates                                                            | 2.9 kB  00:00:00
正在解决依赖关系
--> 正在检查事务
---> 软件包 epel-release.noarch.0.7-11 将被 安装
--> 解决依赖关系完成

依赖关系解决

==============================================================================================
 Package               架构                    版本                  源                 大小
==============================================================================================
正在安装:
 epel-release          noarch                  7-11                  extras             15 k

事务概要
==============================================================================================
安装  1 软件包

总下载量:15 k
安装大小:24 k
Downloading packages:
epel-release-7-11.noarch.rpm                                            |  15 kB  00:00:00
Running transaction check
Running transaction test
Transaction test succeeded
Running transaction
  正在安装    : epel-release-7-11.noarch                                     1/1
  验证中      : epel-release-7-11.noarch                                     1/1

已安装:
  epel-release.noarch 0:7-11

完毕!
[root@localhost ~]# ls -l /etc/yum.repos.d/
总用量 48
-rw-r--r--. 1 root root 1664 10月 23 2020 CentOS-Base.repo
-rw-r--r--. 1 root root 1309 10月 23 2020 CentOS-CR.repo
-rw-r--r--. 1 root root  649 10月 23 2020 CentOS-Debuginfo.repo
-rw-r--r--. 1 root root  314 10月 23 2020 CentOS-fasttrack.repo
-rw-r--r--. 1 root root  630 10月 23 2020 CentOS-Media.repo
-rw-r--r--. 1 root root 1331 10月 23 2020 CentOS-Sources.repo
-rw-r--r--. 1 root root 8515 10月 23 2020 CentOS-Vault.repo
-rw-r--r--. 1 root root  616 10月 23 2020 CentOS-x86_64-kernel.repo
-rw-r--r--. 1 root root  951 10月  3 2017 epel.repo
-rw-r--r--. 1 root root 1050 10月  3 2017 epel-testing.repo
[root@localhost ~]#
[root@localhost ~]# rpm -Uvh http://rpms.famillecollet.com/enterprise/remi-release-7.rpm
获取http://rpms.famillecollet.com/enterprise/remi-release-7.rpm
警告:/var/tmp/rpm-tmp.24hzvA: 头V4 DSA/SHA1 Signature, 密钥 ID 00f97f56: NOKEY
准备中...                          ################################# [100%]
正在升级/安装...
   1:remi-release-7.9-3.el7.remi      ################################# [100%]
[root@localhost ~]#
[root@localhost ~]# ls -l /etc/yum.repos.d/
总用量 108
-rw-r--r--. 1 root root 1664 10月 23 2020 CentOS-Base.repo
-rw-r--r--. 1 root root 1309 10月 23 2020 CentOS-CR.repo
-rw-r--r--. 1 root root  649 10月 23 2020 CentOS-Debuginfo.repo
-rw-r--r--. 1 root root  314 10月 23 2020 CentOS-fasttrack.repo
-rw-r--r--. 1 root root  630 10月 23 2020 CentOS-Media.repo
-rw-r--r--. 1 root root 1331 10月 23 2020 CentOS-Sources.repo
-rw-r--r--. 1 root root 8515 10月 23 2020 CentOS-Vault.repo
-rw-r--r--. 1 root root  616 10月 23 2020 CentOS-x86_64-kernel.repo
-rw-r--r--. 1 root root  951 10月  3 2017 epel.repo
-rw-r--r--. 1 root root 1050 10月  3 2017 epel-testing.repo
-rw-r--r--. 1 root root  446 2月  15 18:37 remi-glpi91.repo
-rw-r--r--. 1 root root  446 2月  15 18:37 remi-glpi92.repo
-rw-r--r--. 1 root root  446 2月  15 18:37 remi-glpi93.repo
-rw-r--r--. 1 root root  446 2月  15 18:37 remi-glpi94.repo
-rw-r--r--. 1 root root  855 2月  15 18:37 remi-modular.repo
-rw-r--r--. 1 root root  456 2月  15 18:37 remi-php54.repo
-rw-r--r--. 1 root root 1314 2月  15 18:37 remi-php70.repo
-rw-r--r--. 1 root root 1314 2月  15 18:37 remi-php71.repo
-rw-r--r--. 1 root root 1314 2月  15 18:37 remi-php72.repo
-rw-r--r--. 1 root root 1314 2月  15 18:37 remi-php73.repo
-rw-r--r--. 1 root root 1314 2月  15 18:37 remi-php74.repo
-rw-r--r--. 1 root root 1314 2月  15 18:37 remi-php80.repo
-rw-r--r--. 1 root root 1314 2月  15 18:37 remi-php81.repo
-rw-r--r--. 1 root root 2605 2月  15 18:37 remi.repo
-rw-r--r--. 1 root root  750 2月  15 18:37 remi-safe.repo
[root@localhost ~]#
安装PHP
yum --enablerepo=remi-php74 install -y php
查看版本:
php -v
[root@localhost ~]# yum --enablerepo=remi-php74 install -y php
已加载插件:fastestmirror, product-id, search-disabled-repos, subscription-manager

This system is not registered with an entitlement server. You can use subscription-manager to register.

Loading mirror speeds from cached hostfile
epel/x86_64/metalink                                            | 6.8 kB  00:00:00
 * base: mirrors.ustc.edu.cn
 * epel: ftp.iij.ad.jp
 * extras: mirrors.ustc.edu.cn
 * remi-php74: ftp.riken.jp
 * remi-safe: ftp.riken.jp
 * updates: mirrors.ustc.edu.cn
epel                                                           | 4.7 kB  00:00:00
remi-php74                                                     | 3.0 kB  00:00:00
remi-safe                                                      | 3.0 kB  00:00:00
(1/5): epel/x86_64/group_gz                                    |  96 kB  00:00:00
(2/5): remi-php74/primary_db                                   | 254 kB  00:00:05
(3/5): epel/x86_64/updateinfo                                  | 1.1 MB  00:00:34
(4/5): remi-safe/primary_db                                    | 2.1 MB  00:01:02
(5/5): epel/x86_64/primary_db                                  | 7.0 MB  00:03:33
正在解决依赖关系
--> 正在检查事务
---> 软件包 php.x86_64.0.7.4.28-1.el7.remi 将被 安装
--> 正在处理依赖关系 httpd-mmn = 20120211x8664,它被软件包 php-7.4.28-1.el7.remi.x86_64 需要
--> 正在处理依赖关系 php-cli(x86-64) = 7.4.28-1.el7.remi,它被软件包 php-7.4.28-1.el7.remi.x86_64 需要
--> 正在处理依赖关系 php-common(x86-64) = 7.4.28-1.el7.remi,它被软件包 php-7.4.28-1.el7.remi.x86_64 需要
--> 正在处理依赖关系 php-sodium(x86-64) = 7.4.28-1.el7.remi,它被软件包 php-7.4.28-1.el7.remi.x86_64 需要
--> 正在处理依赖关系 httpd,它被软件包 php-7.4.28-1.el7.remi.x86_64 需要
--> 正在检查事务
---> 软件包 httpd.x86_64.0.2.4.6-97.el7.centos.4 将被 安装
--> 正在处理依赖关系 httpd-tools = 2.4.6-97.el7.centos.4,它被软件包 httpd-2.4.6-97.el7.centos.4.x86_64 需要
--> 正在处理依赖关系 /etc/mime.types,它被软件包 httpd-2.4.6-97.el7.centos.4.x86_64 需要
--> 正在处理依赖关系 libaprutil-1.so.0()(64bit),它被软件包 httpd-2.4.6-97.el7.centos.4.x86_64 需要
--> 正在处理依赖关系 libapr-1.so.0()(64bit),它被软件包 httpd-2.4.6-97.el7.centos.4.x86_64 需要
---> 软件包 php-cli.x86_64.0.7.4.28-1.el7.remi 将被 安装
---> 软件包 php-common.x86_64.0.7.4.28-1.el7.remi 将被 安装
--> 正在处理依赖关系 php-json(x86-64) = 7.4.28-1.el7.remi,它被软件包 php-common-7.4.28-1.el7.remi.x86_64 需要
---> 软件包 php-sodium.x86_64.0.7.4.28-1.el7.remi 将被 安装
--> 正在处理依赖关系 libsodium.so.23()(64bit),它被软件包 php-sodium-7.4.28-1.el7.remi.x86_64 需要
--> 正在检查事务
---> 软件包 apr.x86_64.0.1.4.8-7.el7 将被 安装
---> 软件包 apr-util.x86_64.0.1.5.2-6.el7 将被 安装
---> 软件包 httpd-tools.x86_64.0.2.4.6-97.el7.centos.4 将被 安装
---> 软件包 libsodium.x86_64.0.1.0.18-1.el7 将被 安装
---> 软件包 mailcap.noarch.0.2.1.41-2.el7 将被 安装
---> 软件包 php-json.x86_64.0.7.4.28-1.el7.remi 将被 安装
--> 解决依赖关系完成

依赖关系解决

=======================================================================
 Package        架构      版本                      源            大小
=======================================================================
正在安装:
 php            x86_64    7.4.28-1.el7.remi        remi-php74    3.4 M
为依赖而安装:
 apr            x86_64    1.4.8-7.el7              base          104 k
 apr-util       x86_64    1.5.2-6.el7              base           92 k
 httpd          x86_64    2.4.6-97.el7.centos.4    updates       2.7 M
 httpd-tools    x86_64    2.4.6-97.el7.centos.4    updates        94 k
 libsodium      x86_64    1.0.18-1.el7             epel           147 k
 mailcap        noarch    2.1.41-2.el7             base            31 k
 php-cli        x86_64    7.4.28-1.el7.remi        remi-php74    5.2 M
 php-common     x86_64    7.4.28-1.el7.remi        remi-php74    1.2 M
 php-json       x86_64    7.4.28-1.el7.remi        remi-php74     74 k
 php-sodium     x86_64    7.4.28-1.el7.remi        remi-php74     85 k

事务概要
=======================================================================
安装  1 软件包 (+10 依赖软件包)

总下载量:13 M
安装大小:52 M
Downloading packages:
(1/11): apr-util-1.5.2-6.el7.x86_64.rpm                        |  92 kB  00:00:00
(2/11): mailcap-2.1.41-2.el7.noarch.rpm                        |  31 kB  00:00:00
(3/11): apr-1.4.8-7.el7.x86_64.rpm                             | 104 kB  00:00:01
(4/11): httpd-tools-2.4.6-97.el7.centos.4.x86_64.rpm           |  94 kB  00:00:01
warning: /var/cache/yum/x86_64/7/epel/packages/libsodium-1.0.18-1.el7.x86_64.rpm: Header V3 RSA/SHA256 Signature, key ID 352c64e5: NOKEY
libsodium-1.0.18-1.el7.x86_64.rpm 的公钥尚未安装
(5/11): libsodium-1.0.18-1.el7.x86_64.rpm                      | 147 kB  00:00:00
(6/11): httpd-2.4.6-97.el7.centos.4.x86_64.rpm                 | 2.7 MB  00:00:02
warning: /var/cache/yum/x86_64/7/remi-php74/packages/php-json-7.4.28-1.el7.remi.x86_64.rpm: Header V4 DSA/SHA1 Signature, key ID 00f97f56: NOKEY
php-json-7.4.28-1.el7.remi.x86_64.rpm 的公钥尚未安装
(7/11): php-json-7.4.28-1.el7.remi.x86_64.rpm                  |  74 kB  00:00:01
(8/11): php-sodium-7.4.28-1.el7.remi.x86_64.rpm                |  85 kB  00:00:01
(9/11): php-common-7.4.28-1.el7.remi.x86_64.rpm                | 1.2 MB  00:00:03
(10/11): php-7.4.28-1.el7.remi.x86_64.rpm                      | 3.4 MB  00:00:10
(11/11): php-cli-7.4.28-1.el7.remi.x86_64.rpm                  | 5.2 MB  00:00:17
------------------------------------------------------------------------------------
总计                                                  717 kB/s |  13 MB  00:00:18
从 file:///etc/pki/rpm-gpg/RPM-GPG-KEY-EPEL-7 检索密钥
导入 GPG key 0x352C64E5:
 用户ID     : "Fedora EPEL (7) <epel@fedoraproject.org>"
 指纹       : 91e9 7d7c 4a5e 96f1 7f3e 888f 6a2f aea2 352c 64e5
 软件包     : epel-release-7-11.noarch (@extras)
 来自       : /etc/pki/rpm-gpg/RPM-GPG-KEY-EPEL-7
从 file:///etc/pki/rpm-gpg/RPM-GPG-KEY-remi 检索密钥
导入 GPG key 0x00F97F56:
 用户ID     : "Remi Collet <RPMS@FamilleCollet.com>"
 指纹       : 1ee0 4cce 88a4 ae4a a29a 5df5 004e 6f47 00f9 7f56
 软件包     : remi-release-7.9-3.el7.remi.noarch (installed)
 来自       : /etc/pki/rpm-gpg/RPM-GPG-KEY-remi
Running transaction check
Running transaction test
Transaction test succeeded
Running transaction
警告:RPM 数据库已被非 yum 程序修改。
  正在安装    : apr-1.4.8-7.el7.x86_64                             1/11
  正在安装    : apr-util-1.5.2-6.el7.x86_64                        2/11
  正在安装    : httpd-tools-2.4.6-97.el7.centos.4.x86_64           3/11
  正在安装    : php-common-7.4.28-1.el7.remi.x86_64                4/11
  正在安装    : php-json-7.4.28-1.el7.remi.x86_64                  5/11
  正在安装    : php-cli-7.4.28-1.el7.remi.x86_64                   6/11
  正在安装    : mailcap-2.1.41-2.el7.noarch                        7/11
  正在安装    : httpd-2.4.6-97.el7.centos.4.x86_64                 8/11
  正在安装    : libsodium-1.0.18-1.el7.x86_64                      9/11
  正在安装    : php-sodium-7.4.28-1.el7.remi.x86_64               10/11
  正在安装    : php-7.4.28-1.el7.remi.x86_64                      11/11
  验证中      : libsodium-1.0.18-1.el7.x86_64                      1/11
  验证中      : mailcap-2.1.41-2.el7.noarch                        2/11
  验证中      : apr-1.4.8-7.el7.x86_64                             3/11
  验证中      : apr-util-1.5.2-6.el7.x86_64                        4/11
  验证中      : httpd-2.4.6-97.el7.centos.4.x86_64                 5/11
  验证中      : php-json-7.4.28-1.el7.remi.x86_64                  6/11
  验证中      : php-common-7.4.28-1.el7.remi.x86_64                7/11
  验证中      : php-sodium-7.4.28-1.el7.remi.x86_64                8/11
  验证中      : php-7.4.28-1.el7.remi.x86_64                       9/11
  验证中      : php-cli-7.4.28-1.el7.remi.x86_64                  10/11
  验证中      : httpd-tools-2.4.6-97.el7.centos.4.x86_64          11/11

已安装:
  php.x86_64 0:7.4.28-1.el7.remi

作为依赖被安装:
  apr.x86_64 0:1.4.8-7.el7                          apr-util.x86_64 0:1.5.2-6.el7
  httpd.x86_64 0:2.4.6-97.el7.centos.4              httpd-tools.x86_64 0:2.4.6-97.el7.centos.4
  libsodium.x86_64 0:1.0.18-1.el7                   mailcap.noarch 0:2.1.41-2.el7
  php-cli.x86_64 0:7.4.28-1.el7.remi                php-common.x86_64 0:7.4.28-1.el7.remi
  php-json.x86_64 0:7.4.28-1.el7.remi               php-sodium.x86_64 0:7.4.28-1.el7.remi

完毕!
[root@localhost ~]#
[root@localhost ~]# php -v
PHP 7.4.28 (cli) (built: Feb 15 2022 13:23:10) ( NTS )
Copyright (c) The PHP Group
Zend Engine v3.4.0, Copyright (c) Zend Technologies
[root@localhost ~]#
安装拓展
yum --enablerepo=remi-php74 install -y php-fpm php-cli php-bcmath php-gd php-json php-mbstring php-mcrypt php-mysqlnd php-opcache php-pdo php-pecl-mcrypt php-xml php-zip
查看拓展:
php -m
[root@localhost ~]# yum --enablerepo=remi-php74 install -y php-fpm php-cli php-bcmath php-gd php-json php-mbstring php-mcrypt php-mysqlnd php-opcache php-pdo php-pecl-mcrypt php-xml php-zip
已加载插件:fastestmirror, product-id, search-disabled-repos, subscription-manager

This system is not registered with an entitlement server. You can use subscription-manager to register.

Loading mirror speeds from cached hostfile
 * base: mirrors.ustc.edu.cn
 * epel: hkg.mirror.rackspace.com
 * extras: mirrors.ustc.edu.cn
 * remi-php74: ftp.riken.jp
 * remi-safe: ftp.riken.jp
 * updates: mirrors.ustc.edu.cn
软件包 php-cli-7.4.28-1.el7.remi.x86_64 已安装并且是最新版本
软件包 php-json-7.4.28-1.el7.remi.x86_64 已安装并且是最新版本
软件包 php-mcrypt 已经被 php-pecl-mcrypt 取代,改为尝试安装 php-pecl-mcrypt-1.0.4-1.el7.remi.7.4.x86_64
正在解决依赖关系
--> 正在检查事务
---> 软件包 php-bcmath.x86_64.0.7.4.28-1.el7.remi 将被 安装
---> 软件包 php-fpm.x86_64.0.7.4.28-1.el7.remi 将被 安装
---> 软件包 php-gd.x86_64.0.7.4.28-1.el7.remi 将被 安装
--> 正在处理依赖关系 libgd.so.103()(64bit),它被软件包 php-gd-7.4.28-1.el7.remi.x86_64 需要
---> 软件包 php-mbstring.x86_64.0.7.4.28-1.el7.remi 将被 安装
--> 正在处理依赖关系 libonig.so.105()(64bit),它被软件包 php-mbstring-7.4.28-1.el7.remi.x86_64 需要
---> 软件包 php-mysqlnd.x86_64.0.7.4.28-1.el7.remi 将被 安装
---> 软件包 php-opcache.x86_64.0.7.4.28-1.el7.remi 将被 安装
---> 软件包 php-pdo.x86_64.0.7.4.28-1.el7.remi 将被 安装
---> 软件包 php-pecl-mcrypt.x86_64.0.1.0.4-1.el7.remi.7.4 将被 安装
--> 正在处理依赖关系 libmcrypt.so.4()(64bit),它被软件包 php-pecl-mcrypt-1.0.4-1.el7.remi.7.4.x86_64 需要
---> 软件包 php-pecl-zip.x86_64.0.1.20.0-1.el7.remi.7.4 将被 安装
--> 正在处理依赖关系 libzip5(x86-64) >= 1.8.0,它被软件包 php-pecl-zip-1.20.0-1.el7.remi.7.4.x86_64 需要
--> 正在处理依赖关系 libzip.so.5()(64bit),它被软件包 php-pecl-zip-1.20.0-1.el7.remi.7.4.x86_64 需要
---> 软件包 php-xml.x86_64.0.7.4.28-1.el7.remi 将被 安装
--> 正在处理依赖关系 libxslt.so.1(LIBXML2_1.0.11)(64bit),它被软件包 php-xml-7.4.28-1.el7.remi.x86_64 需要
--> 正在处理依赖关系 libxslt.so.1(LIBXML2_1.0.13)(64bit),它被软件包 php-xml-7.4.28-1.el7.remi.x86_64 需要
--> 正在处理依赖关系 libxslt.so.1(LIBXML2_1.0.18)(64bit),它被软件包 php-xml-7.4.28-1.el7.remi.x86_64 需要
--> 正在处理依赖关系 libxslt.so.1(LIBXML2_1.0.22)(64bit),它被软件包 php-xml-7.4.28-1.el7.remi.x86_64 需要
--> 正在处理依赖关系 libxslt.so.1(LIBXML2_1.0.24)(64bit),它被软件包 php-xml-7.4.28-1.el7.remi.x86_64 需要
--> 正在处理依赖关系 libexslt.so.0()(64bit),它被软件包 php-xml-7.4.28-1.el7.remi.x86_64 需要
--> 正在处理依赖关系 libxslt.so.1()(64bit),它被软件包 php-xml-7.4.28-1.el7.remi.x86_64 需要
--> 正在检查事务
---> 软件包 gd3php.x86_64.0.2.3.3-4.el7.remi 将被 安装
--> 正在处理依赖关系 libjpeg.so.62(LIBJPEG_6.2)(64bit),它被软件包 gd3php-2.3.3-4.el7.remi.x86_64 需要
--> 正在处理依赖关系 libtiff.so.5(LIBTIFF_4.0)(64bit),它被软件包 gd3php-2.3.3-4.el7.remi.x86_64 需要
--> 正在处理依赖关系 libX11.so.6()(64bit),它被软件包 gd3php-2.3.3-4.el7.remi.x86_64 需要
--> 正在处理依赖关系 libXpm.so.4()(64bit),它被软件包 gd3php-2.3.3-4.el7.remi.x86_64 需要
--> 正在处理依赖关系 libfontconfig.so.1()(64bit),它被软件包 gd3php-2.3.3-4.el7.remi.x86_64 需要
--> 正在处理依赖关系 libjpeg.so.62()(64bit),它被软件包 gd3php-2.3.3-4.el7.remi.x86_64 需要
--> 正在处理依赖关系 libraqm.so.0()(64bit),它被软件包 gd3php-2.3.3-4.el7.remi.x86_64 需要
--> 正在处理依赖关系 libtiff.so.5()(64bit),它被软件包 gd3php-2.3.3-4.el7.remi.x86_64 需要
--> 正在处理依赖关系 libwebp.so.7()(64bit),它被软件包 gd3php-2.3.3-4.el7.remi.x86_64 需要
---> 软件包 libmcrypt.x86_64.0.2.5.8-13.el7 将被 安装
---> 软件包 libxslt.x86_64.0.1.1.28-6.el7 将被 安装
---> 软件包 libzip5.x86_64.0.1.8.0-2.el7.remi 将被 安装
--> 正在处理依赖关系 libzstd(x86-64) >= 1.3.6,它被软件包 libzip5-1.8.0-2.el7.remi.x86_64 需要
--> 正在处理依赖关系 libzstd.so.1()(64bit),它被软件包 libzip5-1.8.0-2.el7.remi.x86_64 需要
---> 软件包 oniguruma5php.x86_64.0.6.9.7.1-1.el7.remi 将被 安装
--> 正在检查事务
---> 软件包 fontconfig.x86_64.0.2.13.0-4.3.el7 将被 安装
--> 正在处理依赖关系 fontpackages-filesystem,它被软件包 fontconfig-2.13.0-4.3.el7.x86_64 需要
--> 正在处理依赖关系 dejavu-sans-fonts,它被软件包 fontconfig-2.13.0-4.3.el7.x86_64 需要
---> 软件包 libX11.x86_64.0.1.6.7-4.el7_9 将被 安装
--> 正在处理依赖关系 libX11-common >= 1.6.7-4.el7_9,它被软件包 libX11-1.6.7-4.el7_9.x86_64 需要
--> 正在处理依赖关系 libxcb.so.1()(64bit),它被软件包 libX11-1.6.7-4.el7_9.x86_64 需要
---> 软件包 libXpm.x86_64.0.3.5.12-1.el7 将被 安装
---> 软件包 libjpeg-turbo.x86_64.0.1.2.90-8.el7 将被 安装
---> 软件包 libraqm.x86_64.0.0.7.0-4.el7 将被 安装
--> 正在处理依赖关系 libfribidi.so.0()(64bit),它被软件包 libraqm-0.7.0-4.el7.x86_64 需要
--> 正在处理依赖关系 libharfbuzz.so.0()(64bit),它被软件包 libraqm-0.7.0-4.el7.x86_64 需要
---> 软件包 libtiff.x86_64.0.4.0.3-35.el7 将被 安装
--> 正在处理依赖关系 libjbig.so.2.0()(64bit),它被软件包 libtiff-4.0.3-35.el7.x86_64 需要
---> 软件包 libwebp7.x86_64.0.1.0.3-1.el7.remi 将被 安装
---> 软件包 libzstd.x86_64.0.1.5.2-1.el7 将被 安装
--> 正在检查事务
---> 软件包 dejavu-sans-fonts.noarch.0.2.33-6.el7 将被 安装
--> 正在处理依赖关系 dejavu-fonts-common = 2.33-6.el7,它被软件包 dejavu-sans-fonts-2.33-6.el7.noarch 需要
---> 软件包 fontpackages-filesystem.noarch.0.1.44-8.el7 将被 安装
---> 软件包 fribidi.x86_64.0.1.0.2-1.el7_7.1 将被 安装
---> 软件包 harfbuzz.x86_64.0.1.7.5-2.el7 将被 安装
--> 正在处理依赖关系 libgraphite2.so.3()(64bit),它被软件包 harfbuzz-1.7.5-2.el7.x86_64 需要
---> 软件包 jbigkit-libs.x86_64.0.2.0-11.el7 将被 安装
---> 软件包 libX11-common.noarch.0.1.6.7-4.el7_9 将被 安装
---> 软件包 libxcb.x86_64.0.1.13-1.el7 将被 安装
--> 正在处理依赖关系 libXau.so.6()(64bit),它被软件包 libxcb-1.13-1.el7.x86_64 需要
--> 正在检查事务
---> 软件包 dejavu-fonts-common.noarch.0.2.33-6.el7 将被 安装
---> 软件包 graphite2.x86_64.0.1.3.10-1.el7_3 将被 安装
---> 软件包 libXau.x86_64.0.1.0.8-2.1.el7 将被 安装
--> 解决依赖关系完成

依赖关系解决

==================================================================================================
 Package                          架构    版本                           源                   大小
==================================================================================================
正在安装:
 php-bcmath                       x86_64  7.4.28-1.el7.remi              remi-php74           80 k
 php-fpm                          x86_64  7.4.28-1.el7.remi              remi-php74          1.8 M
 php-gd                           x86_64  7.4.28-1.el7.remi              remi-php74           89 k
 php-mbstring                     x86_64  7.4.28-1.el7.remi              remi-php74          525 k
 php-mysqlnd                      x86_64  7.4.28-1.el7.remi              remi-php74          255 k
 php-opcache                      x86_64  7.4.28-1.el7.remi              remi-php74          332 k
 php-pdo                          x86_64  7.4.28-1.el7.remi              remi-php74          139 k
 php-pecl-mcrypt                  x86_64  1.0.4-1.el7.remi.7.4           remi-php74           30 k
 php-pecl-zip                     x86_64  1.20.0-1.el7.remi.7.4          remi-php74           63 k
 php-xml                          x86_64  7.4.28-1.el7.remi              remi-php74          209 k
为依赖而安装:
 dejavu-fonts-common              noarch  2.33-6.el7                     base                 64 k
 dejavu-sans-fonts                noarch  2.33-6.el7                     base                1.4 M
 fontconfig                       x86_64  2.13.0-4.3.el7                 base                254 k
 fontpackages-filesystem          noarch  1.44-8.el7                     base                9.9 k
 fribidi                          x86_64  1.0.2-1.el7_7.1                base                 79 k
 gd3php                           x86_64  2.3.3-4.el7.remi               remi-safe           138 k
 graphite2                        x86_64  1.3.10-1.el7_3                 base                115 k
 harfbuzz                         x86_64  1.7.5-2.el7                    base                267 k
 jbigkit-libs                     x86_64  2.0-11.el7                     base                 46 k
 libX11                           x86_64  1.6.7-4.el7_9                  updates             607 k
 libX11-common                    noarch  1.6.7-4.el7_9                  updates             164 k
 libXau                           x86_64  1.0.8-2.1.el7                  base                 29 k
 libXpm                           x86_64  3.5.12-1.el7                   base                 55 k
 libjpeg-turbo                    x86_64  1.2.90-8.el7                   base                135 k
 libmcrypt                        x86_64  2.5.8-13.el7                   epel                 99 k
 libraqm                          x86_64  0.7.0-4.el7                    epel                 15 k
 libtiff                          x86_64  4.0.3-35.el7                   base                172 k
 libwebp7                         x86_64  1.0.3-1.el7.remi               remi-safe           266 k
 libxcb                           x86_64  1.13-1.el7                     base                214 k
 libxslt                          x86_64  1.1.28-6.el7                   base                242 k
 libzip5                          x86_64  1.8.0-2.el7.remi               remi-safe            64 k
 libzstd                          x86_64  1.5.2-1.el7                    epel                282 k
 oniguruma5php                    x86_64  6.9.7.1-1.el7.remi             remi-safe           205 k

事务概要
=================================================================================================
安装  10 软件包 (+23 依赖软件包)

总下载量:8.3 M
安装大小:27 M
Downloading packages:
(1/33): dejavu-fonts-common-2.33-6.el7.noarch.rpm              |  64 kB  00:00:00
(2/33): dejavu-sans-fonts-2.33-6.el7.noarch.rpm                | 1.4 MB  00:00:00
(3/33): fontconfig-2.13.0-4.3.el7.x86_64.rpm                   | 254 kB  00:00:00
(4/33): fontpackages-filesystem-1.44-8.el7.noarch.rpm          | 9.9 kB  00:00:00
(5/33): graphite2-1.3.10-1.el7_3.x86_64.rpm                    | 115 kB  00:00:00
(6/33): fribidi-1.0.2-1.el7_7.1.x86_64.rpm                     |  79 kB  00:00:00
(7/33): libX11-common-1.6.7-4.el7_9.noarch.rpm                 | 164 kB  00:00:00
(8/33): libX11-1.6.7-4.el7_9.x86_64.rpm                        | 607 kB  00:00:00
(9/33): libXau-1.0.8-2.1.el7.x86_64.rpm                        |  29 kB  00:00:00
(10/33): libXpm-3.5.12-1.el7.x86_64.rpm                        |  55 kB  00:00:00
(11/33): libjpeg-turbo-1.2.90-8.el7.x86_64.rpm                 | 135 kB  00:00:00
(12/33): harfbuzz-1.7.5-2.el7.x86_64.rpm                       | 267 kB  00:00:01
(13/33): libraqm-0.7.0-4.el7.x86_64.rpm                        |  15 kB  00:00:00
(14/33): libtiff-4.0.3-35.el7.x86_64.rpm                       | 172 kB  00:00:00
(15/33): libxcb-1.13-1.el7.x86_64.rpm                          | 214 kB  00:00:00
(16/33): libxslt-1.1.28-6.el7.x86_64.rpm                       | 242 kB  00:00:00
(17/33): libmcrypt-2.5.8-13.el7.x86_64.rpm                     |  99 kB  00:00:00
(18/33): libzstd-1.5.2-1.el7.x86_64.rpm                        | 282 kB  00:00:00
(19/33): jbigkit-libs-2.0-11.el7.x86_64.rpm                    |  46 kB  00:00:02
(20/33): gd3php-2.3.3-4.el7.remi.x86_64.rpm                    | 138 kB  00:00:02
(21/33): libzip5-1.8.0-2.el7.remi.x86_64.rpm                   |  64 kB  00:00:00
(22/33): php-gd-7.4.28-1.el7.remi.x86_64.rpm                   |  89 kB  00:00:00
(23/33): libwebp7-1.0.3-1.el7.remi.x86_64.rpm                  | 266 kB  00:00:02
(24/33): php-bcmath-7.4.28-1.el7.remi.x86_64.rpm               |  80 kB  00:00:01
(25/33): oniguruma5php-6.9.7.1-1.el7.remi.x86_64.rpm           | 205 kB  00:00:01
(26/33): php-mbstring-7.4.28-1.el7.remi.x86_64.rpm             | 525 kB  00:00:00
(27/33): php-pecl-mcrypt-1.0.4-1.el7.remi.7.4.x86_64.rpm       |  30 kB  00:00:00
(28/33): php-pecl-zip-1.20.0-1.el7.remi.7.4.x86_64.rpm         |  63 kB  00:00:00
(29/33): php-xml-7.4.28-1.el7.remi.x86_64.rpm                  | 209 kB  00:00:00
(30/33): php-opcache-7.4.28-1.el7.remi.x86_64.rpm              | 332 kB  00:00:00
(31/33): php-mysqlnd-7.4.28-1.el7.remi.x86_64.rpm              | 255 kB  00:00:02
(32/33): php-pdo-7.4.28-1.el7.remi.x86_64.rpm                  | 139 kB  00:00:02
(33/33): php-fpm-7.4.28-1.el7.remi.x86_64.rpm                  | 1.8 MB  00:00:04
--------------------------------------------------------------------------------------
总计 1.2 MB/s | 8.3 MB  00:00:07
Running transaction check
Running transaction test
Transaction test succeeded
Running transaction
  正在安装    : libjpeg-turbo-1.2.90-8.el7.x86_64                  1/33
  正在安装    : fontpackages-filesystem-1.44-8.el7.noarch          2/33
  正在安装    : dejavu-fonts-common-2.33-6.el7.noarch              3/33
  正在安装    : dejavu-sans-fonts-2.33-6.el7.noarch                4/33
  正在安装    : fontconfig-2.13.0-4.3.el7.x86_64                   5/33
  正在安装    : libX11-common-1.6.7-4.el7_9.noarch                 6/33
  正在安装    : libwebp7-1.0.3-1.el7.remi.x86_64                   7/33
  正在安装    : graphite2-1.3.10-1.el7_3.x86_64                    8/33
  正在安装    : harfbuzz-1.7.5-2.el7.x86_64                        9/33
  正在安装    : libxslt-1.1.28-6.el7.x86_64                       10/33
  正在安装    : libXau-1.0.8-2.1.el7.x86_64                       11/33
  正在安装    : libxcb-1.13-1.el7.x86_64                          12/33
  正在安装    : libX11-1.6.7-4.el7_9.x86_64                       13/33
  正在安装    : libXpm-3.5.12-1.el7.x86_64                        14/33
  正在安装    : jbigkit-libs-2.0-11.el7.x86_64                    15/33
  正在安装    : libtiff-4.0.3-35.el7.x86_64                       16/33
  正在安装    : oniguruma5php-6.9.7.1-1.el7.remi.x86_64           17/33
  正在安装    : fribidi-1.0.2-1.el7_7.1.x86_64                    18/33
  正在安装    : libraqm-0.7.0-4.el7.x86_64                        19/33
  正在安装    : gd3php-2.3.3-4.el7.remi.x86_64                    20/33
  正在安装    : libzstd-1.5.2-1.el7.x86_64                        21/33
  正在安装    : libzip5-1.8.0-2.el7.remi.x86_64                   22/33
  正在安装    : libmcrypt-2.5.8-13.el7.x86_64                     23/33
  正在安装    : php-pdo-7.4.28-1.el7.remi.x86_64                  24/33
  正在安装    : php-mysqlnd-7.4.28-1.el7.remi.x86_64              25/33
  正在安装    : php-pecl-mcrypt-1.0.4-1.el7.remi.7.4.x86_64       26/33
  正在安装    : php-pecl-zip-1.20.0-1.el7.remi.7.4.x86_64         27/33
  正在安装    : php-gd-7.4.28-1.el7.remi.x86_64                   28/33
  正在安装    : php-mbstring-7.4.28-1.el7.remi.x86_64             29/33
  正在安装    : php-xml-7.4.28-1.el7.remi.x86_64                  30/33
  正在安装    : php-opcache-7.4.28-1.el7.remi.x86_64              31/33
  正在安装    : php-bcmath-7.4.28-1.el7.remi.x86_64               32/33
  正在安装    : php-fpm-7.4.28-1.el7.remi.x86_64                  33/33
  验证中      : fontconfig-2.13.0-4.3.el7.x86_64                   1/33
  验证中      : gd3php-2.3.3-4.el7.remi.x86_64                     2/33
  验证中      : php-pdo-7.4.28-1.el7.remi.x86_64                   3/33
  验证中      : libmcrypt-2.5.8-13.el7.x86_64                      4/33
  验证中      : dejavu-fonts-common-2.33-6.el7.noarch              5/33
  验证中      : fontpackages-filesystem-1.44-8.el7.noarch          6/33
  验证中      : php-fpm-7.4.28-1.el7.remi.x86_64                   7/33
  验证中      : libtiff-4.0.3-35.el7.x86_64                        8/33
  验证中      : php-mbstring-7.4.28-1.el7.remi.x86_64              9/33
  验证中      : php-bcmath-7.4.28-1.el7.remi.x86_64               10/33
  验证中      : php-xml-7.4.28-1.el7.remi.x86_64                  11/33
  验证中      : libzstd-1.5.2-1.el7.x86_64                        12/33
  验证中      : libzip5-1.8.0-2.el7.remi.x86_64                   13/33
  验证中      : libxcb-1.13-1.el7.x86_64                          14/33
  验证中      : php-gd-7.4.28-1.el7.remi.x86_64                   15/33
  验证中      : libXpm-3.5.12-1.el7.x86_64                        16/33
  验证中      : libjpeg-turbo-1.2.90-8.el7.x86_64                 17/33
  验证中      : harfbuzz-1.7.5-2.el7.x86_64                       18/33
  验证中      : fribidi-1.0.2-1.el7_7.1.x86_64                    19/33
  验证中      : oniguruma5php-6.9.7.1-1.el7.remi.x86_64           20/33
  验证中      : dejavu-sans-fonts-2.33-6.el7.noarch               21/33
  验证中      : jbigkit-libs-2.0-11.el7.x86_64                    22/33
  验证中      : libraqm-0.7.0-4.el7.x86_64                        23/33
  验证中      : php-pecl-mcrypt-1.0.4-1.el7.remi.7.4.x86_64       24/33
  验证中      : php-pecl-zip-1.20.0-1.el7.remi.7.4.x86_64         25/33
  验证中      : php-opcache-7.4.28-1.el7.remi.x86_64              26/33
  验证中      : libXau-1.0.8-2.1.el7.x86_64                       27/33
  验证中      : libxslt-1.1.28-6.el7.x86_64                       28/33
  验证中      : libX11-1.6.7-4.el7_9.x86_64                       29/33
  验证中      : graphite2-1.3.10-1.el7_3.x86_64                   30/33
  验证中      : libwebp7-1.0.3-1.el7.remi.x86_64                  31/33
  验证中      : libX11-common-1.6.7-4.el7_9.noarch                32/33
  验证中      : php-mysqlnd-7.4.28-1.el7.remi.x86_64              33/33

已安装:
  php-bcmath.x86_64 0:7.4.28-1.el7.remi               php-fpm.x86_64 0:7.4.28-1.el7.remi
  php-gd.x86_64 0:7.4.28-1.el7.remi                   php-mbstring.x86_64 0:7.4.28-1.el7.remi
  php-mysqlnd.x86_64 0:7.4.28-1.el7.remi              php-opcache.x86_64 0:7.4.28-1.el7.remi
  php-pdo.x86_64 0:7.4.28-1.el7.remi                  php-pecl-mcrypt.x86_64 0:1.0.4-1.el7.remi.7.4
  php-pecl-zip.x86_64 0:1.20.0-1.el7.remi.7.4         php-xml.x86_64 0:7.4.28-1.el7.remi

作为依赖被安装:
  dejavu-fonts-common.noarch 0:2.33-6.el7             dejavu-sans-fonts.noarch 0:2.33-6.el7
  fontconfig.x86_64 0:2.13.0-4.3.el7                  fontpackages-filesystem.noarch 0:1.44-8.el7
  fribidi.x86_64 0:1.0.2-1.el7_7.1                    gd3php.x86_64 0:2.3.3-4.el7.remi
  graphite2.x86_64 0:1.3.10-1.el7_3                   harfbuzz.x86_64 0:1.7.5-2.el7
  jbigkit-libs.x86_64 0:2.0-11.el7                    libX11.x86_64 0:1.6.7-4.el7_9
  libX11-common.noarch 0:1.6.7-4.el7_9                libXau.x86_64 0:1.0.8-2.1.el7
  libXpm.x86_64 0:3.5.12-1.el7                        libjpeg-turbo.x86_64 0:1.2.90-8.el7
  libmcrypt.x86_64 0:2.5.8-13.el7                     libraqm.x86_64 0:0.7.0-4.el7
  libtiff.x86_64 0:4.0.3-35.el7                       libwebp7.x86_64 0:1.0.3-1.el7.remi
  libxcb.x86_64 0:1.13-1.el7                          libxslt.x86_64 0:1.1.28-6.el7
  libzip5.x86_64 0:1.8.0-2.el7.remi                   libzstd.x86_64 0:1.5.2-1.el7
  oniguruma5php.x86_64 0:6.9.7.1-1.el7.remi

完毕!
[root@localhost ~]#
[root@localhost ~]# php -m
[PHP Modules]
bcmath
bz2
calendar
Core
ctype
curl
date
dom
exif
fileinfo
filter
ftp
gd
gettext
hash
iconv
json
libxml
mbstring
mcrypt
mysqli
mysqlnd
openssl
pcntl
pcre
PDO
pdo_mysql
pdo_sqlite
Phar
readline
Reflection
session
SimpleXML
sockets
sodium
SPL
sqlite3
standard
tokenizer
xml
xmlreader
xmlwriter
xsl
Zend OPcache
zip
zlib

[Zend Modules]
Zend OPcache

[root@localhost ~]#
[root@localhost ~]# php-fpm -v
PHP 7.4.28 (fpm-fcgi) (built: Feb 15 2022 13:23:10)
Copyright (c) The PHP Group
Zend Engine v3.4.0, Copyright (c) Zend Technologies
    with Zend OPcache v7.4.28, Copyright (c), by Zend Technologies
[root@localhost ~]#
代码中如果用到进程管理,会需要 php-posix 拓展:
yum --enablerepo=remi-php74 install -y php-posix
[root@localhost ~]# yum --enablerepo=remi-php74 install -y php-posix
已加载插件:fastestmirror, product-id, search-disabled-repos, subscription-manager

This system is not registered with an entitlement server. You can use subscription-manager to register.

Loading mirror speeds from cached hostfile
 * base: mirrors.ustc.edu.cn
 * epel: hkg.mirror.rackspace.com
 * extras: mirrors.ustc.edu.cn
 * remi-php74: ftp.riken.jp
 * remi-safe: ftp.riken.jp
 * updates: mirrors.ustc.edu.cn
正在解决依赖关系
--> 正在检查事务
---> 软件包 php-process.x86_64.0.7.4.28-1.el7.remi 将被 安装
--> 解决依赖关系完成

依赖关系解决

==========================================================================================
 Package                  架构        版本                           源              大小
==========================================================================================
正在安装:
 php-process              x86_64      7.4.28-1.el7.remi              remi-php74      93 k

事务概要
==========================================================================================
安装  1 软件包

总下载量:93 k
安装大小:200 k
Downloading packages:
php-process-7.4.28-1.el7.remi.x86_64.rpm                       |  93 kB  00:00:01
Running transaction check
Running transaction test
Transaction test succeeded
Running transaction
  正在安装    : php-process-7.4.28-1.el7.remi.x86_64                1/1
  验证中      : php-process-7.4.28-1.el7.remi.x86_64                1/1

已安装:
  php-process.x86_64 0:7.4.28-1.el7.remi

完毕!
[root@localhost ~]#
[root@localhost ~]# php -m
[PHP Modules]
bcmath
bz2
calendar
Core
ctype
curl
date
dom
exif
fileinfo
filter
ftp
gd
gettext
hash
iconv
json
libxml
mbstring
mcrypt
mysqli
mysqlnd
openssl
pcntl
pcre
PDO
pdo_mysql
pdo_sqlite
Phar
posix
readline
Reflection
session
shmop
SimpleXML
sockets
sodium
SPL
sqlite3
standard
sysvmsg
sysvsem
sysvshm
tokenizer
xml
xmlreader
xmlwriter
xsl
Zend OPcache
zip
zlib

[Zend Modules]
Zend OPcache

[root@localhost ~]#
启动
设置开机自动启动:
systemctl enable php-fpm
启动:
systemctl start php-fpm
[root@localhost ~]# systemctl status php-fpm
● php-fpm.service - The PHP FastCGI Process Manager
   Loaded: loaded (/usr/lib/systemd/system/php-fpm.service; disabled; vendor preset: disabled)
   Active: inactive (dead)
[root@localhost ~]#
[root@localhost ~]# systemctl enable php-fpm
Created symlink from /etc/systemd/system/multi-user.target.wants/php-fpm.service to /usr/lib/systemd/system/php-fpm.service.
[root@localhost ~]#
[root@localhost ~]# systemctl start php-fpm
[root@localhost ~]#
[root@localhost ~]# systemctl status php-fpm
● php-fpm.service - The PHP FastCGI Process Manager
   Loaded: loaded (/usr/lib/systemd/system/php-fpm.service; enabled; vendor preset: disabled)
   Active: active (running) since 四 2022-02-17 16:42:51 CST; 2s ago
 Main PID: 2934 (php-fpm)
   Status: "Ready to handle connections"
   CGroup: /system.slice/php-fpm.service
           ├─2934 php-fpm: master process (/etc/php-fpm.conf)
           ├─2935 php-fpm: pool www
           ├─2936 php-fpm: pool www
           ├─2937 php-fpm: pool www
           ├─2938 php-fpm: pool www
           └─2939 php-fpm: pool www

2月 17 16:42:51 localhost.localdomain systemd[1]: Starting The PHP FastCGI Process Manager...
2月 17 16:42:51 localhost.localdomain systemd[1]: Started The PHP FastCGI Process Manager.
[root@localhost ~]#
Nginx安装
常规安装
一般就是直接yum默认源安装,也可以采用下面指定yum源安装。
安装
yum install -y nginx
[root@localhost ~]# yum install -y nginx
已加载插件:fastestmirror, product-id, search-disabled-repos, subscription-manager

This system is not registered with an entitlement server. You can use subscription-manager to register.

Loading mirror speeds from cached hostfile
 * base: mirrors.ustc.edu.cn
 * epel: hkg.mirror.rackspace.com
 * extras: mirrors.ustc.edu.cn
 * remi-safe: ftp.riken.jp
 * updates: mirrors.ustc.edu.cn
正在解决依赖关系
--> 正在检查事务
---> 软件包 nginx.x86_64.1.1.20.1-9.el7 将被 安装
--> 正在处理依赖关系 nginx-filesystem = 1:1.20.1-9.el7,它被软件包 1:nginx-1.20.1-9.el7.x86_64 需要
--> 正在处理依赖关系 libcrypto.so.1.1(OPENSSL_1_1_0)(64bit),它被软件包 1:nginx-1.20.1-9.el7.x86_64 需要
--> 正在处理依赖关系 libssl.so.1.1(OPENSSL_1_1_0)(64bit),它被软件包 1:nginx-1.20.1-9.el7.x86_64 需要
--> 正在处理依赖关系 libssl.so.1.1(OPENSSL_1_1_1)(64bit),它被软件包 1:nginx-1.20.1-9.el7.x86_64 需要
--> 正在处理依赖关系 nginx-filesystem,它被软件包 1:nginx-1.20.1-9.el7.x86_64 需要
--> 正在处理依赖关系 redhat-indexhtml,它被软件包 1:nginx-1.20.1-9.el7.x86_64 需要
--> 正在处理依赖关系 libcrypto.so.1.1()(64bit),它被软件包 1:nginx-1.20.1-9.el7.x86_64 需要
--> 正在处理依赖关系 libprofiler.so.0()(64bit),它被软件包 1:nginx-1.20.1-9.el7.x86_64 需要
--> 正在处理依赖关系 libssl.so.1.1()(64bit),它被软件包 1:nginx-1.20.1-9.el7.x86_64 需要
--> 正在检查事务
---> 软件包 centos-indexhtml.noarch.0.7-9.el7.centos 将被 安装
---> 软件包 gperftools-libs.x86_64.0.2.6.1-1.el7 将被 安装
---> 软件包 nginx-filesystem.noarch.1.1.20.1-9.el7 将被 安装
---> 软件包 openssl11-libs.x86_64.1.1.1.1k-2.el7 将被 安装
--> 解决依赖关系完成

依赖关系解决

=============================================================================================
 Package                        架构                 版本                     源      大小
=============================================================================================
正在安装:
 nginx                          x86_64               1:1.20.1-9.el7           epel     587 k
为依赖而安装:
 centos-indexhtml               noarch               7-9.el7.centos           base     92 k
 gperftools-libs                x86_64               2.6.1-1.el7              base     272 k
 nginx-filesystem               noarch               1:1.20.1-9.el7           epel     24 k
 openssl11-libs                 x86_64               1:1.1.1k-2.el7           epel     1.5 M

事务概要
===========================================================================================
安装  1 软件包 (+4 依赖软件包)

总下载量:2.4 M
安装大小:6.7 M
Downloading packages:
(1/5): gperftools-libs-2.6.1-1.el7.x86_64.rpm                  | 272 kB  00:00:00
(2/5): nginx-filesystem-1.20.1-9.el7.noarch.rpm                |  24 kB  00:00:00
(3/5): centos-indexhtml-7-9.el7.centos.noarch.rpm              |  92 kB  00:00:00
(4/5): nginx-1.20.1-9.el7.x86_64.rpm                           | 587 kB  00:00:00
(5/5): openssl11-libs-1.1.1k-2.el7.x86_64.rpm                  | 1.5 MB  00:00:14
-----------------------------------------------------------------------------------------
总计 168 kB/s | 2.4 MB  00:00:14
Running transaction check
Running transaction test
Transaction test succeeded
Running transaction
  正在安装    : 1:openssl11-libs-1.1.1k-2.el7.x86_64                1/5
  正在安装    : gperftools-libs-2.6.1-1.el7.x86_64                  2/5
  正在安装    : 1:nginx-filesystem-1.20.1-9.el7.noarch              3/5
  正在安装    : centos-indexhtml-7-9.el7.centos.noarch              4/5
  正在安装    : 1:nginx-1.20.1-9.el7.x86_64                         5/5
  验证中      : centos-indexhtml-7-9.el7.centos.noarch              1/5
  验证中      : 1:nginx-filesystem-1.20.1-9.el7.noarch              2/5
  验证中      : gperftools-libs-2.6.1-1.el7.x86_64                  3/5
  验证中      : 1:openssl11-libs-1.1.1k-2.el7.x86_64                4/5
  验证中      : 1:nginx-1.20.1-9.el7.x86_64                         5/5

已安装:
  nginx.x86_64 1:1.20.1-9.el7

作为依赖被安装:
  centos-indexhtml.noarch 0:7-9.el7.centos               gperftools-libs.x86_64 0:2.6.1-1.el7
  nginx-filesystem.noarch 1:1.20.1-9.el7                 openssl11-libs.x86_64 1:1.1.1k-2.el7

完毕!
[root@localhost ~]#
[root@localhost ~]# nginx -v
nginx version: nginx/1.20.1
[root@localhost ~]#
设置开机自动启动:
systemctl enable nginx
启动:
systemctl start nginx
[root@localhost ~]# systemctl status nginx
● nginx.service - The nginx HTTP and reverse proxy server
   Loaded: loaded (/usr/lib/systemd/system/nginx.service; disabled; vendor preset: disabled)
   Active: inactive (dead)
[root@localhost ~]#
[root@localhost ~]# systemctl enable nginx
Created symlink from /etc/systemd/system/multi-user.target.wants/nginx.service to /usr/lib/systemd/system/nginx.service.
[root@localhost ~]#
[root@localhost ~]# systemctl start nginx
[root@localhost ~]#
[root@localhost ~]#
配置
查看配置:
[root@localhost ~]# cat /etc/nginx/nginx.conf
# For more information on configuration, see:
#   * Official English Documentation: http://nginx.org/en/docs/
#   * Official Russian Documentation: http://nginx.org/ru/docs/

user nginx;
worker_processes auto;
error_log /var/log/nginx/error.log;
pid /run/nginx.pid;

# Load dynamic modules. See /usr/share/doc/nginx/README.dynamic.
include /usr/share/nginx/modules/*.conf;

events {
    worker_connections 1024;
}

http {
    log_format  main  '$remote_addr - $remote_user [$time_local] "$request" '
                      '$status $body_bytes_sent "$http_referer" '
                      '"$http_user_agent" "$http_x_forwarded_for"';

    access_log  /var/log/nginx/access.log  main;

    sendfile            on;
    tcp_nopush          on;
    tcp_nodelay         on;
    keepalive_timeout   65;
    types_hash_max_size 4096;

    include             /etc/nginx/mime.types;
    default_type        application/octet-stream;

    # Load modular configuration files from the /etc/nginx/conf.d directory.
    # See http://nginx.org/en/docs/ngx_core_module.html#include
    # for more information.
    include /etc/nginx/conf.d/*.conf;

    server {
        listen       80;
        listen       [::]:80;
        server_name  _;
        root         /usr/share/nginx/html;

        # Load configuration files for the default server block.
        include /etc/nginx/default.d/*.conf;

        error_page 404 /404.html;
        location = /404.html {
        }

        error_page 500 502 503 504 /50x.html;
        location = /50x.html {
        }
    }

# Settings for a TLS enabled server.
#
#    server {
#        listen       443 ssl http2;
#        listen       [::]:443 ssl http2;
#        server_name  _;
#        root         /usr/share/nginx/html;
#
#        ssl_certificate "/etc/pki/nginx/server.crt";
#        ssl_certificate_key "/etc/pki/nginx/private/server.key";
#        ssl_session_cache shared:SSL:1m;
#        ssl_session_timeout  10m;
#        ssl_ciphers HIGH:!aNULL:!MD5;
#        ssl_prefer_server_ciphers on;
#
#        # Load configuration files for the default server block.
#        include /etc/nginx/default.d/*.conf;
#
#        error_page 404 /404.html;
#            location = /40x.html {
#        }
#
#        error_page 500 502 503 504 /50x.html;
#            location = /50x.html {
#        }
#    }

}

[root@localhost ~]# ls -l /etc/nginx/conf.d/
总用量 0
[root@localhost ~]#
编辑nginx配置文件:
vi /etc/nginx/nginx.conf
在 /etc/nginx/nginx.conf 的 include /etc/nginx/conf.d/*.conf; 下加一行 include /media/sf_www/vhost/virtualbox/*.conf;
在 G:\www\vhost 下新建 test.com.conf 文件,写入内容:
server {
    listen       80;
    server_name  test.com;

    location / {
        root   /media/sf_www/test;
        index  index.html index.htm;
    }

    # redirect server error pages to the static page /50x.html
    #
    error_page   500 502 503 504  /50x.html;
    location = /50x.html {
        root   /usr/share/nginx/html;
    }
}
在 G:\www\test 下新建 index.html 文件,写入内容:
hello
在 C:\Windows\System32\drivers\etc\hosts 文件中追加一行:
192.168.56.108 test.com
重启 ngnix 服务:
systemctl restart nginx
浏览器访问 test.com,查看效果。
指定源安装
安装管理repository及扩展包的工具,yum-utils:
yum install -y yum-utils
设置nginx的yum仓库配置:
vi /etc/yum.repos.d/nginx.repo
写入:
[nginx-stable]
name=nginx stable repo
baseurl=http://nginx.org/packages/centos/$releasever/$basearch/
gpgcheck=1
enabled=1
gpgkey=https://nginx.org/keys/nginx_signing.key
module_hotfixes=true

[nginx-mainline]
name=nginx mainline repo
baseurl=http://nginx.org/packages/mainline/centos/$releasever/$basearch/
gpgcheck=1
enabled=0
gpgkey=https://nginx.org/keys/nginx_signing.key
module_hotfixes=true
安装执行:
yum install -y nginx
[root@localhost ~]# yum install -y nginx
已加载插件:fastestmirror, product-id, search-disabled-repos, subscription-manager

This system is not registered with an entitlement server. You can use subscription-manager to register.

Loading mirror speeds from cached hostfile
 * base: mirrors.ustc.edu.cn
 * epel: mirrors.nipa.cloud
 * extras: mirrors.ustc.edu.cn
 * remi-safe: mirror.netweaver.uk
 * updates: mirrors.ustc.edu.cn
正在解决依赖关系
--> 正在检查事务
---> 软件包 nginx.x86_64.1.1.20.2-1.el7.ngx 将被 安装
--> 解决依赖关系完成

依赖关系解决

========================================================================================
 Package              架构           版本                       源                 大小
========================================================================================
正在安装:
 nginx                x86_64         1:1.20.2-1.el7.ngx         nginx-stable      790 k

事务概要
=======================================================================================
安装  1 软件包

总下载量:790 k
安装大小:2.8 M
Downloading packages:
nginx-1.20.2-1.el7.ngx.x86_64.rpm                                      | 790 kB  00:00:02
Running transaction check
Running transaction test
Transaction test succeeded
Running transaction
  正在安装    : 1:nginx-1.20.2-1.el7.ngx.x86_64                             1/1
----------------------------------------------------------------------

Thanks for using nginx!

Please find the official documentation for nginx here:
* https://nginx.org/en/docs/

Please subscribe to nginx-announce mailing list to get
the most important news about nginx:
* https://nginx.org/en/support.html

Commercial subscriptions for nginx are available on:
* https://nginx.com/products/

----------------------------------------------------------------------
  验证中      : 1:nginx-1.20.2-1.el7.ngx.x86_64                             1/1

已安装:
  nginx.x86_64 1:1.20.2-1.el7.ngx

完毕!
[root@localhost ~]#
[root@localhost ~]# systemctl status nginx
● nginx.service - nginx - high performance web server
   Loaded: loaded (/usr/lib/systemd/system/nginx.service; disabled; vendor preset: disabled)
   Active: inactive (dead)
     Docs: http://nginx.org/en/docs/
[root@localhost ~]#
[root@localhost ~]# systemctl enable nginx
Created symlink from /etc/systemd/system/multi-user.target.wants/nginx.service to /usr/lib/systemd/system/nginx.service.
[root@localhost ~]#
[root@localhost ~]# cat /etc/nginx/nginx.conf

user  nginx;
worker_processes  auto;

error_log  /var/log/nginx/error.log notice;
pid        /var/run/nginx.pid;


events {
    worker_connections  1024;
}


http {
    include       /etc/nginx/mime.types;
    default_type  application/octet-stream;

    log_format  main  '$remote_addr - $remote_user [$time_local] "$request" '
                      '$status $body_bytes_sent "$http_referer" '
                      '"$http_user_agent" "$http_x_forwarded_for"';

    access_log  /var/log/nginx/access.log  main;

    sendfile        on;
    #tcp_nopush     on;

    keepalive_timeout  65;

    #gzip  on;

    include /etc/nginx/conf.d/*.conf;
}
[root@localhost ~]#
[root@localhost ~]# ls -l /etc/nginx/conf.d/
总用量 4
-rw-r--r--. 1 root root 1072 11月 16 23:02 default.conf
[root@localhost ~]#
[root@localhost ~]# cat /etc/nginx/conf.d/default.conf
server {
    listen       80;
    server_name  localhost;

    #access_log  /var/log/nginx/host.access.log  main;

    location / {
        root   /usr/share/nginx/html;
        index  index.html index.htm;
    }

    #error_page  404              /404.html;

    # redirect server error pages to the static page /50x.html
    #
    error_page   500 502 503 504  /50x.html;
    location = /50x.html {
        root   /usr/share/nginx/html;
    }

    # proxy the PHP scripts to Apache listening on 127.0.0.1:80
    #
    #location ~ \.php$ {
    #    proxy_pass   http://127.0.0.1;
    #}

    # pass the PHP scripts to FastCGI server listening on 127.0.0.1:9000
    #
    #location ~ \.php$ {
    #    root           html;
    #    fastcgi_pass   127.0.0.1:9000;
    #    fastcgi_index  index.php;
    #    fastcgi_param  SCRIPT_FILENAME  /scripts$fastcgi_script_name;
    #    include        fastcgi_params;
    #}

    # deny access to .htaccess files, if Apache's document root
    # concurs with nginx's one
    #
    #location ~ /\.ht {
    #    deny  all;
    #}
}

[root@localhost ~]#
[root@localhost ~]# lsof -nP -iTCP -sTCP:LISTEN
COMMAND  PID   USER   FD   TYPE DEVICE SIZE/OFF NODE NAME
php-fpm 1121   root    7u  IPv4  20520      0t0  TCP 127.0.0.1:9000 (LISTEN)
sshd    1126   root    3u  IPv4  19701      0t0  TCP *:22 (LISTEN)
sshd    1126   root    4u  IPv6  19703      0t0  TCP *:22 (LISTEN)
php-fpm 1243 apache    9u  IPv4  20520      0t0  TCP 127.0.0.1:9000 (LISTEN)
php-fpm 1244 apache    9u  IPv4  20520      0t0  TCP 127.0.0.1:9000 (LISTEN)
php-fpm 1246 apache    9u  IPv4  20520      0t0  TCP 127.0.0.1:9000 (LISTEN)
php-fpm 1247 apache    9u  IPv4  20520      0t0  TCP 127.0.0.1:9000 (LISTEN)
php-fpm 1248 apache    9u  IPv4  20520      0t0  TCP 127.0.0.1:9000 (LISTEN)
master  1394   root   13u  IPv4  19968      0t0  TCP 127.0.0.1:25 (LISTEN)
master  1394   root   14u  IPv6  19969      0t0  TCP [::1]:25 (LISTEN)
[root@localhost ~]#
[root@localhost ~]#
[root@localhost ~]# ss -tunlp
Netid State   Recv-Q Send-Q    Local Address:Port  Peer Address:Port
udp   UNCONN     0      0               *:68           *:*    users:(("dhclient",pid=1932,fd=6))
udp   UNCONN     0      0       127.0.0.1:323          *:*    users:(("chronyd",pid=702,fd=5))
udp   UNCONN     0      0           [::1]:323       [::]:*    users:(("chronyd",pid=702,fd=6))
tcp   LISTEN     0      128             *:22           *:*    users:(("sshd",pid=1126,fd=3))
tcp   LISTEN     0      100     127.0.0.1:25           *:*    users:(("master",pid=1394,fd=13))
tcp   LISTEN     0      128     127.0.0.1:9000         *:*    users:(("php-fpm",pid=1248,fd=9),("php-fpm",pid=1247,fd=9),("php-fpm",pid=1246,fd=9),("php-fpm",pid=1244,fd=9),("php-fpm",pid=1243,fd=9),("php-fpm",pid=1121,fd=7))
tcp   LISTEN     0      128          [::]:22        [::]:*    users:(("sshd",pid=1126,fd=4))
tcp   LISTEN     0      100         [::1]:25        [::]:*    users:(("master",pid=1394,fd=14))
[root@localhost ~]#
[root@localhost ~]#
[root@localhost ~]# systemctl start nginx
[root@localhost ~]#
[root@localhost ~]# systemctl status nginx
● nginx.service - nginx - high performance web server
   Loaded: loaded (/usr/lib/systemd/system/nginx.service; enabled; vendor preset: disabled)
   Active: active (running) since 四 2022-02-17 20:02:31 CST; 12s ago
     Docs: http://nginx.org/en/docs/
  Process: 2154 ExecStart=/usr/sbin/nginx -c /etc/nginx/nginx.conf (code=exited, status=0/SUCCESS)
 Main PID: 2155 (nginx)
   CGroup: /system.slice/nginx.service
           ├─2155 nginx: master process /usr/sbin/nginx -c /etc/nginx/nginx.conf
           ├─2156 nginx: worker process
           ├─2157 nginx: worker process
           ├─2158 nginx: worker process
           └─2159 nginx: worker process

2月 17 20:02:31 localhost.localdomain systemd[1]: Starting nginx - high performance web server...
2月 17 20:02:31 localhost.localdomain systemd[1]: Started nginx - high performance web server.
[root@localhost ~]#
[root@localhost ~]# lsof -nP -iTCP -sTCP:LISTEN
COMMAND  PID   USER   FD   TYPE DEVICE SIZE/OFF NODE NAME
php-fpm 1121   root    7u  IPv4  20520      0t0  TCP 127.0.0.1:9000 (LISTEN)
sshd    1126   root    3u  IPv4  19701      0t0  TCP *:22 (LISTEN)
sshd    1126   root    4u  IPv6  19703      0t0  TCP *:22 (LISTEN)
php-fpm 1243 apache    9u  IPv4  20520      0t0  TCP 127.0.0.1:9000 (LISTEN)
php-fpm 1244 apache    9u  IPv4  20520      0t0  TCP 127.0.0.1:9000 (LISTEN)
php-fpm 1246 apache    9u  IPv4  20520      0t0  TCP 127.0.0.1:9000 (LISTEN)
php-fpm 1247 apache    9u  IPv4  20520      0t0  TCP 127.0.0.1:9000 (LISTEN)
php-fpm 1248 apache    9u  IPv4  20520      0t0  TCP 127.0.0.1:9000 (LISTEN)
master  1394   root   13u  IPv4  19968      0t0  TCP 127.0.0.1:25 (LISTEN)
master  1394   root   14u  IPv6  19969      0t0  TCP [::1]:25 (LISTEN)
nginx   2155   root    6u  IPv4  23427      0t0  TCP *:80 (LISTEN)
nginx   2156  nginx    6u  IPv4  23427      0t0  TCP *:80 (LISTEN)
nginx   2157  nginx    6u  IPv4  23427      0t0  TCP *:80 (LISTEN)
nginx   2158  nginx    6u  IPv4  23427      0t0  TCP *:80 (LISTEN)
nginx   2159  nginx    6u  IPv4  23427      0t0  TCP *:80 (LISTEN)
[root@localhost ~]#
[root@localhost ~]# ss -tunlp
Netid State    Recv-Q Send-Q  Local Address:Port   Peer Address:Port
udp   UNCONN     0      0               *:68           *:*    users:(("dhclient",pid=1932,fd=6))
udp   UNCONN     0      0       127.0.0.1:323          *:*    users:(("chronyd",pid=702,fd=5))
udp   UNCONN     0      0           [::1]:323       [::]:*    users:(("chronyd",pid=702,fd=6))
tcp   LISTEN     0      128             *:80           *:*    users:(("nginx",pid=2159,fd=6),("nginx",pid=2158,fd=6),("nginx",pid=2157,fd=6),("nginx",pid=2156,fd=6),("nginx",pid=2155,fd=6))
tcp   LISTEN     0      128             *:22           *:*    users:(("sshd",pid=1126,fd=3))
tcp   LISTEN     0      100     127.0.0.1:25           *:*    users:(("master",pid=1394,fd=13))
tcp   LISTEN     0      128     127.0.0.1:9000         *:*    users:(("php-fpm",pid=1248,fd=9),("php-fpm",pid=1247,fd=9),("php-fpm",pid=1246,fd=9),("php-fpm",pid=1244,fd=9),("php-fpm",pid=1243,fd=9),("php-fpm",pid=1121,fd=7))
tcp   LISTEN     0      128          [::]:22        [::]:*    users:(("sshd",pid=1126,fd=4))
tcp   LISTEN     0      100         [::1]:25        [::]:*    users:(("master",pid=1394,fd=14))
[root@localhost ~]#
[root@localhost ~]#
浏览器访问 192.168.56.108,查看效果。
WEB配置
修改/etc/nginx/nginx.conf:
vi /etc/nginx/nginx.conf
把 include /etc/nginx/conf.d/*.conf; 替换为 include /media/sf_www/vhost/virtualbox/*.conf;
在 G:\www\vhost\virtualbox 下新建 test.com.conf 文件,写入内容:
server {
    listen       80;
    server_name  test.com www.test.com;

    location / {
        root   /media/sf_www/test;
        index  index.html index.htm;
    }

    error_page   500 502 503 504  /50x.html;
    location = /50x.html {
        root   /usr/share/nginx/html;
    }

    location ~ \.php$ {
        root   /media/sf_www/test;
        fastcgi_pass   127.0.0.1:9000;
        fastcgi_param  SCRIPT_FILENAME  /scripts$fastcgi_script_name;
        include        fastcgi_params;
        #try_files $uri =404;
    }
}
在 G:\www\test 下新建 index.php 文件,写入内容:
<?php
echo "hello";
在 C:\Windows\System32\drivers\etc\hosts 文件中追加一行:
192.168.56.108 test.com
重启 ngnix 服务:
systemctl restart nginx
浏览器访问 test.com,查看效果。
用户权限
把nginx和php用户加入共享文件夹组vboxsf
usermod -aG vboxsf nginx
usermod -aG vboxsf apache
发现还是不行,关闭 SELinux 后才可以了,临时关闭(设置 SELinux 成为 permissive 模式):
setenforce 0
[root@localhost ~]# sestatus
SELinux status:                 enabled
SELinuxfs mount:                /sys/fs/selinux
SELinux root directory:         /etc/selinux
Loaded policy name:             targeted
Current mode:                   enforcing
Mode from config file:          enforcing
Policy MLS status:              enabled
Policy deny_unknown status:     allowed
Max kernel policy version:      31
[root@localhost ~]#
[root@localhost ~]# setenforce 0
[root@localhost ~]#
[root@localhost ~]# sestatus
SELinux status:                 enabled
SELinuxfs mount:                /sys/fs/selinux
SELinux root directory:         /etc/selinux
Loaded policy name:             targeted
Current mode:                   permissive
Mode from config file:          enforcing
Policy MLS status:              enabled
Policy deny_unknown status:     allowed
Max kernel policy version:      31
[root@localhost ~]#
[root@localhost ~]#
(setenforce 1 设置SELinux 成为enforcing模式)
永久关闭:
vi /etc/selinux/config
# This file controls the state of SELinux on the system.
# SELINUX= can take one of these three values:
#     enforcing - SELinux security policy is enforced.
#     permissive - SELinux prints warnings instead of enforcing.
#     disabled - No SELinux policy is loaded.
SELINUX=enforcing
# SELINUXTYPE= can take one of three values:
#     targeted - Targeted processes are protected,
#     minimum - Modification of targeted policy. Only selected processes are protected.
#     mls - Multi Level Security protection.
SELINUXTYPE=targeted
将SELINUX=enforcing 改为 SELINUX=disabled
设置后需要重启才能生效。
MySQL
问题一
创建表时报错:
[Err] 1055 - Expression #1 of ORDER BY clause is not in GROUP BY clause and contains nonaggregated column 'information_schema.PROFILING.SEQ' which is not functionally dependent on columns in GROUP BY clause; this is incompatible with sql_mode=only_full_group_by
select @@global.sql_mode读取到:
select @@global.sql_mode ONLY_FULL_GROUP_BY,STRICT_TRANS_TABLES,NO_ZERO_IN_DATE,NO_ZERO_DATE,ERROR_FOR_DIVISION_BY_ZERO,NO_ENGINE_SUBSTITUTION
执行
set @@global.sql_mode =‘STRICT_TRANS_TABLES,NO_ZERO_IN_DATE,NO_ZERO_DATE,ERROR_FOR_DIVISION_BY_ZERO,NO_AUTO_CREATE_USER,NO_ENGINE_SUBSTITUTION’;
返回:
[Err] 1064 - You have an error in your SQL syntax; check the manual that corresponds to your MySQL server version for the right syntax to use near ',NO_ZERO_DATE,ERROR_FOR_DIVISION_BY_ZERO,NO_AUTO_CREATE_USER,NO_ENGINE_SUBSTITUT' at line 1
问题未解决。
附录
桥接、NAT、Host-only的区别
桥接
简而言之桥接就是指:就是通过一台设备(可能不止一个)把几个网络串起来形成的连接。这边主要介绍虚拟机所采用的桥接方式, 虚拟出来的操作系统就像是局域网中的一独立的主机,它可以通过路由器网线访问网内任何一台机器。 不过虚拟机需要占用你同一个网段的一个 IP 地址,当且仅当虚拟机和实体机在同一个网段,两者才可以进行通信, 如:虚拟机 IP:192.168.1.101,实体机 IP:192.168.1.100。
虚拟机采用桥接方式时,是不需要虚拟网卡的,这时候虚拟机操作系统和实体机操作系统同时使用真实网卡工作, 然后真实网卡发送数据出去,而如果虚拟机发送数据给真实机,则数据流向是:虚拟机系统->真实网卡->路由器->真实网卡->实体机系统, 不难看出同一个数据经过网卡在路由器上面绕了一圈又回到了网卡。
通过上述内容发现,桥接必须经过真实网卡和路由器,因此当你的电脑没有链接有线网或者无线网的话, 你的实体机是无法和虚拟机进行交互的,即便看起来两者很近也不行。而选用桥接还是 NAT 等方式是在虚拟机软件中选定, 进入虚拟的操作系统后,所有的设置和真实电脑没有本质区别,如果路由器允许自动分配 IP 地址, 则操作系统设置为自动获取 IP 即可,如果不能自动分配,也可以在操作系统中手动分配 IP 地址。 另外值得注意的是某些公司路由器绑定了电脑 mac 地址和 IP 地址,这时候虚拟机中的桥接也相当于一个真实电脑, 也需要完成相关的绑定才可以访问网络。
可以看出:如果你想利用VMware在局域网内新建一个虚拟服务器,为局域网用户提供网络服务,就应该选择桥接模式。下面举个例子:
例如大学宿舍里有一个路由器,宿舍里四个人连接这个路由器,路由器的 wanip 就不理会了,这个 ip 是动态获取的, 而一般lanip默认是192.168.1.1,子网掩码是255.255.255.0。而其他四个人是自动获取ip,假设四个人的 ip 是:
A: 192.168.1.100/255.255.255.0,
B: 192.168.1.101/255.255.255.0,
C: 192.168.1.102/255.255.255.0,
D: 192.168.1.103/255.255.255.0
那么虚拟机的ip 可以设置的 ip地址范围 是(网络地址 0 和 1 的除外,再除去 ABCD 四个人的 ip 地址):
192.168.1.2 - 192.168.1.99,
192.168.1.104 - 192.168.1.254
假设虚拟机的 ip 地址可以设置为 192.168.1.98/255.255.255.0,设置了这个 ip 地址, ABCD 这四个人就可以通过 192.168.1.98 访问虚拟机了。 如果虚拟机需要上外网,那么还需要配置虚拟机的路由地址,就是 192.168.1.1 了,这样,虚拟机就可以上外网了。 但是,上网我们一般是通过域名去访问外网的,所以我们还需要为虚拟机配置一个 dns 服务器, 我们可以简单点,把 dns 服务器地址配置为 google 的 dns 服务器:8.8.8.8,到此,虚拟机就可以上网了。
综上所述,同一个数据经过网卡在路由器上面绕了一圈又回到了网卡。而虚拟机的桥接也只在其他电脑需要访问你电脑的虚拟机时, 或者你虚拟机需要访问其他外部设备时才有相关需求,一般情况还是建议配置成操作方便使用简单的 NAT 方式。
NAT
NAT(Network Address Translation)模式实际是虚拟了一个网卡出来,虚拟机直接连接这个虚拟网卡, 每次访问和交互通过这个虚拟网卡交换数据。
- 虚拟机发送数据给实体机:虚拟机系统->虚拟网卡->实体机系统;
- 虚拟机访问外网:虚拟机系统->虚拟网卡->实体机系统->真实网卡->路由器->外网。
虚拟机借助 NAT (网络地址转换)功能,通过宿主机器所在的网络来访问公网。 NAT 模式中,虚拟机的网卡和真实网卡的网络, 不需要在同一个网络,虚拟机的网卡的网段可以理解为:路由器所在网段之下的一个子网段。
采用NAT模式最大的优势是虚拟系统接入互联网非常简单,你不需要进行任何其他的配置,只需要宿主机器能访问互联网即可。 如果你想利用VMWare安装一个新的虚拟系统,在虚拟系统中不用进行任何手工配置就能直接访问互联网,建议你采用NAT模式。 而缺点是: NAT 模式下,虚拟机仅仅可以同路由器下网段中的一台真实机通讯,但真实机却无法与该虚拟机通讯, 而这台真实机就是安装虚拟机的这台电脑,之所以可以通讯是因为这台电脑本身充当了虚拟机的路由器, 相当于路由器的 192.168.1.1 这个地址,而你在 VMWare 下的网卡管理中是可以看到这个地址的。
这边再补充一点:采用NAT模式时,虚拟机和实体机交互并不是直接进行的, 首先虚拟机操作系统访问虚拟网卡 VMnet8 (地址如: 192.188.1.33), 然后这个虚拟网卡会再将数据提交给真实机操作系统VMware Network Adapter VMnet8(地址: 192.188.1.1), 而地址(192.188.1.33 和 192.188.1.1)实际都是由虚拟机软件 VMWare 提供的,具体的交互细节不作研究。
Host-Only
在 Host-Only 模式下,虚拟网络是一个全封闭的网络,它唯一能够访问的就是主机,主机也可以访问虚拟机。 其实 Host-Only 网络和 NAT 网络很相似,不同的地方就是 Host-Only 网络没有 NAT 服务,所以虚拟网络不能连接到 Internet 。 主机和虚拟机之间的通信是通过 VMware Network Adepter VMnet1 虚拟网卡来实现的。
Host-Only 的宗旨就是建立一个与外界隔绝的内部网络,来提高内网的安全性。这个功能或许对普通用户来说没有多大意义, 但大型服务商会常常利用这个功能。如果你想为 VMnet1 网段提供路由功能,那就需要使用RRAS, 而不能使用 XP 或 2000 的 ICS,因为 ICS 会把内网的 IP 地址改为 192.168.0.1, 但虚拟机是不会给 VMnet1 虚拟网卡分配这个地址的,那么主机和虚拟机之间就不能通信了。
Firewall 防火墙
Firewall 的 Zone 还能将不同的网络连接归类到不同的信任级别:
drop: 丢弃所有进入的包,而不给出任何响应
block: 拒绝所有外部发起的连接,允许内部发起的连接
public: 允许指定的进入连接
external: 同上,对伪装的进入连接,一般用于路由转发
dmz: 允许受限制的进入连接
work: 允许受信任的计算机被限制的进入连接,类似 workgroup
home: 同上,类似 homegroup
internal: 同上,范围针对所有互联网用户
trusted: 信任所有连接
过滤规则解释如下:
source: 根据源地址过滤(优先级最高)
interface: 根据网卡过滤(优先级次高)
service: 根据服务名过滤
port: 根据端口过滤
icmp-block: icmp 报文过滤,按照 icmp 类型配置
masquerade: ip 地址伪装
forward-port: 端口转发
rule: 自定义规则
查看端口的开放情况:
> sudo firewall-cmd --list-all

public (active)
  target: default
  icmp-block-inversion: no
  interfaces: enp0s3 enp0s8
  sources:
  services: dhcpv6-client http ssh
  ports: 80/tcp
  protocols:
  masquerade: no
  forward-ports:
  source-ports:
  icmp-blocks:
  rich rules:
命令:
# 查看是否开启
systemctl status firewalld.service
# 打开防火墙
systemctl start firewalld.service
# 停用防火墙
systemctl disable firewalld
# 禁用防火墙
systemctl stop firewalld.service

# 开机启动
systemctl enable firewalld
# 取消开机启动
systemctl disable firewalld

# 查看运行状态
firewall-cmd --state
# 查看接口信息
firewall-cmd --list-all

# 更新防火墙规则方法1:无需断开连接,动态更改规则
firewall-cmd --reload
# 更新防火墙规则方法2:断开连接,以重启的方式更改规则
firewall-cmd --complete-reload

# 查看帮助
firewall-cmd --help
--zone=NAME # 指定 Zone
--permanent # 为永久生效
--timeout=seconds # 持续一段时间,到期后自动移除,经常用于调试,且不能与 --permanent 同时使用

# 追加一个8181端口,永久有效
firewall-cmd --add-port=8181/tcp --permanent
# 追加一段端口范围
firewall-cmd --add-port=6000-6600/tcp
# 开放 ftp 服务
firewall-cmd --add-service=ftp
# 添加eth0 接口至 public 信任等级,永久有效
firewall-cmd --zone=public --add-interface=eth0 --permanent

# 配置 public zone 的端口转发
firewall-cmd --zone=public --add-masquerade
# 然后转发 tcp 22 端口至 9527
firewall-cmd --zone=public --add-forward-port=port=22:proto=tcp:toport=9527
# 转发 22 端口数据至另一个 ip 的相同端口上
firewall-cmd --zone=public --add-forward-port=port=22:proto=tcp:toaddr=192.168.1.123
# 转发 22 端口数据至另一 ip 的 9527 端口上
firewall-cmd --zone=public --add-forward-port=port=22:proto=tcp:toport=9527:toaddr=192.168.1.100

# IP 封禁
firewall-cmd --permanent --add-rich-rule="rule family='ipv4' source address='192.168.1.123' reject"
# 通过 ipset 来封禁 ip
firewall-cmd --permanent --zone=public --new-ipset=blacklist --type=hash:ip
firewall-cmd --permanent --zone=public --ipset=blacklist --add-entry=192.168.1.123
# 封禁网段
firewall-cmd --permanent --zone=public --new-ipset=blacklist --type=hash:net
firewall-cmd --permanent --zone=public --ipset=blacklist --add-entry=192.168.1.0/24
# 倒入 ipset 规则 blacklist,然后封禁 blacklist
firewall-cmd --permanent --zone=public --new-ipset-from-file=/path/blacklist.xml
firewall-cmd --permanent --zone=public --add-rich-rule='rule source ipset=blacklist drop'
查看端口:firewall-cmd --permanent --list-ports
查看哪些程序正在使用互联网:firewall-cmd --permanent --list-services
添加端口:firewall-cmd --permanent --add-port=8080-8085/tcp
firewall-cmd --zone=public --add-port=3306/tcp --permanent
加载设置:firewall-cmd --reload
删除端口:firewall-cmd --permanent --remove-port=8080-8085/tcp
SELinux
安全增强型 Linux(Security-Enhanced Linux)简称 SELinux,它是一个 Linux 内核模块,也是 Linux 的一个安全子系统。
SELinux 主要由美国国家安全局开发。2.6 及以上版本的 Linux 内核都已经集成了 SELinux 模块。
SELinux 主要作用就是最大限度地减小系统中服务进程可访问的资源(最小权限原则)。
FHS
Filesystem Hierarchy Standard 文件系统层次化标准
约定俗成的目录规范
定义目录及其一级子目录
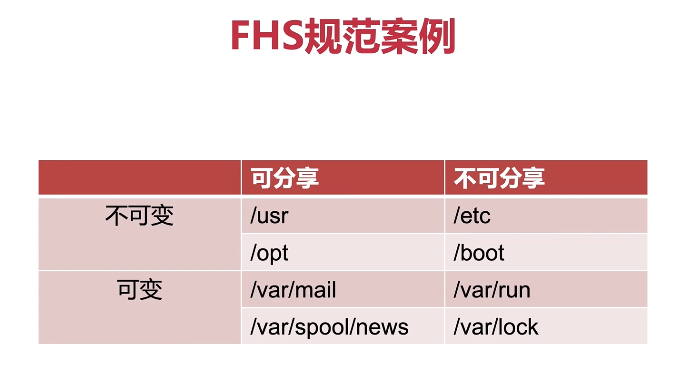
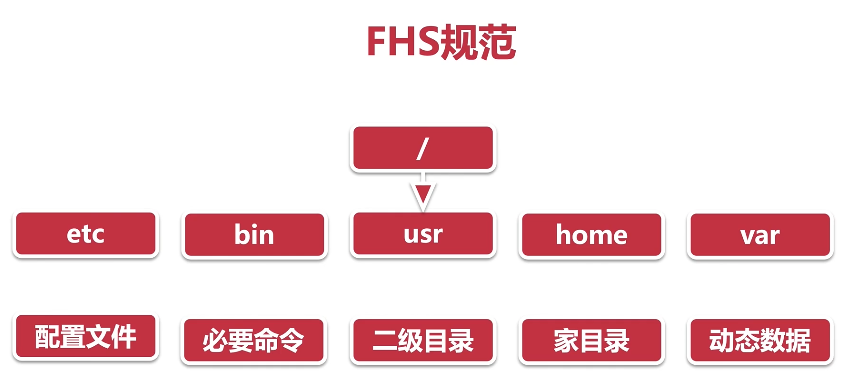
在早期的 UNIX 系统中,各个厂家都定义了自己文件系统的命名构成,比较混乱,而且难以区分。
为了避免在 Linux 系统上也出现这种命名混乱的问题,在 1994 年推出了 FSSTND(FileSystem Standard) 的 Linux 文件系统层次结构标准, 后来 UNIX 团队把 FSSTND 发扬光大,成为了后来的 FHS(FileSystem Hierarchy Standard) 。
FHS 标准使得众多的 Linux distributions(Linux 发行版) 有了统一的文件系统命名标准, 换一种说法:FHS 就是一种文件系统的命名标准。一般来说,Linux distributions 都需要遵循 FHS 规定的
- 目录结构和目录内容
- 文件类型的权限
但是,FHS 仅仅定义了两层规范,第一层是 / 下面的各个目录要放什么文件数据, 比如 /etc 下面需要放设置文件,/bin 和 /sbin 下面需要放可执行文件等; 第二层是针对 /usr 和 /var 这两个目录来定义的,比如 /usr/share 需要放共享数据,/var/log需要放系统登录文件等。
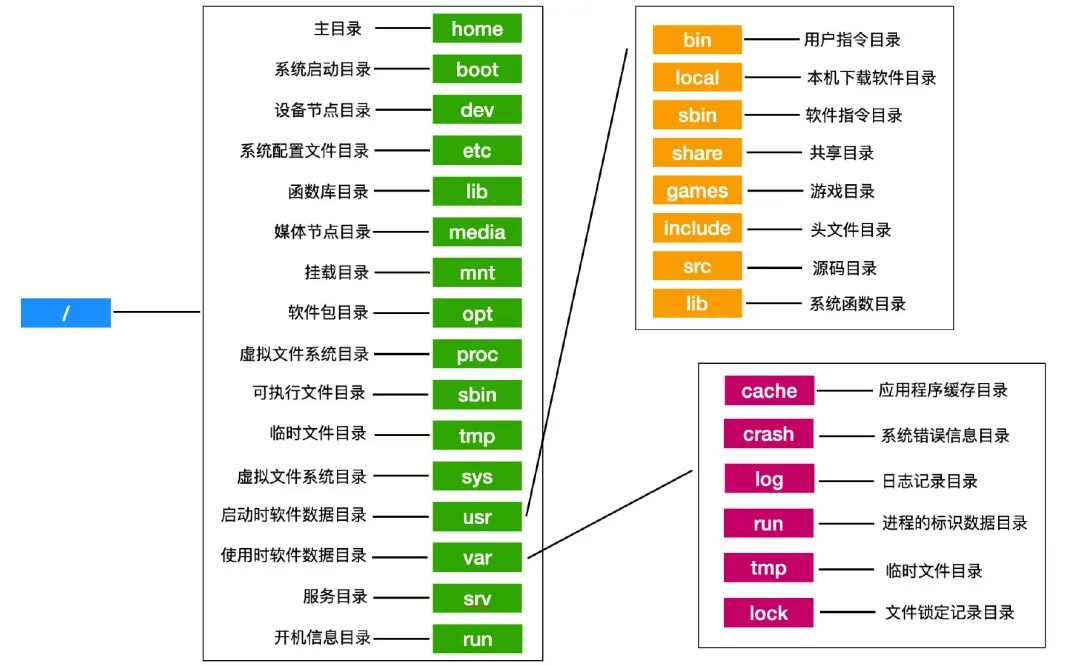
VFS
Virtual File System 虚拟文件系统
内核层抽象出通用的文件系统接口
支持文件、网络、特殊文件系统
参考资料
Jenkins持续集成安装部署到项目开发实战详细教程合集 https://www.ixigua.com/6827368436994146828
小白速进,五小时linux速成班 centos8安装 https://www.bilibili.com/video/BV1ey4y1S7Q6?p=6
https://www.bilibili.com/video/BV1pF411Y7tq https://www.bilibili.com/video/BV1pF411Y7tq
Oracle VM VirtualBox 安装 Centos7 并配置静态IP https://blog.csdn.net/qq_23033339/article/details/80867195
如何安装Virtual Box的VBox Guest Additions扩展程序 https://blog.csdn.net/i042416/article/details/82735161
21/70 桥接、NAT、Host-only上网方式的区别 https://www.jianshu.com/p/b496f9cae1a9
VirtualBox的网络接入模式解释 Net Host-Only Bridged… https://blog.csdn.net/y1534414425/article/details/122354784
Centos7.8 安装PHP7.4 https://ibaiyang.github.io/blog/linux/2021/08/29/Centos7.8-安装PHP7.4.html
Win10家庭版WSL2安装Centos7.8 https://ibaiyang.github.io/blog/linux/2021/08/28/Win10家庭版WSL2安装Centos7.8.html
CentOS 7 的防火墙开启 http 80 端口 https://chaishiwei.com/blog/1274.html
防火墙管理 https://liuurick.github.io/2019/01/11/防火墙管理/
CentOS 7.X 关闭SELinux https://www.cnblogs.com/activiti/p/7552677.html
一文彻底明白linux中的selinux到底是什么 https://blog.csdn.net/yanjun821126/article/details/80828908
SELinux 入门 https://linux.cn/article-7317-1.html
用了这么久 Linux ,才知道这些概念 https://mp.weixin.qq.com/s/10SUh8RKGfSQwXSL14Vw2Q
Filesystem Hierarchy Standard https://www.pathname.com/fhs/