引言
个人使用的是Linux环境做个人主机,也是因为对Linux不熟悉,各种摸索和折腾,光PHP就安装了好多个版本,而且里面的版本还升过版本, 导致服务环境非常乱,给PHP安装个拓展总是报错:拓展编码的phpize版本和PHP的版本不一致,导致拓展使用不了,折腾了好长时间无法解决。 算了,还是把这些很杂乱的版本就卸载了吧,居然卸载也卸载不了,因为PHP有的是apt安装的、有的是yum安装的、有的是编译安装的、有的还用apt升过级, 现在不知道哪个版本是用哪种方式安装的了,也没法卸载了,只能物理删除了。
查看下当前的PHP版本:
php -v
看一下PHP的命令地址:
which php
再看下php在哪里:
whereis php
这里可以看到php散落在各个地方。
还好当时安装的都是php7的版本,我们搜一下php7开头的有哪些:
> find / -name 'php7*'
发现列出了很长的一个列表,既有7.0,又有7.1,还有7.4。既然无法一个一个卸载,那就物理删除吧:
find / -name 'php7*'|xargs rm -rf
操作完成后,再搜索看一下:
> find / -name 'php7*'
接下来就是一些很琐碎的相关文件删除了,先大致搜索看看:
find / -name php.ini
find / -name php
追踪看看,能删的就删了吧,注意别把自己的项目开发文件给删了!
可以看到,一个系统安装很多版本导致的问题,会影响到系统的正常使用,如果安装时只安装一个版本就好了。 或者现在有一种解决方案,就是用docker,一个container中运行一个服务、一个版本,这样以后想尝试多版本也有办法了。
介绍
在未使用虚拟化技术的机子上,长期使用后,上面的软件和版本就变得乱七八器,很混乱和庞杂,比如一个机子上可能既有PHP7.1、又有PHP7.0、还有PHP5.6, 其他软件也一样,而且由于Linux上安装方式的多样性,既有源码编译安装,又有apt、rpm、yum、dpkg等包管理工具安装, 导致PHP7.1是编译安装的、PHP7.0是apt方式安装的、PHP5.6又是dpkg方式安装的等等,最后自己也记不清哪个软件的哪个版本是通过哪种方式安装的了, 卸载都不知道通过什么方式卸载,看着这一摊子不头大才怪:如果一个机子上面每个软件版本都有自己的一个容器,不想要这个版本了,直接把容器删了就好了。
这就是虚拟化技术。有一种传统的方式是虚拟机。虚拟机,类似于“子电脑”,占用空间大、启动慢,一般要几GB到几十GB的空间。 还有一种新的虚拟化技术就是Docker这样的容器技术,属于轻量级的虚拟化,只需要MB级甚至KB级的空间,启动时间很快,几秒钟就能完成。
所有我们选中的就是Docker技术。Docker 是一个开源的应用容器引擎,让开发者可以打包他们的应用以及依赖包到一个可移植的容器中, 然后发布到任何流行的 Linux 机器上,也可以实现虚拟化。容器是完全使用沙箱机制,相互之间不会有任何接口。
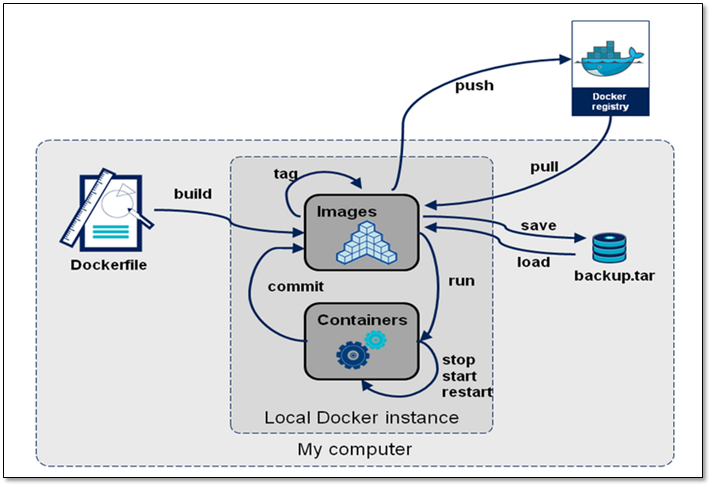
放一张总结的图:
Docker信息查看
我们在《趣谈网络协议》的TCP/IP实验环境的搭建中安装过Docker,另外有些Linux发行版本可能集成了Docker,我们可以查看下Docker的基本信息。
我们电脑上可能已经安装好了Docker,我们查看一下版本:
docker -v
输出:
Docker version 19.03.5, build 633a0ea838
也可以通过下面这条命令查看详情:
docker version
输出:
Client: Docker Engine - Community
 Version:           19.03.5
 API version:       1.40
 Go version:        go1.12.12
 Git commit:        633a0ea838
 Built:             Wed Nov 13 07:25:58 2019
 OS/Arch:           linux/amd64
 Experimental:      false

Server: Docker Engine - Community
 Engine:
  Version:          19.03.5
  API version:      1.40 (minimum version 1.12)
  Go version:       go1.12.12
  Git commit:       633a0ea838
  Built:            Wed Nov 13 07:24:29 2019
  OS/Arch:          linux/amd64
  Experimental:     false
 containerd:
  Version:          1.2.10
  GitCommit:        b34a5c8af56e510852c35414db4c1f4fa6172339
 runc:
  Version:          1.0.0-rc8+dev
  GitCommit:        3e425f80a8c931f88e6d94a8c831b9d5aa481657
 docker-init:
  Version:          0.18.0
  GitCommit:        fec3683
查看镜像有哪些:
docker images
输出:
REPOSITORY                              TAG      IMAGE ID         CREATED        SIZE
hub.c.163.com/liuchao110119163/ubuntu   tcpip    396485da9bdd     21 months ago  345MB
安装Docker引擎
Docker 的旧版本被称为 docker,docker.io 或 docker-engine 。如果已安装,请卸载它们:
sudo apt-get remove docker docker-engine docker.io containerd runc
更新 apt 包索引:
sudo apt-get update
安装 apt 依赖包,用于通过HTTPS来获取仓库:
sudo apt-get install \
    apt-transport-https \
    ca-certificates \
    curl \
    gnupg-agent \
    software-properties-common
添加 Docker 的官方 GPG 密钥:
curl -fsSL https://download.docker.com/linux/debian/gpg | sudo apt-key add -
如果不能成功,我们可以换成国内的源:
curl -fsSL https://mirrors.ustc.edu.cn/docker-ce/linux/debian/gpg | sudo apt-key add -
可以看出我们是在debian系上安装,如果要在ubuntu上安装,可用:
curl -fsSL https://download.docker.com/linux/ubuntu/gpg | sudo apt-key add -
通过搜索指纹的最后8个字符,验证您现在拥有指纹9DC8 5822 9FC7 DD38 854A E2D8 8D81 803C 0EBF CD88的密钥:
sudo apt-key fingerprint 0EBFCD88
输出:
pub   4096R/0EBFCD88 2017-02-22
      Key fingerprint = 9DC8 5822 9FC7 DD38 854A  E2D8 8D81 803C 0EBF CD88
uid                  Docker Release (CE deb) <docker@docker.com>
sub   4096R/F273FCD8 2017-02-22
我们设置docker稳定版储存库:
sudo add-apt-repository \
   "deb [arch=amd64] https://download.docker.com/linux/debian \
   $(lsb_release -cs) \
   stable"
过程可能报错:
Traceback (most recent call last):
  File "/usr/bin/add-apt-repository", line 95, in <module>
    sp = SoftwareProperties(options=options)
  File "/usr/lib/python3/dist-packages/softwareproperties/SoftwareProperties.py", line 109, in __init__
    self.reload_sourceslist()
  File "/usr/lib/python3/dist-packages/softwareproperties/SoftwareProperties.py", line 599, in reload_sourceslist
    self.distro.get_sources(self.sourceslist)
  File "/usr/lib/python3/dist-packages/aptsources/distro.py", line 93, in get_sources
    (self.id, self.codename))
aptsources.distro.NoDistroTemplateException: Error: could not find a distribution template for Deepin/stable
看来我们需要把源直接写进配置了:
sudo vim /etc/apt/sources.list
把下面内容补充进去,保存并退出:
# 官方源
# deb [arch=amd64] https://download.docker.com/linux/debian wheezy stable
# 国内中科大源
deb [arch=amd64] https://mirrors.ustc.edu.cn/docker-ce/linux/debian stretch stable
上面把软件储存库设置好了,下面我们进行安装。
更新 apt 包索引:
sudo apt-get update
列出可用版本:
apt-cache madison docker-ce
输出:
 docker-ce | 5:19.03.8~3-0~debian-stretch | https://mirrors.ustc.edu.cn/docker-ce/linux/debian stretch/stable amd64 Packages
 docker-ce | 5:19.03.7~3-0~debian-stretch | https://mirrors.ustc.edu.cn/docker-ce/linux/debian stretch/stable amd64 Packages
 docker-ce | 5:19.03.6~3-0~debian-stretch | https://mirrors.ustc.edu.cn/docker-ce/linux/debian stretch/stable amd64 Packages
 docker-ce | 5:19.03.5~3-0~debian-stretch | https://mirrors.ustc.edu.cn/docker-ce/linux/debian stretch/stable amd64 Packages
 docker-ce | 5:19.03.4~3-0~debian-stretch | https://mirrors.ustc.edu.cn/docker-ce/linux/debian stretch/stable amd64 Packages
 docker-ce | 5:19.03.3~3-0~debian-stretch | https://mirrors.ustc.edu.cn/docker-ce/linux/debian stretch/stable amd64 Packages
 docker-ce | 5:19.03.2~3-0~debian-stretch | https://mirrors.ustc.edu.cn/docker-ce/linux/debian stretch/stable amd64 Packages
 docker-ce | 5:19.03.1~3-0~debian-stretch | https://mirrors.ustc.edu.cn/docker-ce/linux/debian stretch/stable amd64 Packages
 docker-ce | 5:19.03.0~3-0~debian-stretch | https://mirrors.ustc.edu.cn/docker-ce/linux/debian stretch/stable amd64 Packages
 docker-ce | 5:18.09.9~3-0~debian-stretch | https://mirrors.ustc.edu.cn/docker-ce/linux/debian stretch/stable amd64 Packages
 docker-ce | 5:18.09.8~3-0~debian-stretch | https://mirrors.ustc.edu.cn/docker-ce/linux/debian stretch/stable amd64 Packages
 docker-ce | 5:18.09.7~3-0~debian-stretch | https://mirrors.ustc.edu.cn/docker-ce/linux/debian stretch/stable amd64 Packages
 docker-ce | 5:18.09.6~3-0~debian-stretch | http://packages.deepin.com/deepin lion/non-free amd64 Packages
 docker-ce | 5:18.09.6~3-0~debian-stretch | https://mirrors.ustc.edu.cn/docker-ce/linux/debian stretch/stable amd64 Packages
 docker-ce | 5:18.09.5~3-0~debian-stretch | https://mirrors.ustc.edu.cn/docker-ce/linux/debian stretch/stable amd64 Packages
 docker-ce | 5:18.09.4~3-0~debian-stretch | https://mirrors.ustc.edu.cn/docker-ce/linux/debian stretch/stable amd64 Packages
 docker-ce | 5:18.09.3~3-0~debian-stretch | https://mirrors.ustc.edu.cn/docker-ce/linux/debian stretch/stable amd64 Packages
 docker-ce | 5:18.09.2~3-0~debian-stretch | https://mirrors.ustc.edu.cn/docker-ce/linux/debian stretch/stable amd64 Packages
 docker-ce | 5:18.09.1~3-0~debian-stretch | https://mirrors.ustc.edu.cn/docker-ce/linux/debian stretch/stable amd64 Packages
 docker-ce | 5:18.09.0~3-0~debian-stretch | https://mirrors.ustc.edu.cn/docker-ce/linux/debian stretch/stable amd64 Packages
 docker-ce | 18.06.3~ce~3-0~debian | https://mirrors.ustc.edu.cn/docker-ce/linux/debian stretch/stable amd64 Packages
 docker-ce | 18.06.2~ce~3-0~debian | https://mirrors.ustc.edu.cn/docker-ce/linux/debian stretch/stable amd64 Packages
 docker-ce | 18.06.1~ce~3-0~debian | https://mirrors.ustc.edu.cn/docker-ce/linux/debian stretch/stable amd64 Packages
 docker-ce | 18.06.0~ce~3-0~debian | https://mirrors.ustc.edu.cn/docker-ce/linux/debian stretch/stable amd64 Packages
 docker-ce | 18.03.1~ce-0~debian | https://mirrors.ustc.edu.cn/docker-ce/linux/debian stretch/stable amd64 Packages
 docker-ce | 18.03.0~ce-0~debian | https://mirrors.ustc.edu.cn/docker-ce/linux/debian stretch/stable amd64 Packages
 docker-ce | 17.12.1~ce-0~debian | https://mirrors.ustc.edu.cn/docker-ce/linux/debian stretch/stable amd64 Packages
 docker-ce | 17.12.0~ce-0~debian | https://mirrors.ustc.edu.cn/docker-ce/linux/debian stretch/stable amd64 Packages
 docker-ce | 17.09.1~ce-0~debian | https://mirrors.ustc.edu.cn/docker-ce/linux/debian stretch/stable amd64 Packages
 docker-ce | 17.09.0~ce-0~debian | https://mirrors.ustc.edu.cn/docker-ce/linux/debian stretch/stable amd64 Packages
 docker-ce | 17.06.2~ce-0~debian | https://mirrors.ustc.edu.cn/docker-ce/linux/debian stretch/stable amd64 Packages
 docker-ce | 17.06.1~ce-0~debian | https://mirrors.ustc.edu.cn/docker-ce/linux/debian stretch/stable amd64 Packages
 docker-ce | 17.06.0~ce-0~debian | https://mirrors.ustc.edu.cn/docker-ce/linux/debian stretch/stable amd64 Packages
 docker-ce | 17.03.3~ce-0~debian-stretch | https://mirrors.ustc.edu.cn/docker-ce/linux/debian stretch/stable amd64 Packages
 docker-ce | 17.03.2~ce-0~debian-stretch | https://mirrors.ustc.edu.cn/docker-ce/linux/debian stretch/stable amd64 Packages
 docker-ce | 17.03.1~ce-0~debian-stretch | https://mirrors.ustc.edu.cn/docker-ce/linux/debian stretch/stable amd64 Packages
 docker-ce | 17.03.0~ce-0~debian-stretch | https://mirrors.ustc.edu.cn/docker-ce/linux/debian stretch/stable amd64 Packages
我们可以安装上面看到的指定版本, 例如 5:19.03.8~3-0~debian-stretch 版:
sudo apt-get install docker-ce=<VERSION_STRING> docker-ce-cli=<VERSION_STRING> containerd.io
<VERSION_STRING>, 替换为 5:19.03.8~3-0~debian-stretch 。
sudo apt-get install docker-ce=5:19.03.8~3-0~debian-stretch docker-ce-cli=5:19.03.8~3-0~debian-stretch containerd.io
或者我们可以通过下面的命令直接安装最新版,不过有可能不是稳定版:
sudo apt-get install docker-ce docker-ce-cli containerd.io
输出:
正在读取软件包列表... 完成
正在分析软件包的依赖关系树
正在读取状态信息... 完成
下列软件包将被升级:
  containerd.io docker-ce docker-ce-cli
升级了 3 个软件包,新安装了 0 个软件包,要卸载 0 个软件包,有 179 个软件包未被升级。
需要下载 85.1 MB 的归档。
解压缩后将会空出 2,726 kB 的空间。
获取:1 https://mirrors.ustc.edu.cn/docker-ce/linux/debian stretch/stable amd64 containerd.io amd64 1.2.13-2 [21.4 MB]
获取:2 https://mirrors.ustc.edu.cn/docker-ce/linux/debian stretch/stable amd64 docker-ce-cli amd64 5:19.03.9~3-0~debian-stretch [41.2 MB]
获取:3 https://mirrors.ustc.edu.cn/docker-ce/linux/debian stretch/stable amd64 docker-ce amd64 5:19.03.9~3-0~debian-stretch [22.5 MB]
已下载 85.1 MB,耗时 51秒 (1,662 kB/s)
(正在读取数据库 ... 系统当前共安装有 370139 个文件和目录。)
正准备解包 .../containerd.io_1.2.13-2_amd64.deb  ...
正在将 containerd.io (1.2.13-2) 解包到 (1.2.10-3) 上 ...
正准备解包 .../docker-ce-cli_5%3a19.03.9~3-0~debian-stretch_amd64.deb  ...
正在将 docker-ce-cli (5:19.03.9~3-0~debian-stretch) 解包到 (5:19.03.5~3-0~debian-stretch) 上 ...
正准备解包 .../docker-ce_5%3a19.03.9~3-0~debian-stretch_amd64.deb  ...
正在将 docker-ce (5:19.03.9~3-0~debian-stretch) 解包到 (5:19.03.5~3-0~debian-stretch) 上 ...
正在设置 containerd.io (1.2.13-2) ...
正在安装新版本配置文件 /etc/containerd/config.toml ...
正在处理用于 systemd (232-25+deb9u6) 的触发器 ...
正在处理用于 man-db (2.7.6.1-2) 的触发器 ...
正在设置 docker-ce-cli (5:19.03.9~3-0~debian-stretch) ...
正在设置 docker-ce (5:19.03.9~3-0~debian-stretch) ...
通过以上步骤,Docker就安装好了。
containerd.io、docker-ce-cli、docker-ce分别是干什么的:
- containerd.io - daemon to interface with the OS API (in this case, LXC - Linux Containers), essentially decouples Docker from the OS, also provides container services for non-Docker container managers
- docker-ce - Docker daemon, this is the part that does all the management work, requires the other two on Linux
- docker-ce-cli - CLI tools to control the daemon, you can install them on their own if you want to control a remote Docker daemon.
翻译过来是:
- containerd.io -与OS API进行交互的守护程序(在本例中为LXC-Linux容器),从本质上将Docker与OS分离,还为非Docker容器管理器提供容器服务。
- docker-ce -Docker守护程序,这是完成所有管理工作的部分,在Linux上需要另外两个。
- docker-ce-cli -用于控制守护程序的CLI工具,如果要控制远程Docker守护程序,则可以单独安装它们。
Docker是虚拟化容器引擎,我们可以运行hello world映像,验证Docker引擎是否正确安装:
sudo docker run hello-world
输出:
Unable to find image 'hello-world:latest' locally
latest: Pulling from library/hello-world
0e03bdcc26d7: Pull complete
Digest: sha256:6a65f928fb91fcfbc963f7aa6d57c8eeb426ad9a20c7ee045538ef34847f44f1
Status: Downloaded newer image for hello-world:latest

Hello from Docker!
This message shows that your installation appears to be working correctly.

To generate this message, Docker took the following steps:
 1. The Docker client contacted the Docker daemon.
 2. The Docker daemon pulled the "hello-world" image from the Docker Hub.
    (amd64)
 3. The Docker daemon created a new container from that image which runs the
    executable that produces the output you are currently reading.
 4. The Docker daemon streamed that output to the Docker client, which sent it
    to your terminal.

To try something more ambitious, you can run an Ubuntu container with:
 $ docker run -it ubuntu bash

Share images, automate workflows, and more with a free Docker ID:
 https://hub.docker.com/

For more examples and ideas, visit:
 https://docs.docker.com/get-started/
此命令下载测试映像并在容器中运行它。当容器运行时,它会打印一条信息性消息并退出。
Docker引擎已安装并运行。docker组已创建,但未添加任何用户。你需要用sudo来运行Docker命令。 继续Linux postinstall以允许非特权用户运行Docker命令和其他可选配置步骤。
原则上一个容器只提供一种服务,这样可以方便以后服务的维护。所以我们mysql独立一个容器、nginx独立一个容器、php-fpm独立一个容器。
帮助信息
查看docker帮助信息:
> docker --help
Usage:  docker COMMAND

A self-sufficient runtime for containers

Options:
      --config string      Location of client config files (default "/root/.docker")
  -D, --debug              Enable debug mode
      --help               Print usage
  -H, --host list          Daemon socket(s) to connect to (default [])
  -l, --log-level string   Set the logging level ("debug", "info", "warn", "error", "fatal") (default "info")
      --tls                Use TLS; implied by --tlsverify
      --tlscacert string   Trust certs signed only by this CA (default "/root/.docker/ca.pem")
      --tlscert string     Path to TLS certificate file (default "/root/.docker/cert.pem")
      --tlskey string      Path to TLS key file (default "/root/.docker/key.pem")
      --tlsverify          Use TLS and verify the remote
  -v, --version            Print version information and quit

Management Commands:
  container   Manage containers
  image       Manage images
  network     Manage networks
  node        Manage Swarm nodes
  plugin      Manage plugins
  secret      Manage Docker secrets
  service     Manage services
  stack       Manage Docker stacks
  swarm       Manage Swarm
  system      Manage Docker
  volume      Manage volumes

Commands:
  attach      Attach to a running container
  build       Build an image from a Dockerfile
  commit      Create a new image from a container's changes
  cp          Copy files/folders between a container and the local filesystem
  create      Create a new container
  diff        Inspect changes on a container's filesystem
  events      Get real time events from the server
  exec        Run a command in a running container
  export      Export a container's filesystem as a tar archive
  history     Show the history of an image
  images      List images
  import      Import the contents from a tarball to create a filesystem image
  info        Display system-wide information
  inspect     Return low-level information on Docker objects
  kill        Kill one or more running containers
  load        Load an image from a tar archive or STDIN
  login       Log in to a Docker registry
  logout      Log out from a Docker registry
  logs        Fetch the logs of a container
  pause       Pause all processes within one or more containers
  port        List port mappings or a specific mapping for the container
  ps          List containers
  pull        Pull an image or a repository from a registry
  push        Push an image or a repository to a registry
  rename      Rename a container
  restart     Restart one or more containers
  rm          Remove one or more containers
  rmi         Remove one or more images
  run         Run a command in a new container
  save        Save one or more images to a tar archive (streamed to STDOUT by default)
  search      Search the Docker Hub for images
  start       Start one or more stopped containers
  stats       Display a live stream of container(s) resource usage statistics
  stop        Stop one or more running containers
  tag         Create a tag TARGET_IMAGE that refers to SOURCE_IMAGE
  top         Display the running processes of a container
  unpause     Unpause all processes within one or more containers
  update      Update configuration of one or more containers
  version     Show the Docker version information
  wait        Block until one or more containers stop, then print their exit codes

Run 'docker COMMAND --help' for more information on a command.
centos安装
我们可以在自己的机子上再装一个linux虚拟环境,可以用docker实现。
在docker官方仓库 https://hub.docker.com/_/centos?tab=tags 看一下具体的centos版本有哪些,自己需要哪一个。
拉取镜像:
docker pull centos:7
创建容器并运行:
docker run -td centos:7
用docker ps可以看到centos的容器正在UP运行中。
mysql安装
下载mysql镜像:
docker pull mysql:5.7
随后看到下载信息:
5.7: Pulling from library/mysql
afb6ec6fdc1c: Already exists
0bdc5971ba40: Pull complete
97ae94a2c729: Pull complete
f777521d340e: Pull complete
1393ff7fc871: Pull complete
a499b89994d9: Pull complete
7ebe8eefbafe: Pull complete
4eec965ae405: Pull complete
a531a782d709: Pull complete
10e94c02b508: Pull complete
799a94b968ef: Pull complete
Digest: sha256:5c9fd7949bc0f076429fa2c40d0e7406e095bdb5216a923257b31972a6f3ae4f
Status: Downloaded newer image for mysql:5.7
docker.io/library/mysql:5.7
我们输入docker images可以查看到下载的mysql的5.7版的镜像。
创建容器并运行:
docker run --name mysql_server -p 3306:3306 -e MYSQL_ROOT_PASSWORD=root -d mysql:5.7
--name 指定容器名字,links特性需要使用名字
-i 交互式操作,允许你对容器内的标准输入 (STDIN) 进行交互
-t 终端,在新容器内指定一个伪终端或终端
-d 指定容器的运行模式为后台运行,默认不会进入容器
-e 内置环境变量 这里是给ROOT 帐号设置密码
nginx安装
docker pull nginx
输出:
Using default tag: latest
latest: Pulling from library/nginx
afb6ec6fdc1c: Already exists
b90c53a0b692: Pull complete
11fa52a0fdc0: Pull complete
Digest: sha256:30dfa439718a17baafefadf16c5e7c9d0a1cde97b4fd84f63b69e13513be7097
Status: Downloaded newer image for nginx:latest
docker.io/library/nginx:latest
创建容器并运行(加上privileged参数,以特权方式运行):
docker run --privileged=true -p 81:80 -d nginx
现在我们通过浏览器访问一下127.0.0.1:81,就可以看到nginx的欢迎界面了。
php-fpm安装
docker pull php:7.1.30-fpm
输出:
7.1.30-fpm: Pulling from library/php
f5d23c7fed46: Pull complete
4f36b8588ea0: Pull complete
6f4f95ddefa8: Pull complete
187af28c9b1d: Pull complete
7ba9cd8f12bd: Pull complete
19ce450f6a80: Pull complete
6a0aa94e79c7: Pull complete
3097ec58d870: Pull complete
05ecbde01690: Pull complete
ab28ea58dda0: Pull complete
Digest: sha256:a0f0773dc2f92ca8f4dab7c7c525574d467d3aa4bb27424bb7f0540a7c9efcd0
Status: Downloaded newer image for php:7.1.30-fpm
docker.io/library/php:7.1.30-fpm
新建几个文件夹,分别用来映射:网站根目录、日志文件、nginx配置文件:
mkdir -p /var/www/docker/nginx/www /var/www/docker/nginx/logs /var/www/docker/nginx/conf
在新建的www目录中新建:index.php用来检测php环境是否搭建成功:
<?php
   phpinfo();
?>
在nginx配置文件目录conf下新建:test-php.conf,后缀是.conf即可:
server {
    listen       80;
    server_name  localhost;

    location / {
        root   /usr/share/nginx/html;
        index  index.html index.htm index.php;
    }

    error_page   500 502 503 504  /50x.html;
    location = /50x.html {
        root   /usr/share/nginx/html;
    }

    location ~ \.php$ {
        fastcgi_pass   php:9000;
        fastcgi_index  index.php;
        fastcgi_param  SCRIPT_FILENAME  /www/$fastcgi_script_name;
        include        fastcgi_params;
    }
}
实例化php:
docker run --name server-phpfpm71 --privileged=true -v /var/www/docker/nginx/www:/www -d php:7.1.30-fpm
实例化nginx,指定端口,网站根目录,网站配置文件目录:
docker run --name server-nginx --privileged=true -p 80:80 -v /var/www/docker/nginx/www:/usr/share/nginx/html -v /var/www/docker/nginx/conf:/etc/nginx/conf.d --link server-phpfpm71:php -d nginx
访问:127.0.0.1,可以看到效果,展示了phpinfo()详情。
容器自动停止问题
以 docker run -d 运行之后,还是会自动停止,docker ps 看不到运行的容器, docker ps -a 后看到容器状态为 Exited。
可能原因1,容器中发生了错误,所以容器 Exited 了,我们可以用 docker logs CONTAINER 查看下日志,如:
docker logs 13528397216b
输出:
[emerg] 1#1: socket() 0.0.0.0:80 failed (13: Permission denied)
nginx: [emerg] socket() 0.0.0.0:80 failed (13: Permission denied)
可以看出是容器中执行命令权限不够,被拒绝执行了。
我们可以在生成容器时加上--privileged=true,如:
docker run --privileged=true -p 80:80 -d nginx
现在再ps看一下容器运行状态就处于Up状态了。
大约在0.6版,privileged被引入docker。使用该参数,container内的root拥有真正的root权限。否则,container内的root只是外部的一个普通用户权限。 privileged启动的容器,可以看到很多host上的设备,并且可以执行mount。甚至允许你在docker容器中启动docker容器。
可能原因2,这是因为 基于的centos dockerfile 具有默认命令 bash ,这意味着当在后台运行(-d)时,shell会立即退出。
-d 选项有问题。 您的容器立即停止,除非命令不在前台运行。
Docker要求您的命令在前台继续运行。否则,它会认为您的应用程序停止并关闭该容器。
问题是某些应用程序不会在前台运行。在这种情况下,您可以将 tail -f /dev/null 添加到您的命令。
通过这样做,即使您的主命令在后台运行,您的容器也不会停止,因为tail在前台继续运行。
如:
docker run -d centos tail -f /dev/null
Dockerfile
Dockerfile是用来构建Docker镜像的文件,是由一系列命令和参数构成的脚本。
Docker镜像的特点:
- 由Dockerfile生成
- 呈现层级结构
- 每层镜像包含:镜像文件以及镜像json元数据信息
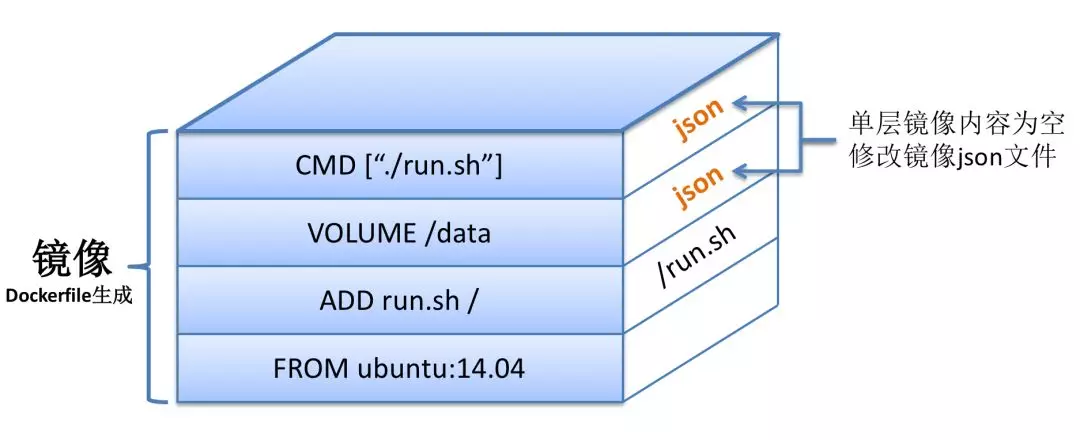
Docker镜像可以通过分层来进行继承。
例如,hello-world的Dockerfile镜像FROM scratch镜像,scratch在Docker中是一个基础镜像,Centos的Dockerfile镜像也是FROM scratch镜像。 那么Centos镜像和hello-world共享同一个基础镜像层scratch,提高了存储效率。
Docker每一层镜像的json文件,都扮演着一个非常重要的角色,其主要的作用如下:
- 记录 Docker 镜像中与容器动态信息相关的内容
- 记录父子 Docker 镜像之间真实的差异关系
- 弥补 Docker 镜像内容的完整性与动态内容的缺失
Docker镜像的json文件可以认为是镜像的元数据信息。
php-fpm镜像build脚本
Dockerfile 文件:
# 基础镜像
FROM centos:7

# 维护者
MAINTAINER www  ibaiyang@email.com

# 设置变量
ENV PHPIZE_DEPS \
        autoconf \
        file \
        g++ \
        gcc \

# apk add命令从仓库中安装最新软件包,并自动安装必须的依赖包
RUN apk add --no-cache --virtual .persistent-deps \
        ca-certificates \
        curl \
        tar \
        xz \
# https://github.com/docker-library/php/issues/494
        libressl

# 设置变量
ENV PHP_INI_DIR /usr/local/etc/php

# 生成php配置目录
RUN mkdir -p $PHP_INI_DIR/conf.d

# 设置变量,php拓展
ENV PHP_EXTRA_CONFIGURE_ARGS --enable-fpm --disable-cgi --enable-bcmath --enable-sockets --enable-exif --enable-zip --with-gd --with-jpeg-dir --with-png-dir --with-freetype-dir --with-webp-dir --with-xpm-dir  --with-gettext --enable-intl --with-mcrypt --with-mysqli --enable-pcntl --with-pdo-mysql --enable-shmop -enable-soap --enable-sysvsem --with-xmlrpc --with-xs

# 设置变量,PHP_VERSION php版本
ENV PHP_VERSION 7.1.23

# 设置变量,PHP_URL官方包地址
ENV PHP_URL="https://secure.php.net/get/php-7.1.23.tar.xz/from/this/mirror" PHP_ASC_URL="https://secure.php.net/get/php-7.1.23.tar.xz.asc/from/this/mirror"

# 生成php包下载目录,并下载php包
RUN mkdir -p /usr/src; \
    cd /usr/src; \
    \
    wget -O php.tar.xz "$PHP_URL";

RUN    wget -O /usr/src/php.tar.xz  https://secure.php.net/get/php-7.1.21.tar.xz/from/this/mirror && rm -rf /usr/src/php && mkdir /usr/src/php && tar -Jxf /usr/src/php.tar.xz -C /usr/src/php --strip-components=1 \

# 给php配置拓展
RUN  ./configure   --prefix=/usr/local/php --with-pdo-mysql --disable-cgi  -with-mysqli  -enable-ftp  -enable-zip  -with-bz2  -with-jpeg-dir   -with-png-dir    -with-freetype-dir    -with-libxml-dir  -with-xmlrpc    -with-zlib-dir   -with-gd  -with-curl   -with-gettext    -with-pear  -enable-mbstring -enable-bcmath   -enable-sockets   -enable-exif  -enable-fpm  -enable-pcntl   -with-mhash  -with-gmp    -with-openssl   -enable-sysvsem   -enable-sysvshm -enable-mbregex --enable-intl --with-mcrypt --enable-shmop
运行命令生成镜像:
docker build -t php:7.1.23 .
其他一些补充操作:
# yum安装工具包
yum install libxml2-devel openssl-devel bzip2-devel curl-devel libjpeg-devel libpng-devel freetype-devel gmp-devel -y

freetype

krb5-devel keyutils-libs-devel libcom_err-devel libselinux-devel  libsepol-devel libverto-devel xz-devel pcre-devel zlib-devel

libjpeg-turbo
libkadm5
libpng


yum install gcc-c++ -y
yum install libicu-devel -y

yum install systemtap-sdt-devel enchant-devel xpm-devel libXpm-devel libc-client-devel openldap-devel libmcrypt-devel unixODBC-devel -y

yum install make -y

yum autoremove systemtap-sdt-devel enchant-devel xpm-devel libXpm-devel libc-client-devel openldap-devel libmcrypt-devel unixODBC-devel
项目镜像build脚本
# 生成docker-php-entrypoint文件
cat > docker-php-entrypoint << EOF
#!/bin/sh
nginx -g 'daemon off;' &
php-fpm
EOF

# 增加可执行权限
chmod +x docker-php-entrypoint

# 生成crm项目的Dockerfile文件
cat > Dockerfile << EOF
#FROM vipcloud/vipcloud-php-fpm-v2:7.1.24
FROM vipcloud/vipcloud-php-fpm-apcu:7.1.24
RUN mkdir /var/www/html/ -pv
RUN mkdir /config/dev/ -pv
# crm项目配置
COPY --chown=nginx:nginx crm.json /config/dev/
# crm项目文件包
COPY --chown=nginx:nginx dist/crm.${BUILD_NUMBER}.${BUILD_ID}.tar.gz /var/www/html/
WORKDIR /var/www/html/
# 安装crm项目
RUN /bin/sh -xe \
&& tar -xf ./crm.${BUILD_NUMBER}.${BUILD_ID}.tar.gz && rm -f ./crm.${BUILD_NUMBER}.${BUILD_ID}.tar.gz \
&& cd /var/www/html/ \
&& mkdir -p runtime \
&& mkdir -p web/assets \
&& mkdir -p web/tmp \
&& chown -R nginx:nginx runtime \
&& chown -R nginx:nginx web/assets \
&& chown -R nginx:nginx web/tmp \
&& chmod -R 0777 runtime \
&& chmod -R 0777 web/assets \
&& chmod -R 0777 web/tmp \

COPY docker-php-entrypoint /usr/local/bin/
# 暴露端口
EXPOSE 80
# the command of entrypoint
ENTRYPOINT ["docker-php-entrypoint"]
EOF
cat > 文件名 << EOF 用来创建文件,在这之后输入任何东西,都是在文件里的,输入完成之后EOF结尾代表结束。
BUILD_NUMBER 和 BUILD_ID 是全局变量。
把上面的命令粘贴到命令行回车执行,生成文件:docker-php-entrypoint 和 Dockerfile 。
接下来我们就可以根据Dockerfile生成镜像:
docker build -t crm:test .
输出:
Sending build context to Docker daemon  12.29kB
Step 1/10 : FROM vipcloud/vipcloud-php-fpm-apcu:7.1.24
 ---> bedff48e5f51
Step 2/10 : RUN mkdir /var/www/html/ -pv
 ---> Using cache
 ---> e4c45ddc515a
Step 3/10 : RUN mkdir /config/dev/ -pv
 ---> Using cache
 ---> b488b7aea6ce
Step 4/10 : COPY --chown=nginx:nginx crm.json /config/dev/
 ---> Using cache
 ---> 7496eb7eecbc
Step 5/10 : COPY --chown=nginx:nginx dist/crm.tar.gz /var/www/html/
 ---> Using cache
 ---> 33339f9db58f
Step 6/10 : WORKDIR /var/www/html/
 ---> Using cache
 ---> 506aeb020038
Step 7/10 : RUN /bin/sh -xe && tar -xf ./crm.tar.gz && rm -f ./crm.tar.gz && cd /var/www/html/ && mkdir -p runtime && mkdir -p web/assets && mkdir -p web/tmp && chown -R nginx:nginx runtime && chown -R nginx:nginx web/assets && chown -R nginx:nginx web/tmp && chmod -R 0777 runtime && chmod -R 0777 web/assets && chmod -R 0777 web/tmp
 ---> Using cache
 ---> 02d25f41d4c9
Step 8/10 : COPY docker-php-entrypoint /usr/local/bin/
 ---> 29abd2526ca9
Step 9/10 : EXPOSE 80
 ---> Running in 45bb46463296
Removing intermediate container 45bb46463296
 ---> 3d580d103b69
Step 10/10 : ENTRYPOINT ["docker-php-entrypoint"]
 ---> Running in 0befd0acc74c
Removing intermediate container 0befd0acc74c
 ---> 5e849ed7a72d
Successfully built 5e849ed7a72d
Successfully tagged crm:test
镜像crm:test生成成功。
配置文件./crm.json,压缩包文件./dist/crm.tar.gz,我们需要在当前目录下准备好。
参考资料
Docker仓库 https://hub.docker.com/
阿里云ECS之Docker使用 https://ibaiyang.github.io/blog/linux/2020/05/30/阿里云ECS之Docker使用.html
deepin系统安装 https://ibaiyang.github.io/blog/linux/2019/05/24/deepin系统安装.html
Install Docker Engine on Debian https://docs.docker.com/install/linux/docker-ce/debian/
Deepin 中的 Docker https://wiki.deepin.org/wiki/Docker
干货满满!10分钟看懂Docker和K8S https://my.oschina.net/jamesview/blog/2994112
Linux和Docker常用命令 https://www.cnblogs.com/mq0036/p/8520605.html
Docker runoob教程 https://www.runoob.com/docker/docker-tutorial.html
使用 Docker 搭建 PHP 开发环境 https://www.linuxidc.com/Linux/2019-08/160149.htm
php7.2运行tp5项目时,报could not find driver解决办法 https://blog.csdn.net/resilient/article/details/86736759
docker一键搭建Nginx+PHP环境(含自动部署命令) https://www.cnblogs.com/lz0925/p/10985700.html
Docker秒搭建Php7开发环境 https://www.jianshu.com/p/43037ce40b00
基于Docker搭建LNPM环境 https://www.jianshu.com/p/beb8cebaafb8
Docker run 命令的使用方法 http://dockone.io/article/152
docker之Dockerfile实践 https://www.cnblogs.com/jsonhc/p/7767669.html
Docker容器将在“docker run -d”之后自动停止 https://www.it1352.com/646432.html
ZhongFuCheng3y/3y 博客 https://github.com/ZhongFuCheng3y/3y